Gold in the Rainbow of Happiness

I’ve been taking a much needed break from, well … pretty much everything! My family and my personal well-being have been top priority these past couple months as I rest and reset. All consistency, planning, and organizing are to be tossed out the window! My attention and energy will be reserved for my family, their needs, schedules, and our household with the expectation of returning to my jobby (job/hobby) in the summer with a renewed work/life balance.

I miss you though, so I thought I’d take a break (from my break) to share a Rainbow of Happiness design with you!

Way back in November, I ordered some new products and only just opened them in January! The Rainbow of Happiness Bundle and the coordinating Sunshine & Rainbows Sale-a-bration exclusive patterned paper were waiting so patiently in the dark all that time. Poor things.
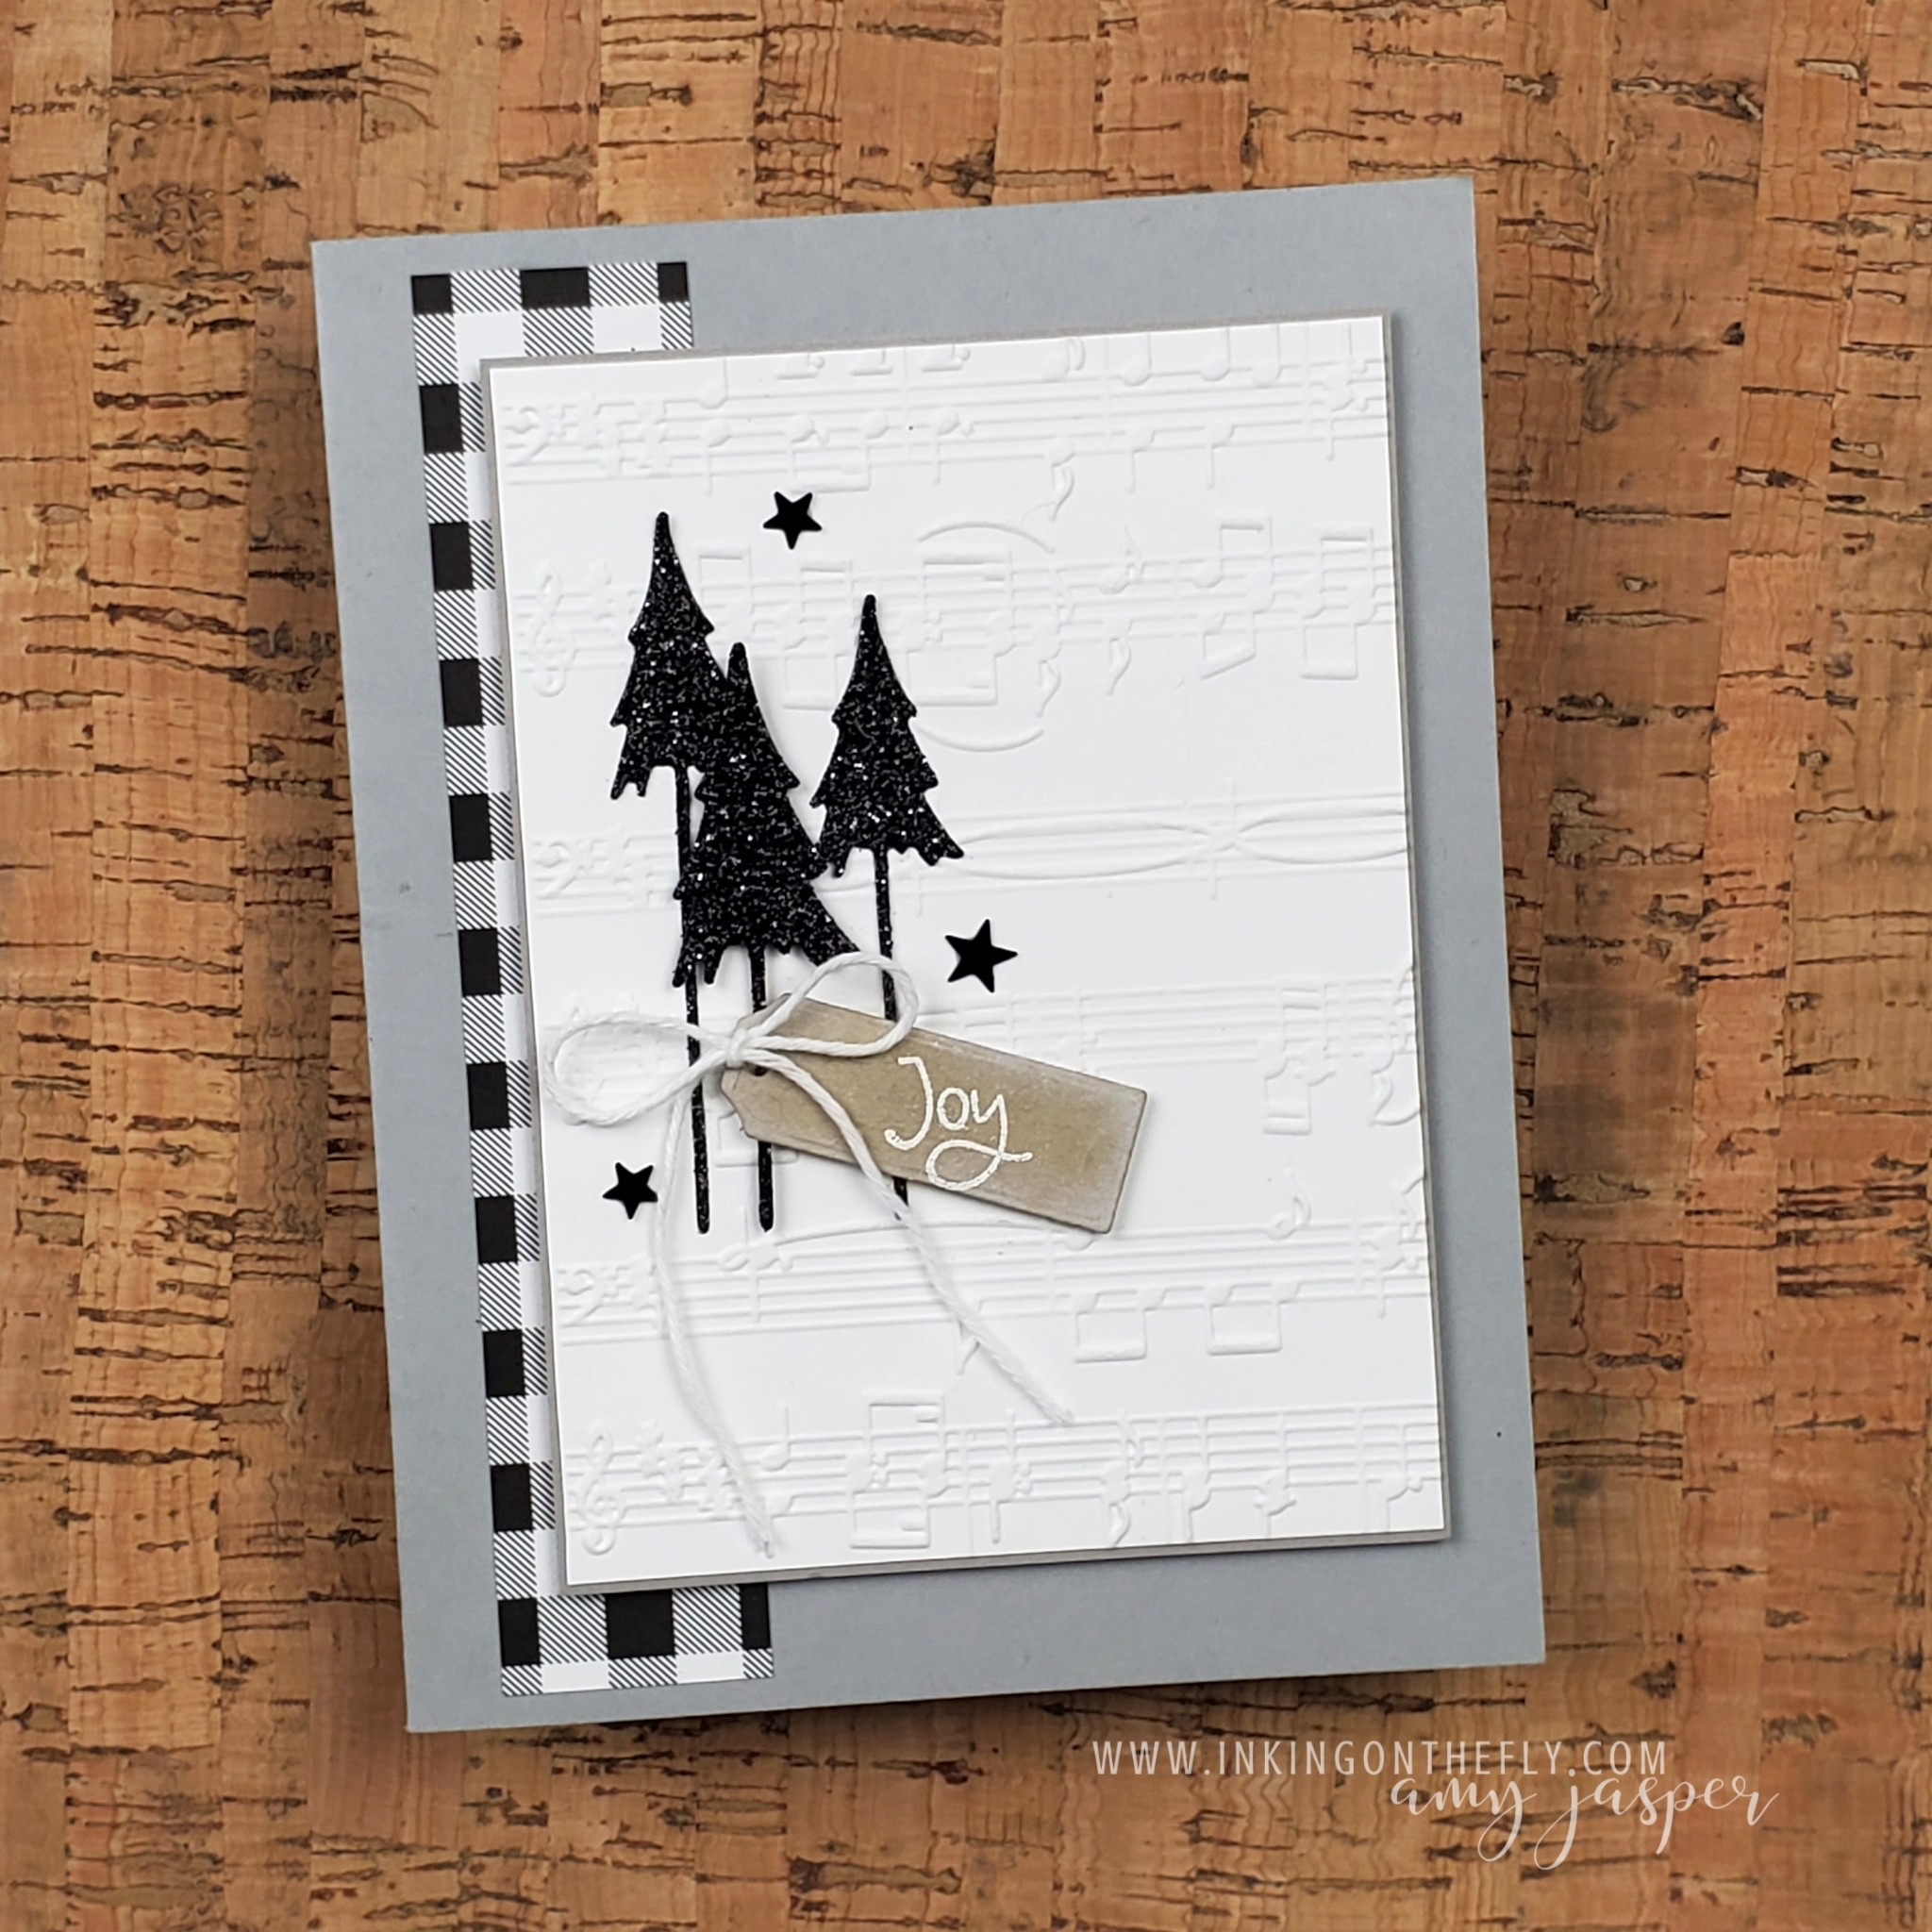
The Rainbow

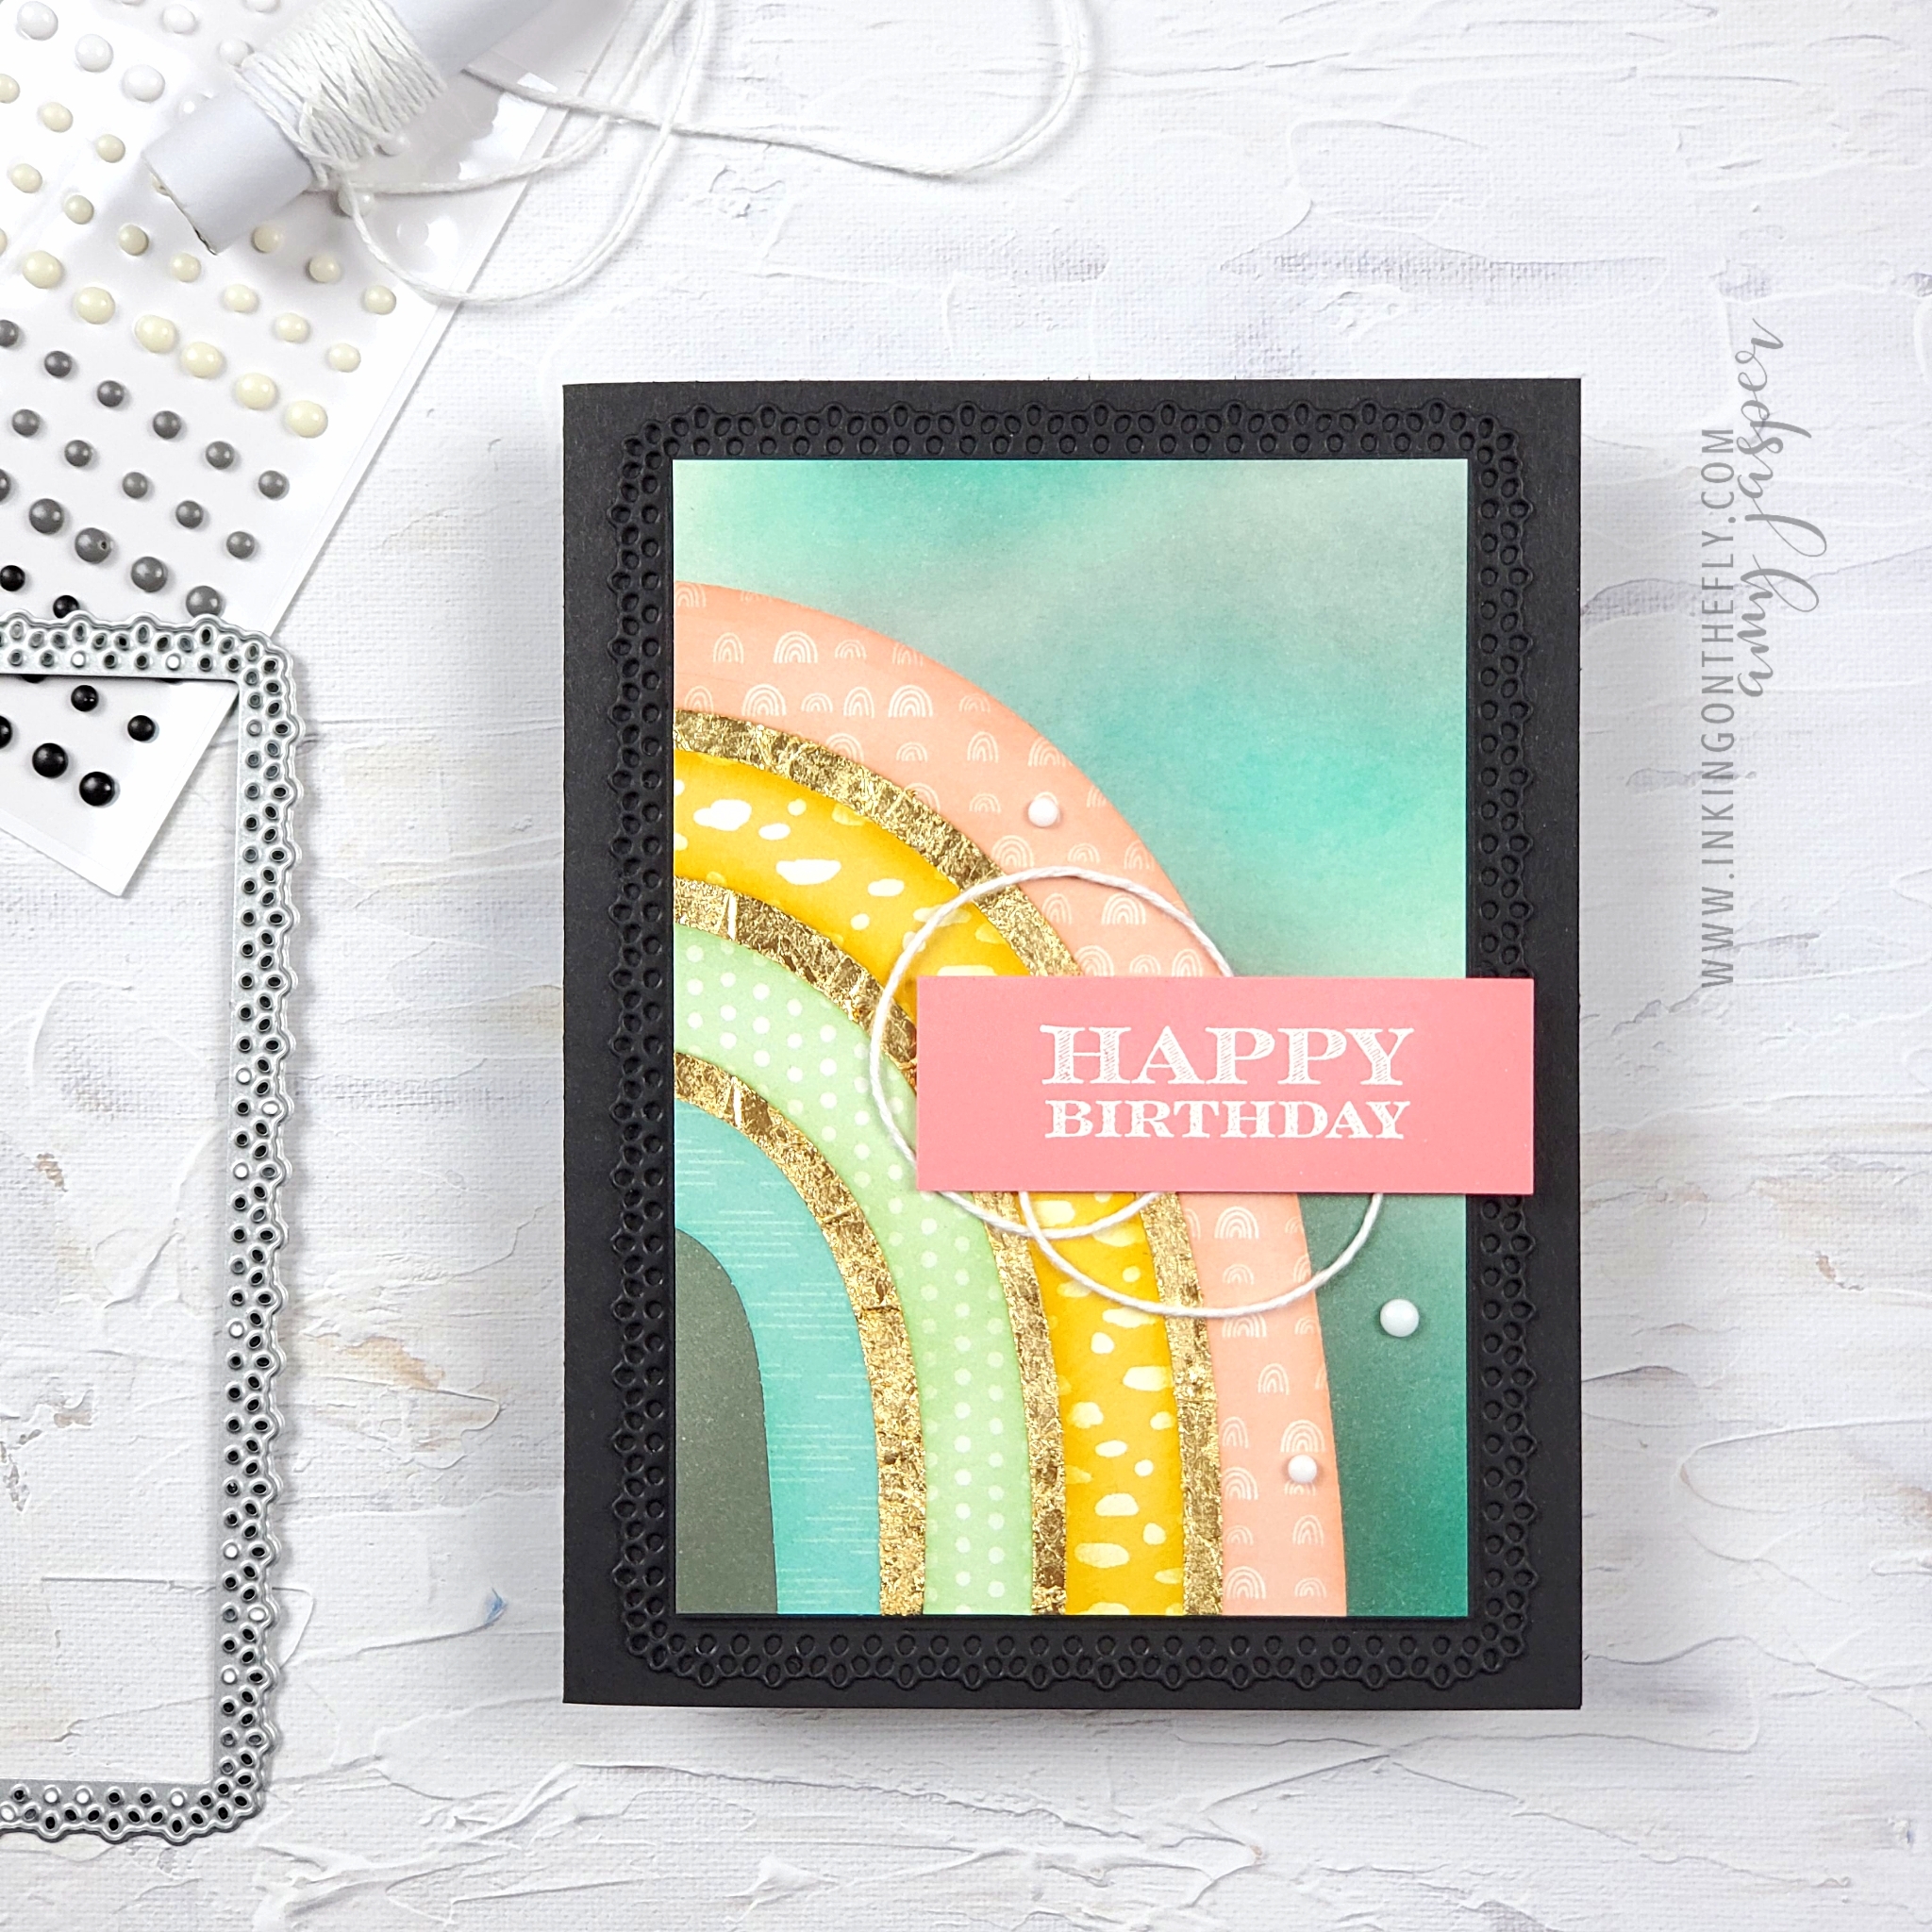
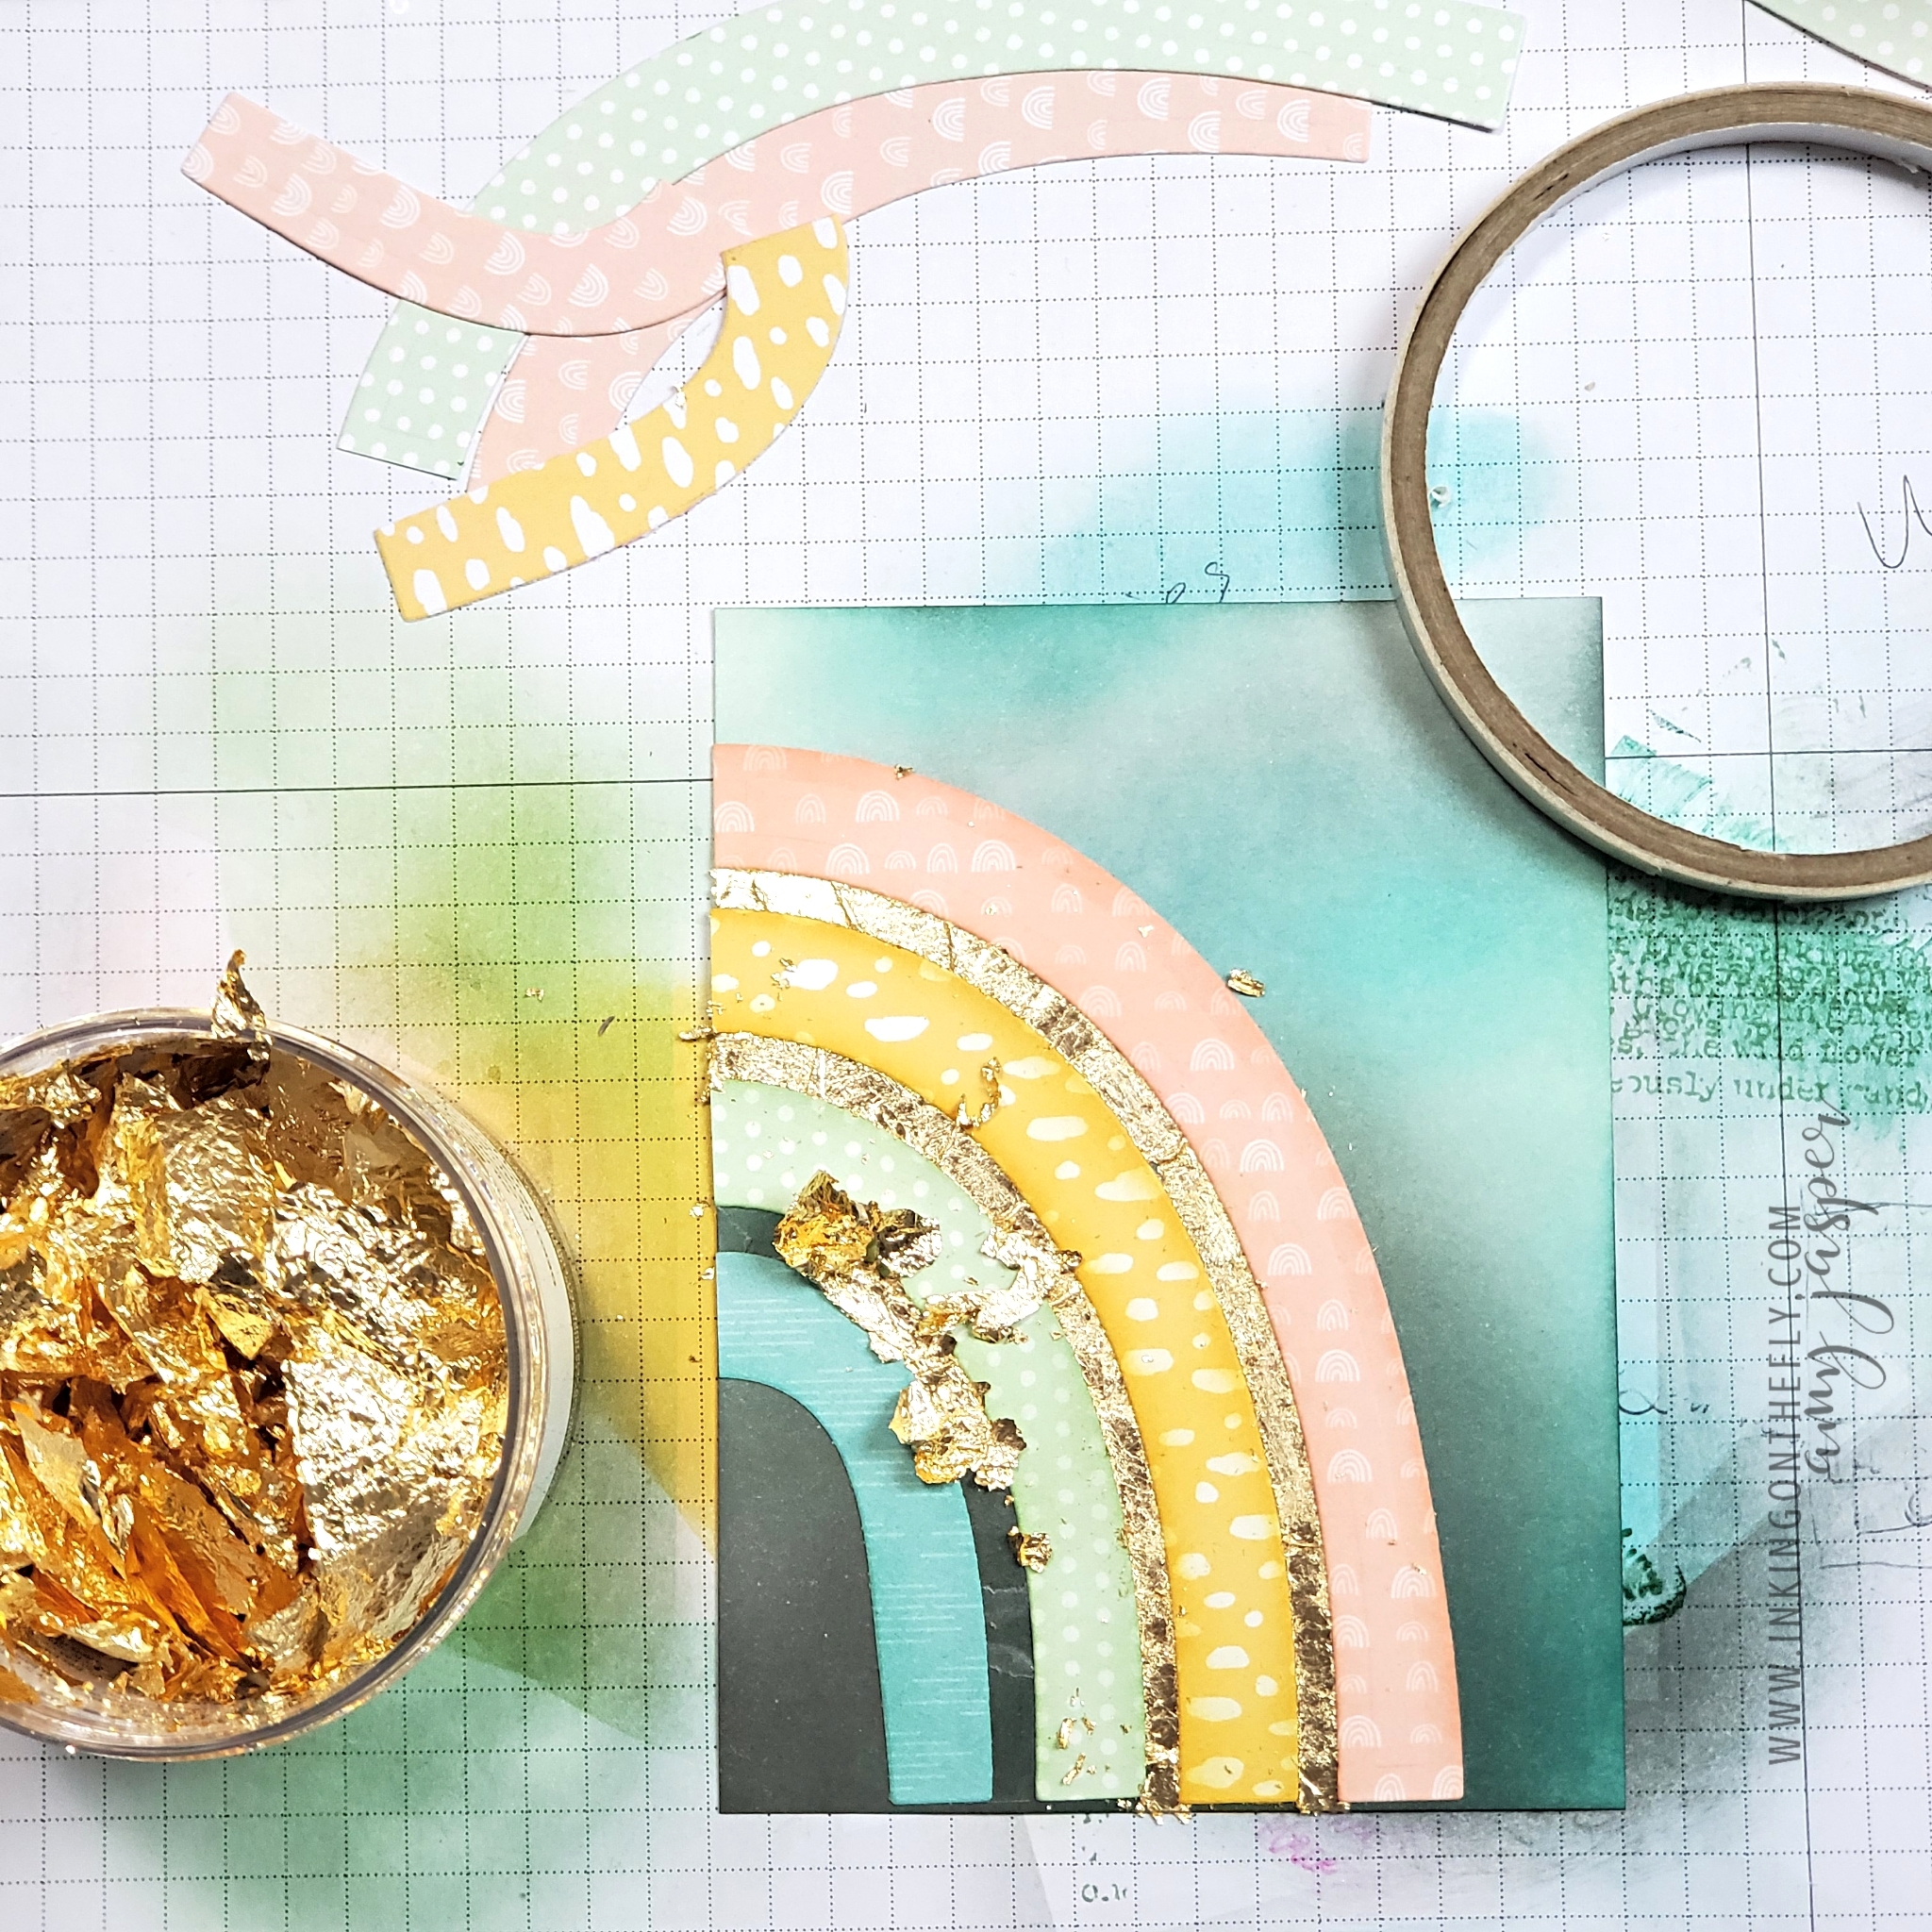
I sponged some Basic Grey, Bermuda Bay, and Pool Party ink on Basic White cardstock to create the background for my rainbow. The rainbow beams were die-cut from the Sunshine & Rainbows paper so that each beam could be a different colour and pattern. I also took the time to sponge the edges of each beam with coordinating ink to give them a bit more punch. Before adhering the beams to my background paper, I applied Tear & Tape adhesive to where the spaces in my rainbow were going to be. I adhere my rainbow beams and then applied the Gold Leafing to the exposed Tear & Tape.

I love this! So Pretty!

The Layers

After completing the main feature of my design, I then could add my other layers and embellishments. The card base is Basic Black cardstock, over which I added a Basic Black die-cut layer, cut with my Cut & Emboss Machine and the Ornate Layers dies. I added a very thin Basic Black layer behind my inked rainbow piece and used Stampin’ Dimensionals to attach this ensemble to the center of the frame.

The sentiment from the Many Messages stamp was stamped with Versamark ink and heat embossed with White Embossing Powder on the Flirty Flamingo cardstock. I looped some white Baker’s Twine to adhere to the card before using more Stampin’ Dimensionals to apply the sentiment. The final touch was to add the three white Classic Matte Dots.

It felt good to do some stamping again and I am happy to take this moment to share it with you.

I don’t currently have a schedule for my blog posts, but when the wind blows just right and the mood strikes, I’ll be back to see you. I’m not going anywhere. I’m just taking it easy and floating on the breeze for a while.

No plans, no direction. Just going wherever the wind takes me.

Amy Jasper, Independent Stampin’ Up! Demonstrator
Kelowna, BC, Canada

Make this Jolly Pets Holiday Card

I have a sweet Christmas design to share with you featuring the Sweet Stockings Designer Series Paper, the Snowy White Velvet Sheets, the Cabin Dies, and the Holly Jolly Wishes Stamp set from Stampin’ Up!®

A Fond Farewell to As You See It

My card for you today is the last card that I will be sharing as an As You See It Designer for the As You See It Challenge Blog. I’ve been doing cards with the blog for years and can hardly even remember when I WASN’T part of this awesome design team!

It has been an incredible honour and a pleasure to be among those fantastic creators. Not only have I enjoyed designing some of the challenges and sharing my sample cards for them, but it is also a privilege to vote on our winners. I have to say, most times it is VERY difficult to pick my favourites.

In addition to sharing my card designs for each challenge, I also created the current graphics for the blog. Developing the digital graphics was a labour of love (there were days when I forgot to eat … or pee!). Many hours were spent working on the different challenge banners, the digital badges, the blog header, and the bio images, and I loved every minute of it! My ADHD hyperfocus superpower kicked into high gear during the process; 8 hours could easily fly by and it felt like only half an hour had passed! I suppose, in a small way, my graphic designs allow me to continue to be part of the blog.

The Theme Challenge

My design begins, of course, with an As You See It Challenge.

As designers, we take turns coming up with ideas for the challenges. This theme challenge is my own idea: pets.

Because I designed the base graphics for all the theme banners, I was able to take this graphic a bit further and make it my own. I think the animals are super cute, peeking their heads into the frame! Special attention was spent adding the splash of water for the fish to jump into the scene and bringing the turtle into the foreground. Since this is my last challenge on the As You See It Design Team, it seems fitting to be finishing with my own challenge, don’t you think!

The Card

I don’t have a lot of stamps that would fit into this theme, but I did have the Sweet Stockings Designer Series Paper. This paper is adorable with the various pets in their holiday poses. I fussy-cut the two furry festive friends from the patterned paper for my card!

The card base is Thick Basic White cardstock with a layer of the Sweet Stockings Designer Series Paper layered on the front. Stampin’ Dimensionals were used to layer the Granny Apply Green cardstock to the card. It is on this layer that all the fun happens!

I stamped the sentiment from the Holly Jolly Wishes stamp set with Versamark Ink on the Basic White cardstock and heat set it with White Embossing Powder and my Heat Tool. Then I used a Blending Brush and Pool party Ink to apply the colour to be boldest in the centre and softening to the edges. After wiping the excess ink off of the embossed sentiment, I tapped some water droplets over the inked area to create the spatter in the background.

Next, the Cabin Dies were used to cut the Snowy White Velvet Sheets. These pieces were layered on the card with glue dots for some subtle dimension. Then, I added the crazy Christmas canines with Stampin’ Dimensionals.

The sequins are the perfect finishing touch to the wintery background!

I hope you like this card as much as I do! This is my last time to share a project as a designer for the As You See It Challenge Blog, so be sure to play along for this one!

Repeat the Sounding Joy

Sometimes I start making a card with a very specific plan, then something happens and my plan morphs into something completely different. That’s exactly what happened with this design.

Not that my original idea was bad, it just wanted to be something else, LOL!

I made this card as one of the samples for the As You See It Challenge blog. You can go over there and check out some of the other ideas posted. If you’d like to try this challenge, then you can also share it over there on the blog. We love to see your beautiful designs!

Today, the AYSI blog has an assortment challenge for us. You must include all of the items listed to participate in the challenge.

Originally, I wanted to work with Crumb Cake and Basic White for a classic and clean design. However, as I went along, I ended up with a Smoky Slate card and only a pop of Crumb Cake! The black accents were not part of the original plan, but once I reached for the black gingham paper from the Pattern Party designer paper, that’s when everything started to shift.

As you can see, my one word sentiment is “joy”. Using this word on a card inevitably has me singing “Joy to the world”. Am I just weird or do you do that, too? The sentiment is stamped and embossed with White Embossing Powder on a Crumb Cake label, which was cut using the Ornate Frames Dies. I sponged the edges with Whisper White Craft ink. Cute, right!?

The Basic White layer lays over a layer of Gray Granite. I used the beautiful Merry Melody Embossing Folder to give it some texture and, of course, to make sure I have that embossed element required for the challenge.

The three little Black Glitter Paper trees are die-cut with the Christmas Trees Dies. I love these little trees!

The White Baker’s Twine and the black stars from the Cute Stars Adhesive Backed Sequins pack add just the right amount of texture and interest to catch the eye.

As always, you can go to my online store to order Stampin’ Up! supplies from me in Canada. If you don’t want to order, you can show your support by leaving me a note in the comments. I love to know that you stopped by!