markers

My Challenge Results were Joy and Peace

It feels funny to be talking about Christmas this week when my kids are wearing their Halloween costumes to school today! However, in my stamping and crafting world, I have to work on Christmas projects all through the fall. That way, December can’t sneak up on me!

The As You See It Challenge blog has a challenge for us, and this one is all about Christmas!

I’ve been working on designing cards for an upcoming event. Conveniently, this challenge allows me the opportunity to create one card for two purposes! WhooHoo! I love how efficient that makes me feel! *grin*

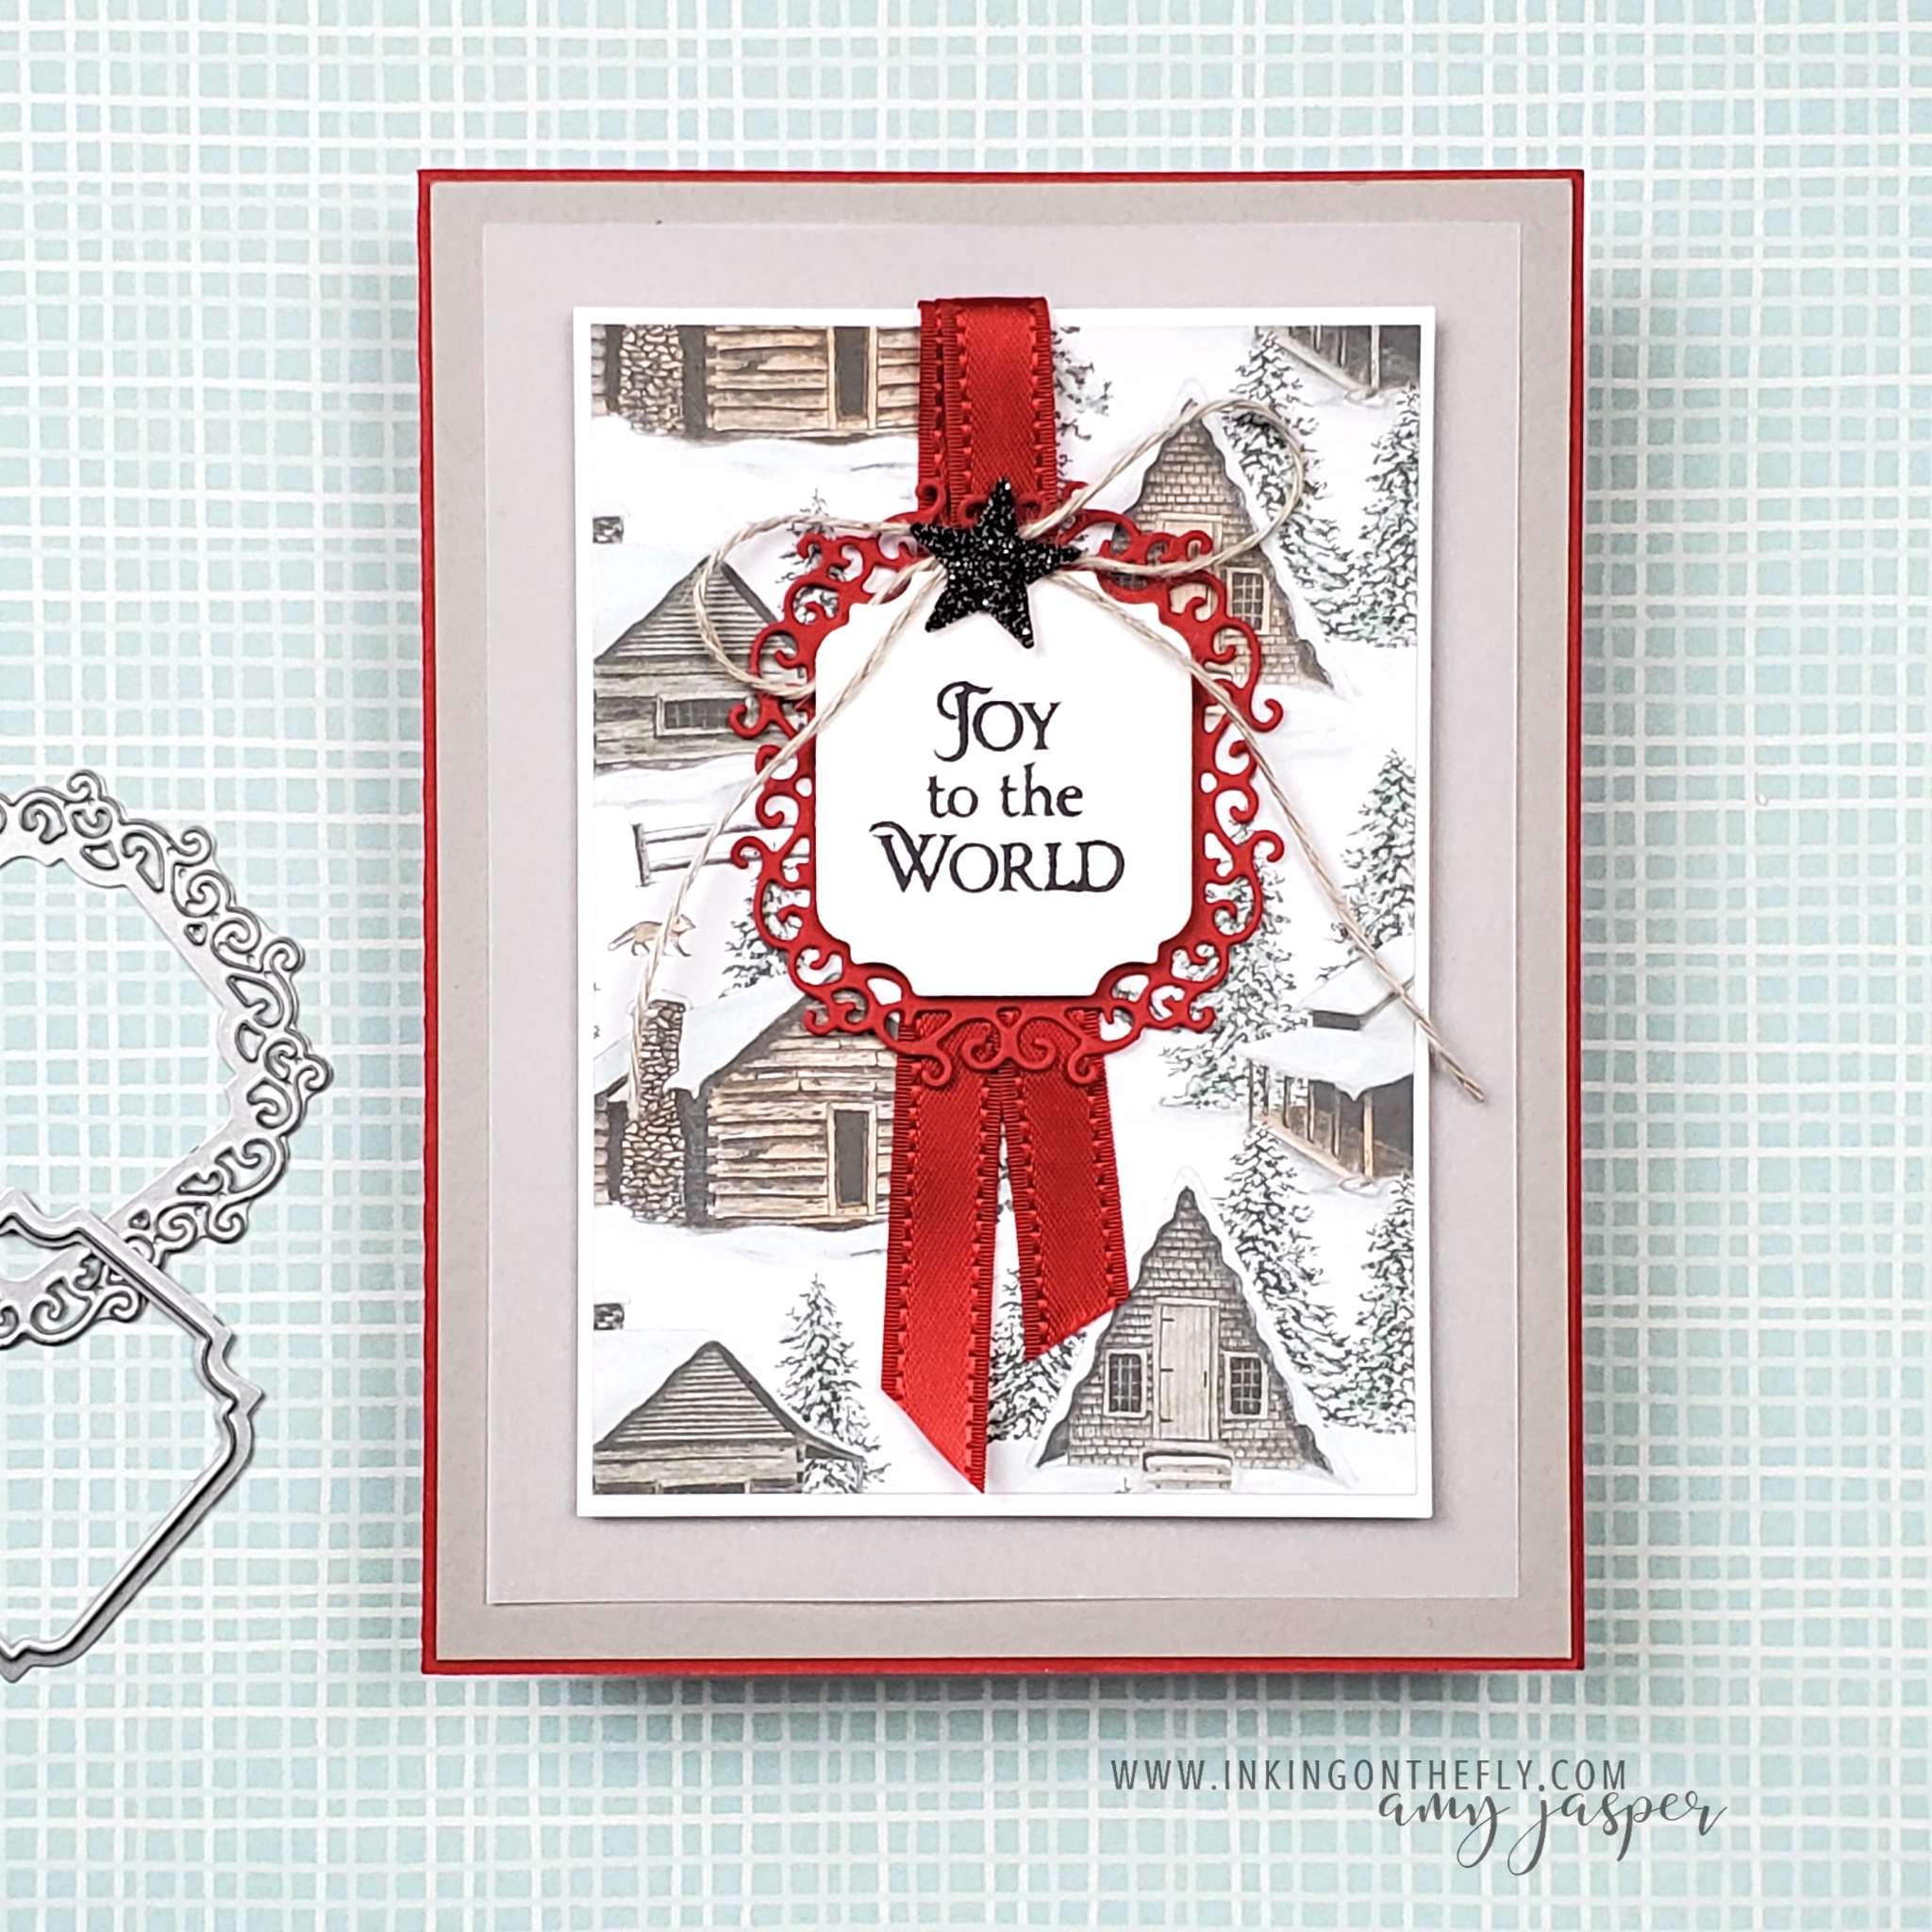
My results for this challenge? Joy and peace, of course! This card represents the emotions that perfectly sum up Christmas for me.

Making the card

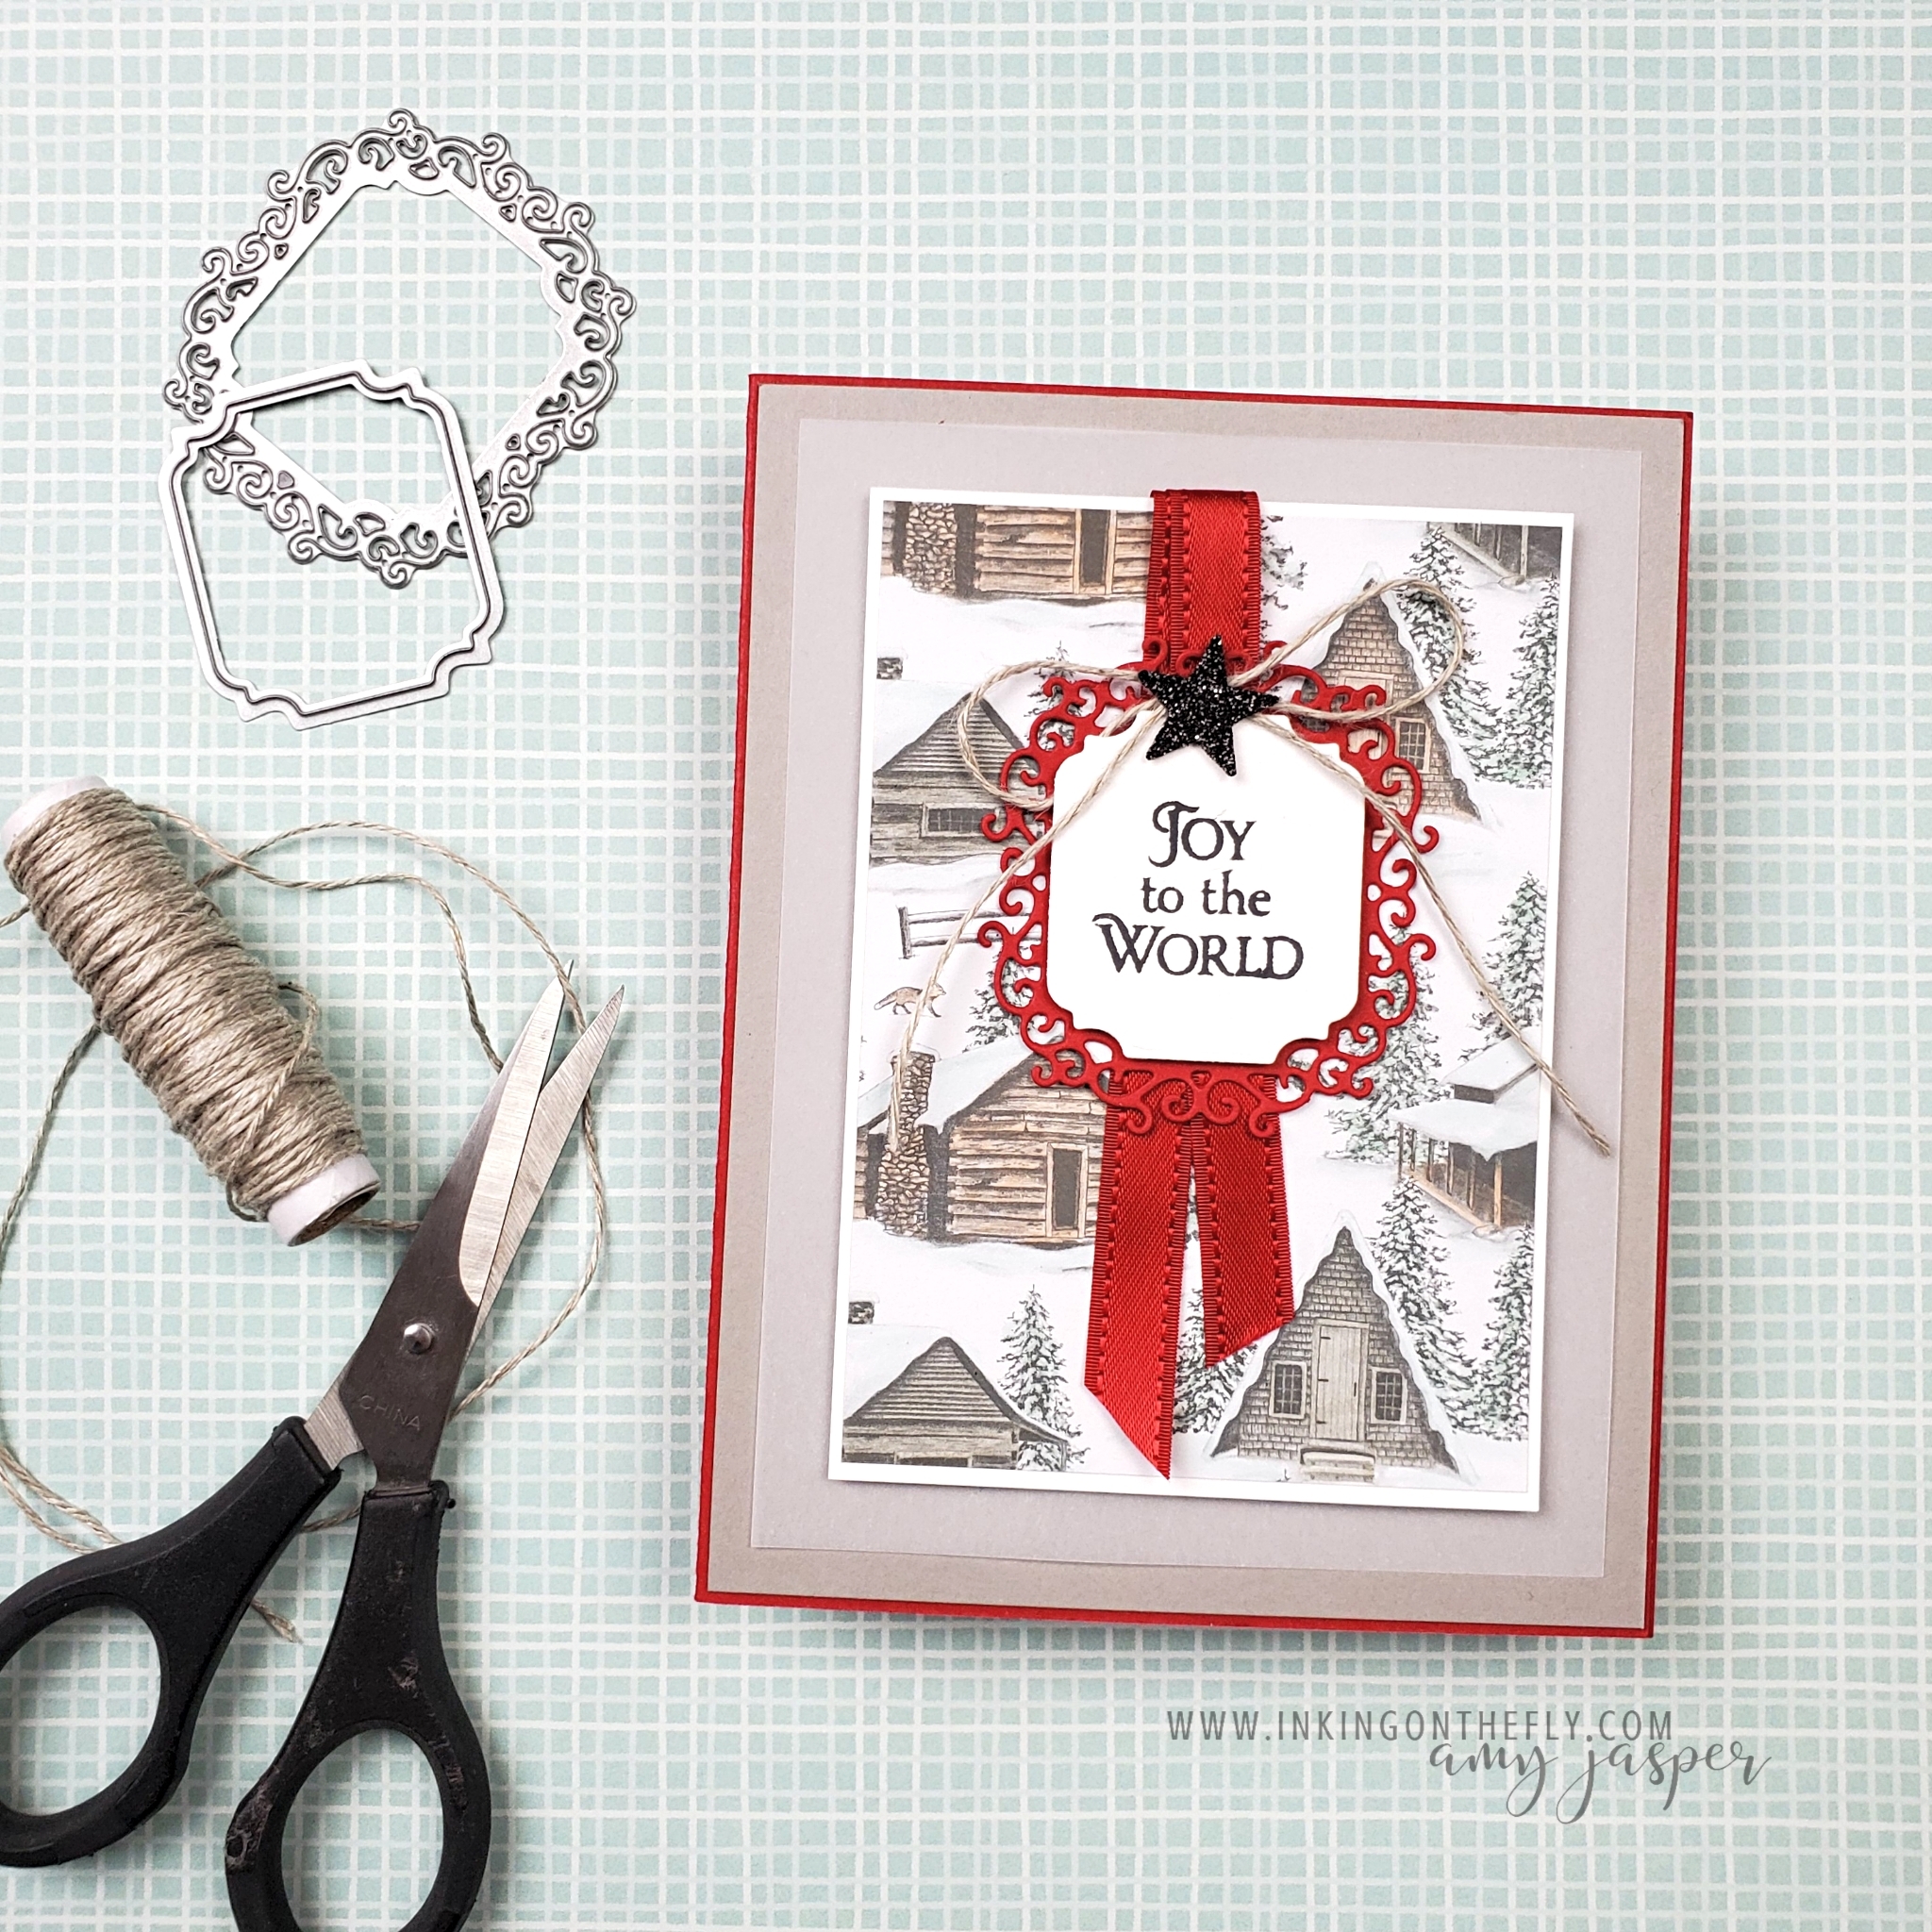
First, I used a Real Red cardstock base, layered with Gray Granite and Vellum. Next, I coloured the Peaceful Place patterned paper before adhering it to the Basic White. To colour the paper, you can either use some of the light Blends Markers or the Stampin’ Write Markers. Of course, the Stampin’ Blends Markers are super easy, as you can achieve a very even colour.

On this particular card, I used Petal Pink and Sahara Sand Stampin’ Write Markers directly on the cabins and the fox. Then, I scribbled Mint Macaron and Pool Party Stampin’ Write Marker on an acrylic block, so I could pick up the colour with a Blender Pen to create a softer colour for the trees and the snow drifts.

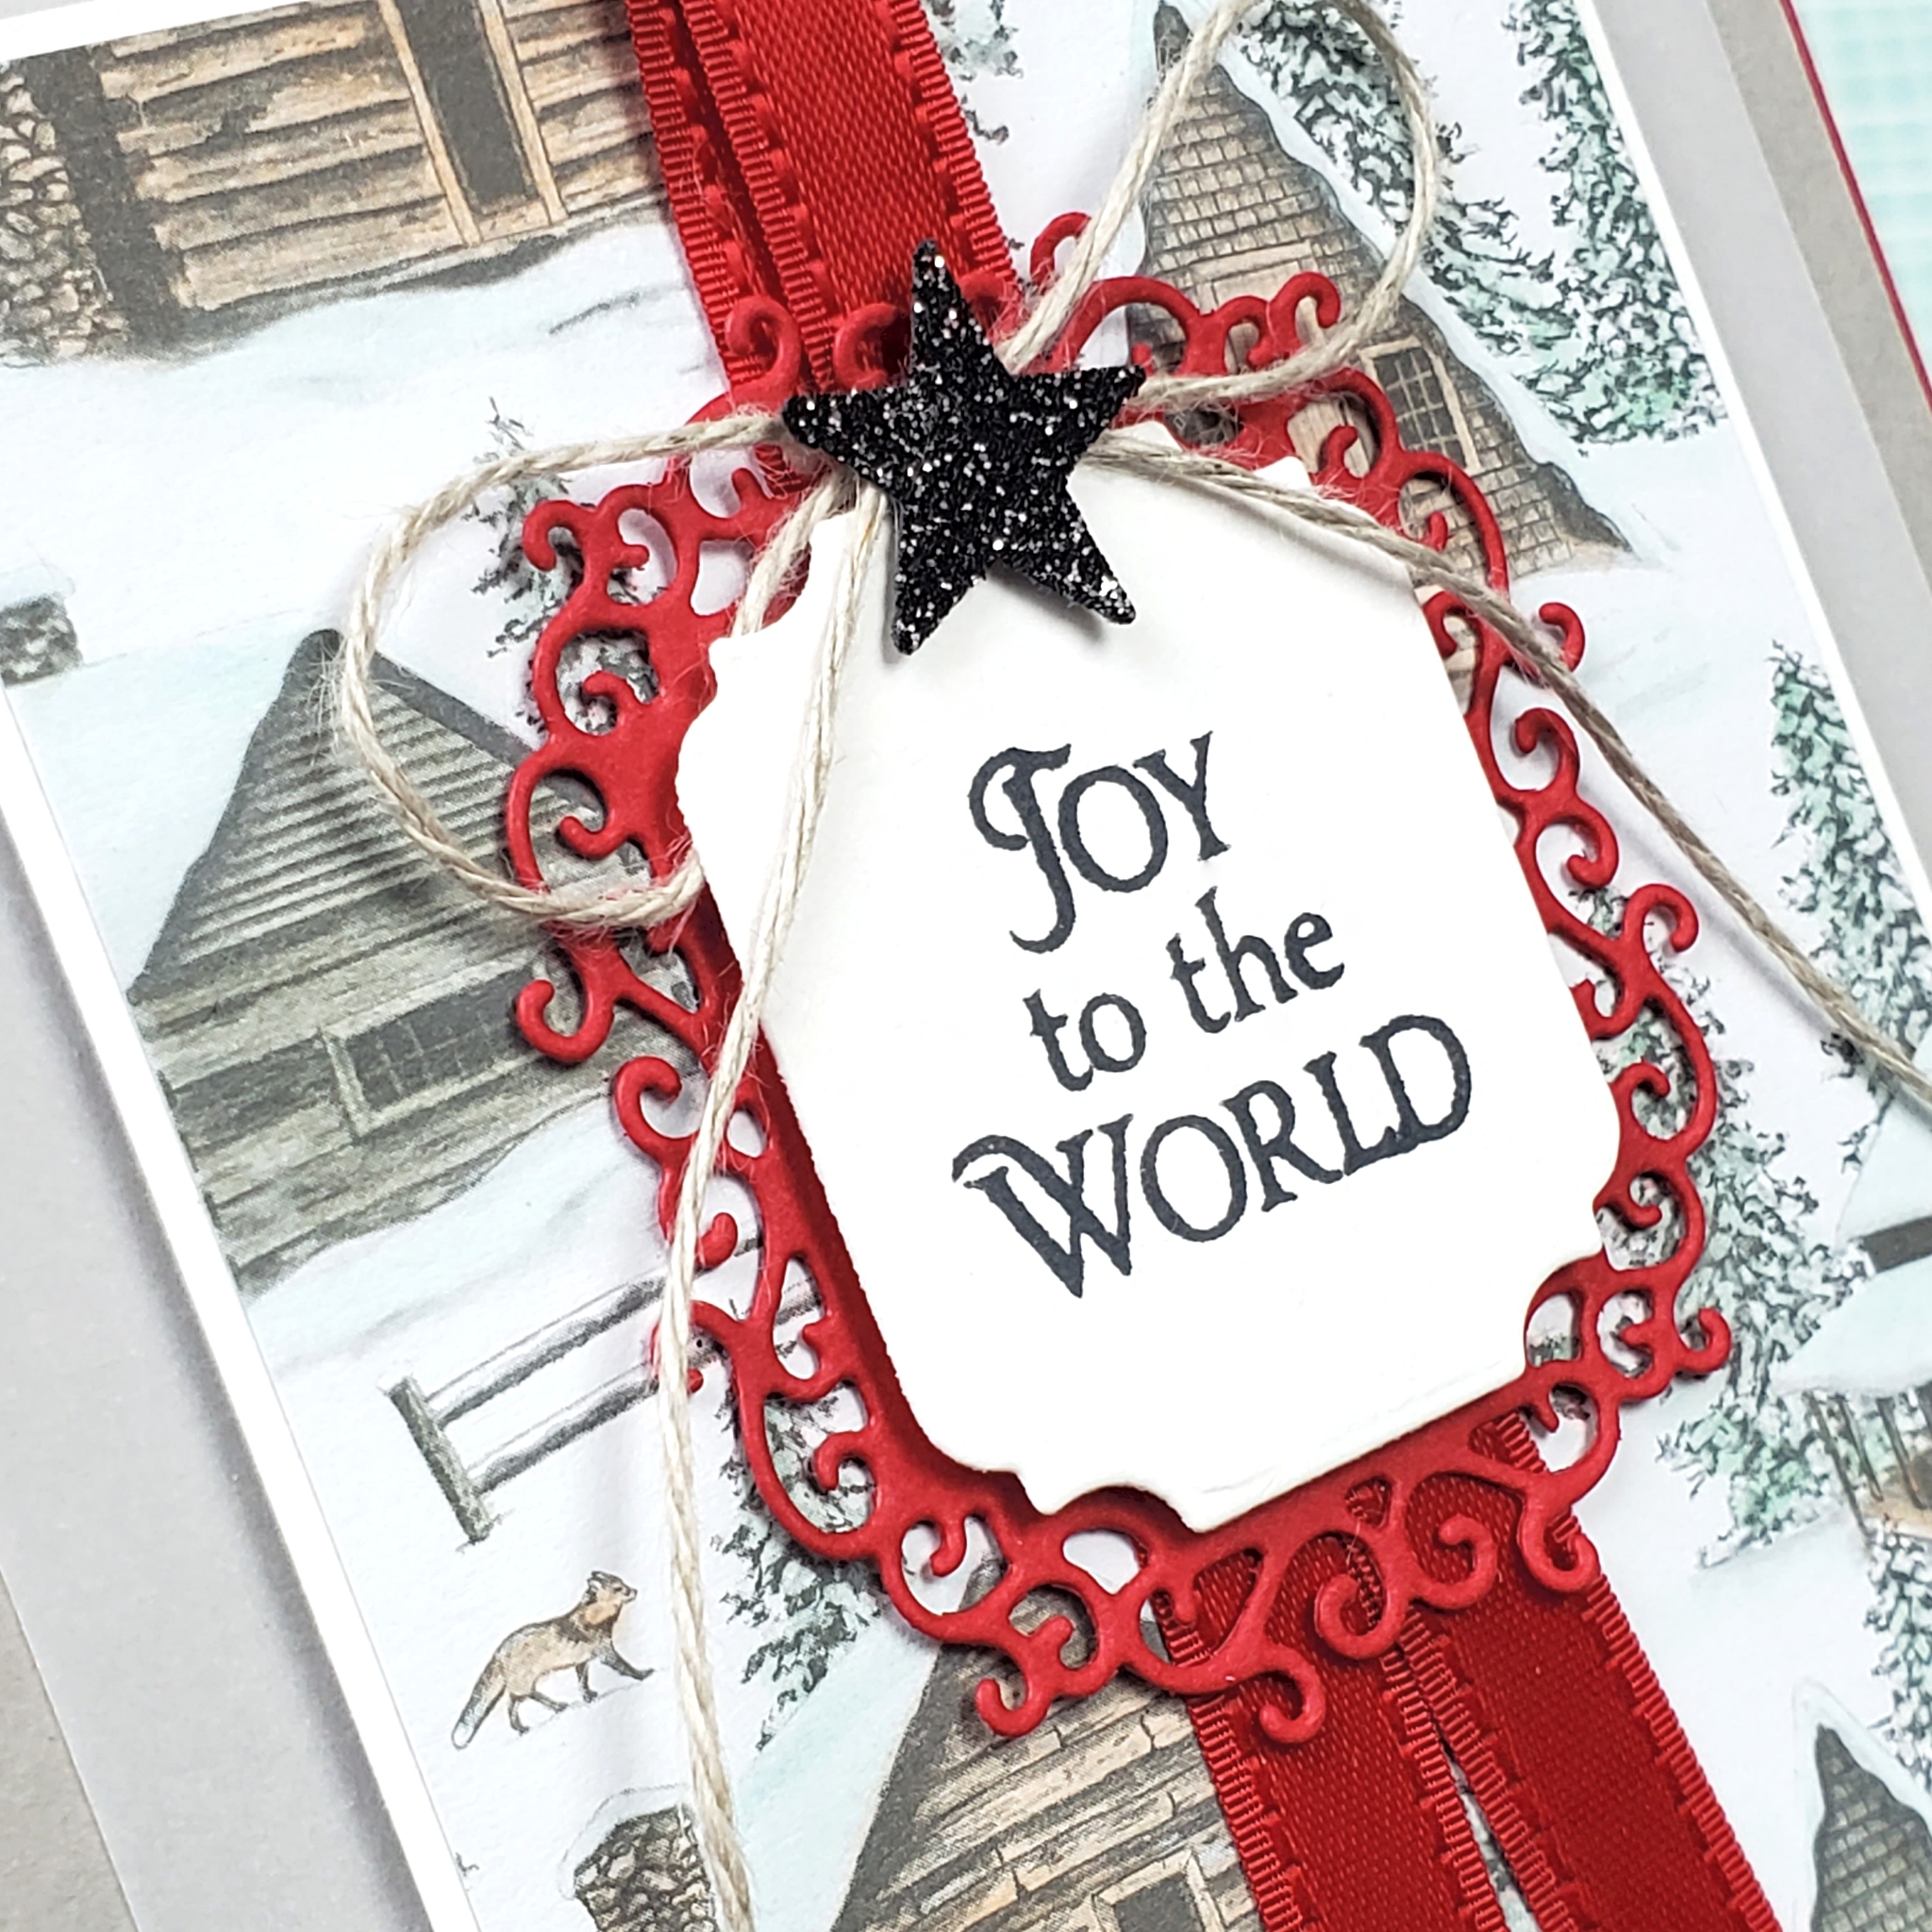
The sentiment from the Stars are Shining stamp set has been stamped on Basic White cardstock. This and the Real Red frame were die-cut using the Cut & Emboss Machine and the Ornate Frames Dies.

To make it festive, the Real Red Satin Ribbon and the Linen Thread topped off with a Black Glitter Paper star, are added to the card. I love that little star! The Starlit Punch, which can be purchased separately or bundled with the Stars are Shining stamp set, is what I used to punch out that sweet element.

If you tend to skip over the Halloween products in the catalogues, then you may have missed the Black Glitter paper. Even though I don’t make a lot of Halloween crafts, I made a point to snatch up that paper for other occasions. In this case, it is a great accent for a Christmas card!

Holiday Stamp Camp

This card will be one of the 10 cards that we’ll be making at the Holiday Stamp Camp event in November. Once again, Desirée Spenst and I have teamed up for another day-long virtual event! Anyone in Canada can join us for this event. Registration closes October 31st, so don’t wait! Go to my Events & Classes Page to find out more and to register.

Dragonfly Note Cards

Welcome to a simple stamping Sunday.

Last Tuesday, I shared an easy small gift box that I made to fit note cards. Well, my friends, I whipped up some note cards lickety-split using the Dragonfly Garden stamp set and the Dandy Garden Designer Series Paper from Stampin’ Up!.

If you didn’t see the box I made, you can go to my blog post by clicking HERE. There is a handy video tutorial there as well for anyone who might find it useful. I suspect that it will be a video that I refer back to myself when I want to make another box like it. It’s so easy when you have the measurements and instructions at your fingertips!

Making these mini note cards are super quick and easy as well!

The card bases are patterned paper cut to 2 3/4″ x 5 1/2″, then folded in half. I like my note cards to fit easily into the 3″ x 3″ Mini Envelopes, so I choose to make the cards 2 3/4″ square.

I used my Stampin’ Write Markers to colour the floral image from the Dragonfly Garden stamp set. The dragonflies were punched out with the Dragonflies Punch from one of the patterns of the Designer Series Paper. I could have stamped the dragonfly and coloured it myself before punching it out, but, hey, I’m all about efficiency today! LOL!

Normally, I wouldn’t use designer paper for my card base, but these cards are so little that it doesn’t matter that the paper is thin. Adding the layers on the front and inside the card add structure and make up for the designer paper being so much thinner. The cool thing about using the patterned paper for the base is that you get to show off both sides!

Note cards like this are great for anyone with a small business. You can write a quick thank you note and pop it in with a customer’s purchase. I also like to use note cards to attach to a little gift. A box of chocolates for a friend. Flowers for your mom. A personalized mug with some fancy tea for a teacher. These cards give that little extra something without overshadowing the modest elegance that a small gift represents.

All of the products that I used on these cards and the box are available to purchase at my Canadian online store. Let me know if you have any questions about products. I’m always happy to help if I can!

Birdies for You

This sweet Sunday design has a little bit extra with fancy score lines, some ink blending, and coloured ribbon.

I started with a Gray Granite cardbase and layered a strip of Rococo Rose cardstock. I created the grid pattern on the square piece of Very Vanilla cardstock with my Simply Scoring Tool, then used a Blending Brush with Rococo Rose Ink to emphasize those score lines with a bit of colour. The little birdies from the Quite Curvy stamp set were stamped with Tuxedo Black Momento ink to look like they’re standing on the grid lines.

After adhering the Pearlescent Paper behind the vanilla piece, I coloured a section of the Pool Party Sheer Ribbon using the Dark Blackberry Bliss Blends Marker and wrapped it around the two layers, adding a Heart Charm into the knot before tying a bow.

The final touch was to stamp the sentiment on the strip of Crumb Cake cardstock, flag the end with my Paper Snips and adhere it to the card with Stampin’ Dimensionals.

This was one of the 10 cards offered as part of the Stamp Camp event in January. Registration for the next stamp camp (only available in Canada) ends April 30th and features the Hand-Penned stamp set from the upcoming 2021 – 2022 Annual Stampin’ Up! Catalogue. Click on Events and Classes in the menu on the top of the page to find out more.