Shaker card

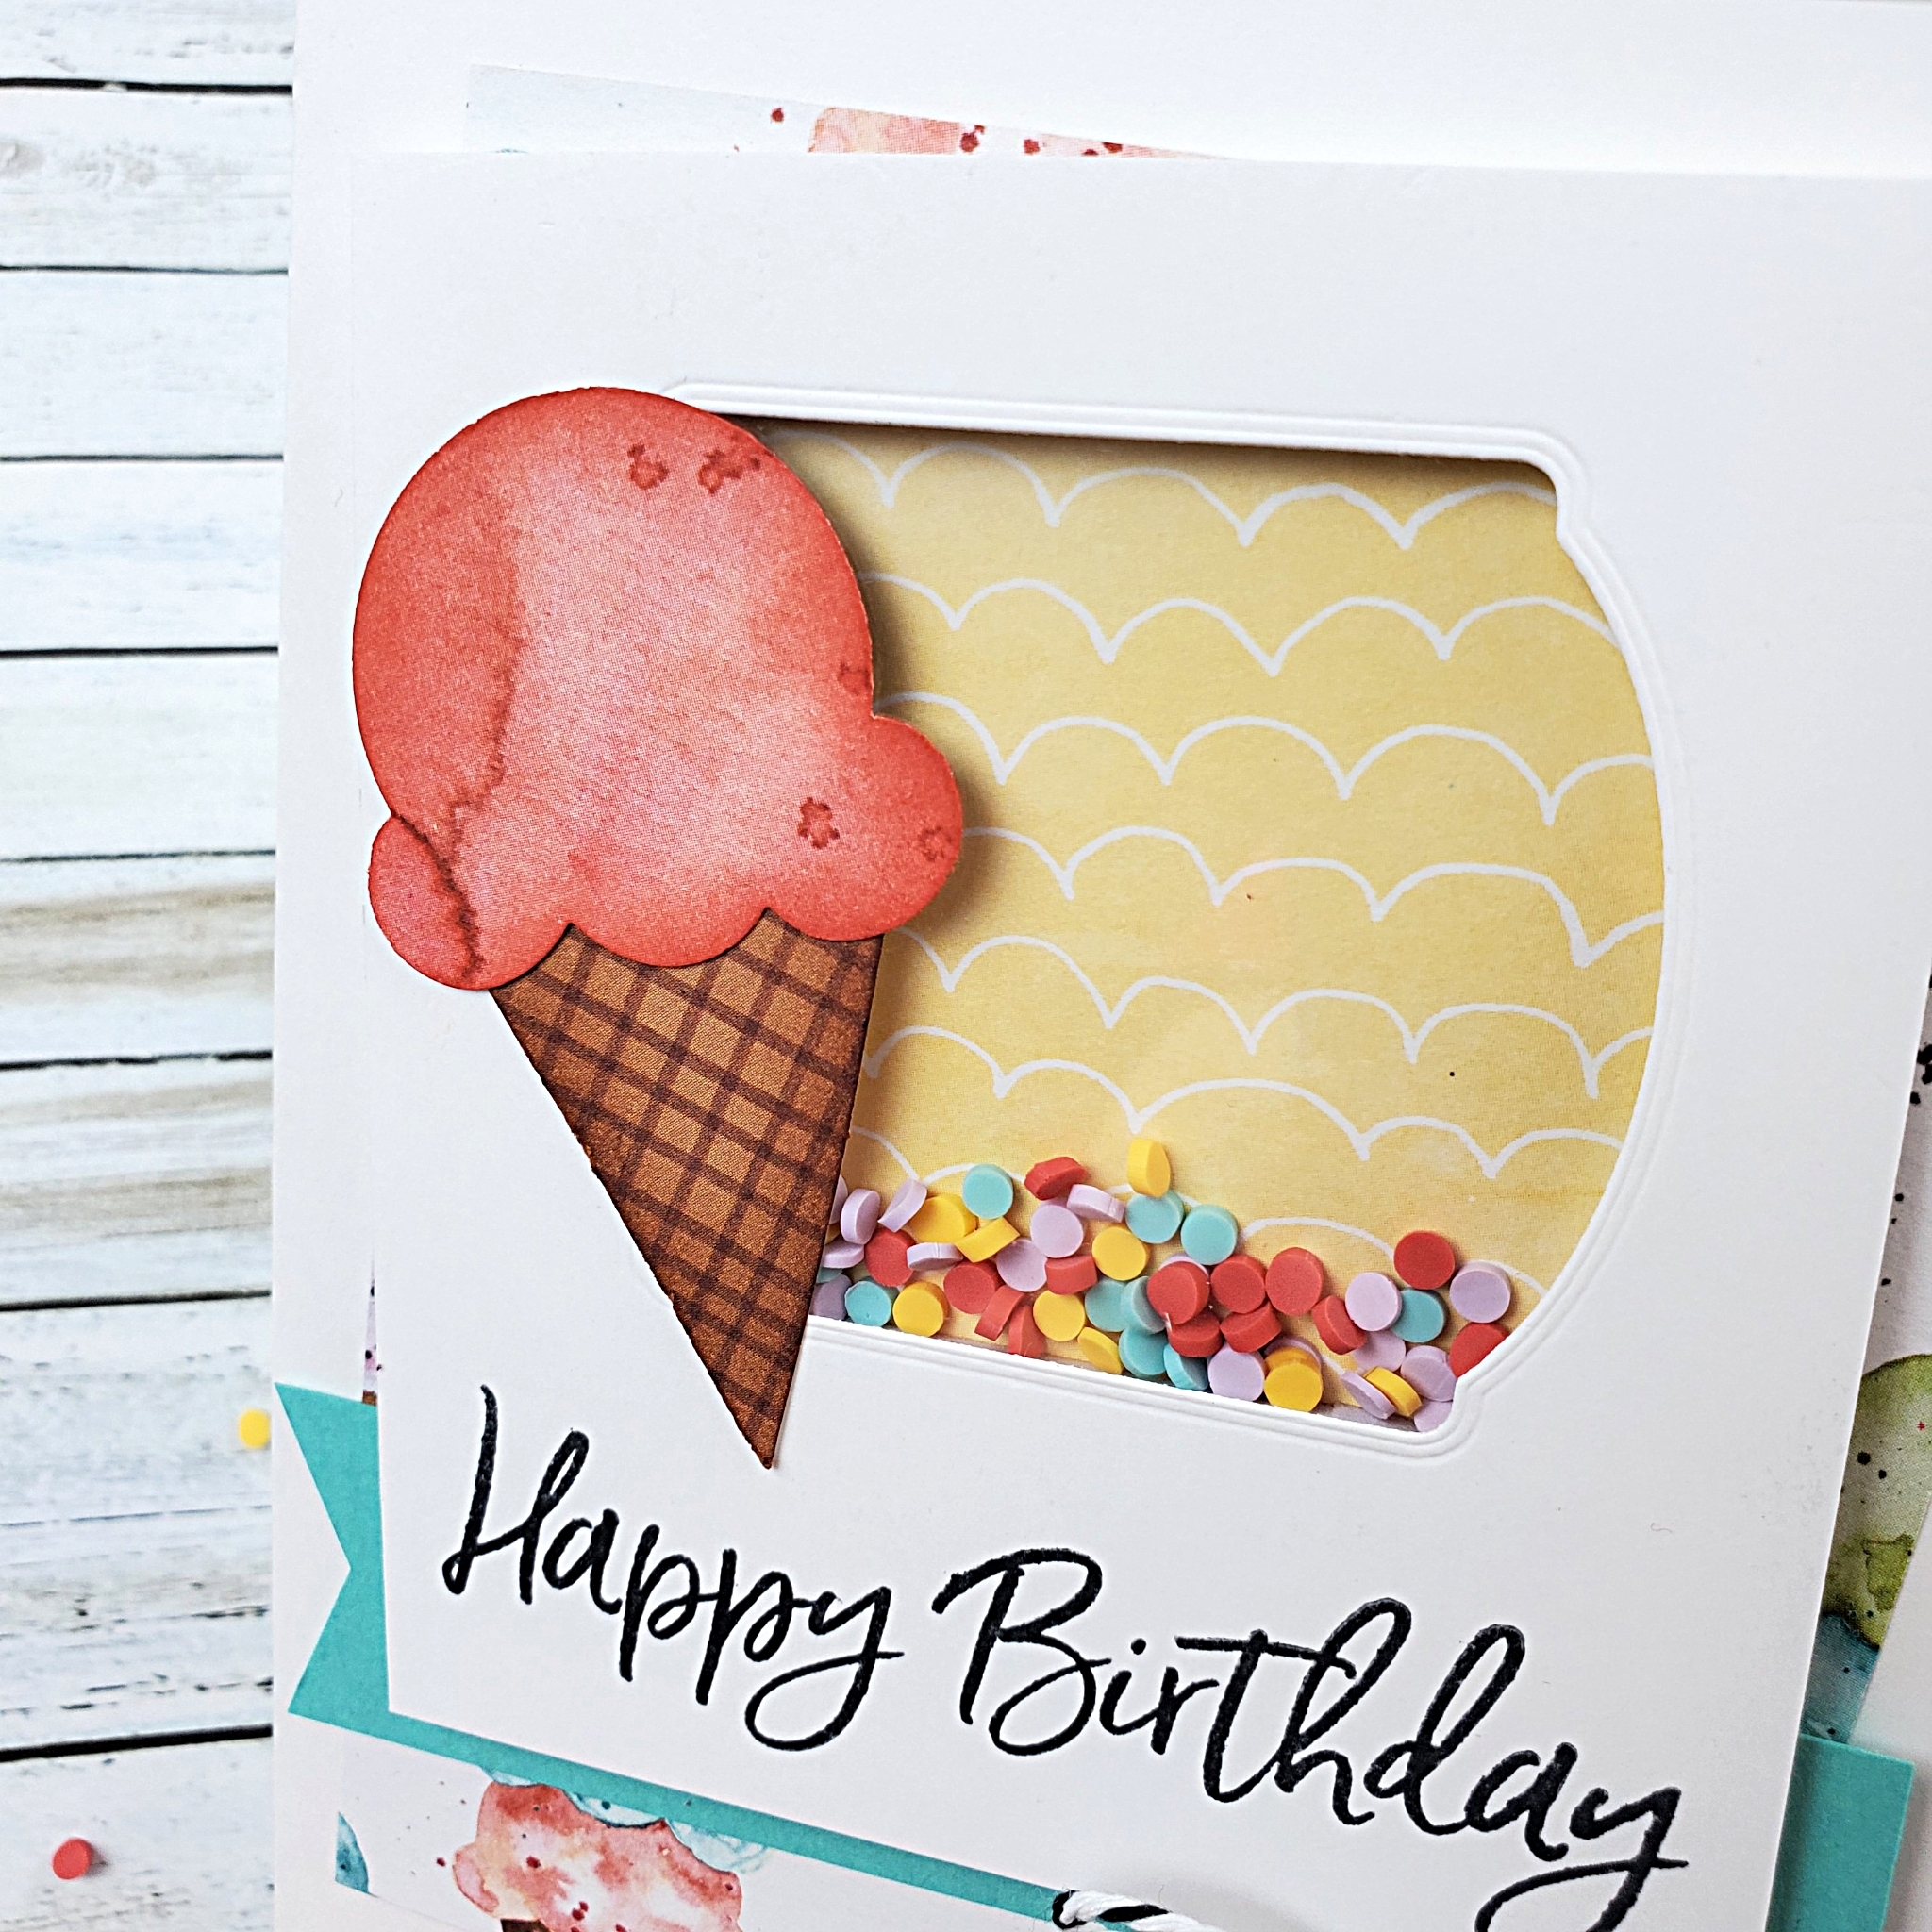
Ice Cream Shaker Card

If you know me, then you know that I love ice cream. I will eat almost any ice cream.

(Sorry, McDonalds, you definitely don’t make the cut)

My favourites are coffee or vanilla bean Häagen-Dazs, but I also love a good ice cream cone from most ice cream shops. We have an ice cream shop in town called MooLix, which is a favourite for me and my family. It’s even become a tradition for us on Canada Day to walk along the boardwalk by the lake, so we can hit up the MooLix. A waffle cone with a couple scoops of whatever flavour suites our fancy in the moment is a gloriously tasty treat!

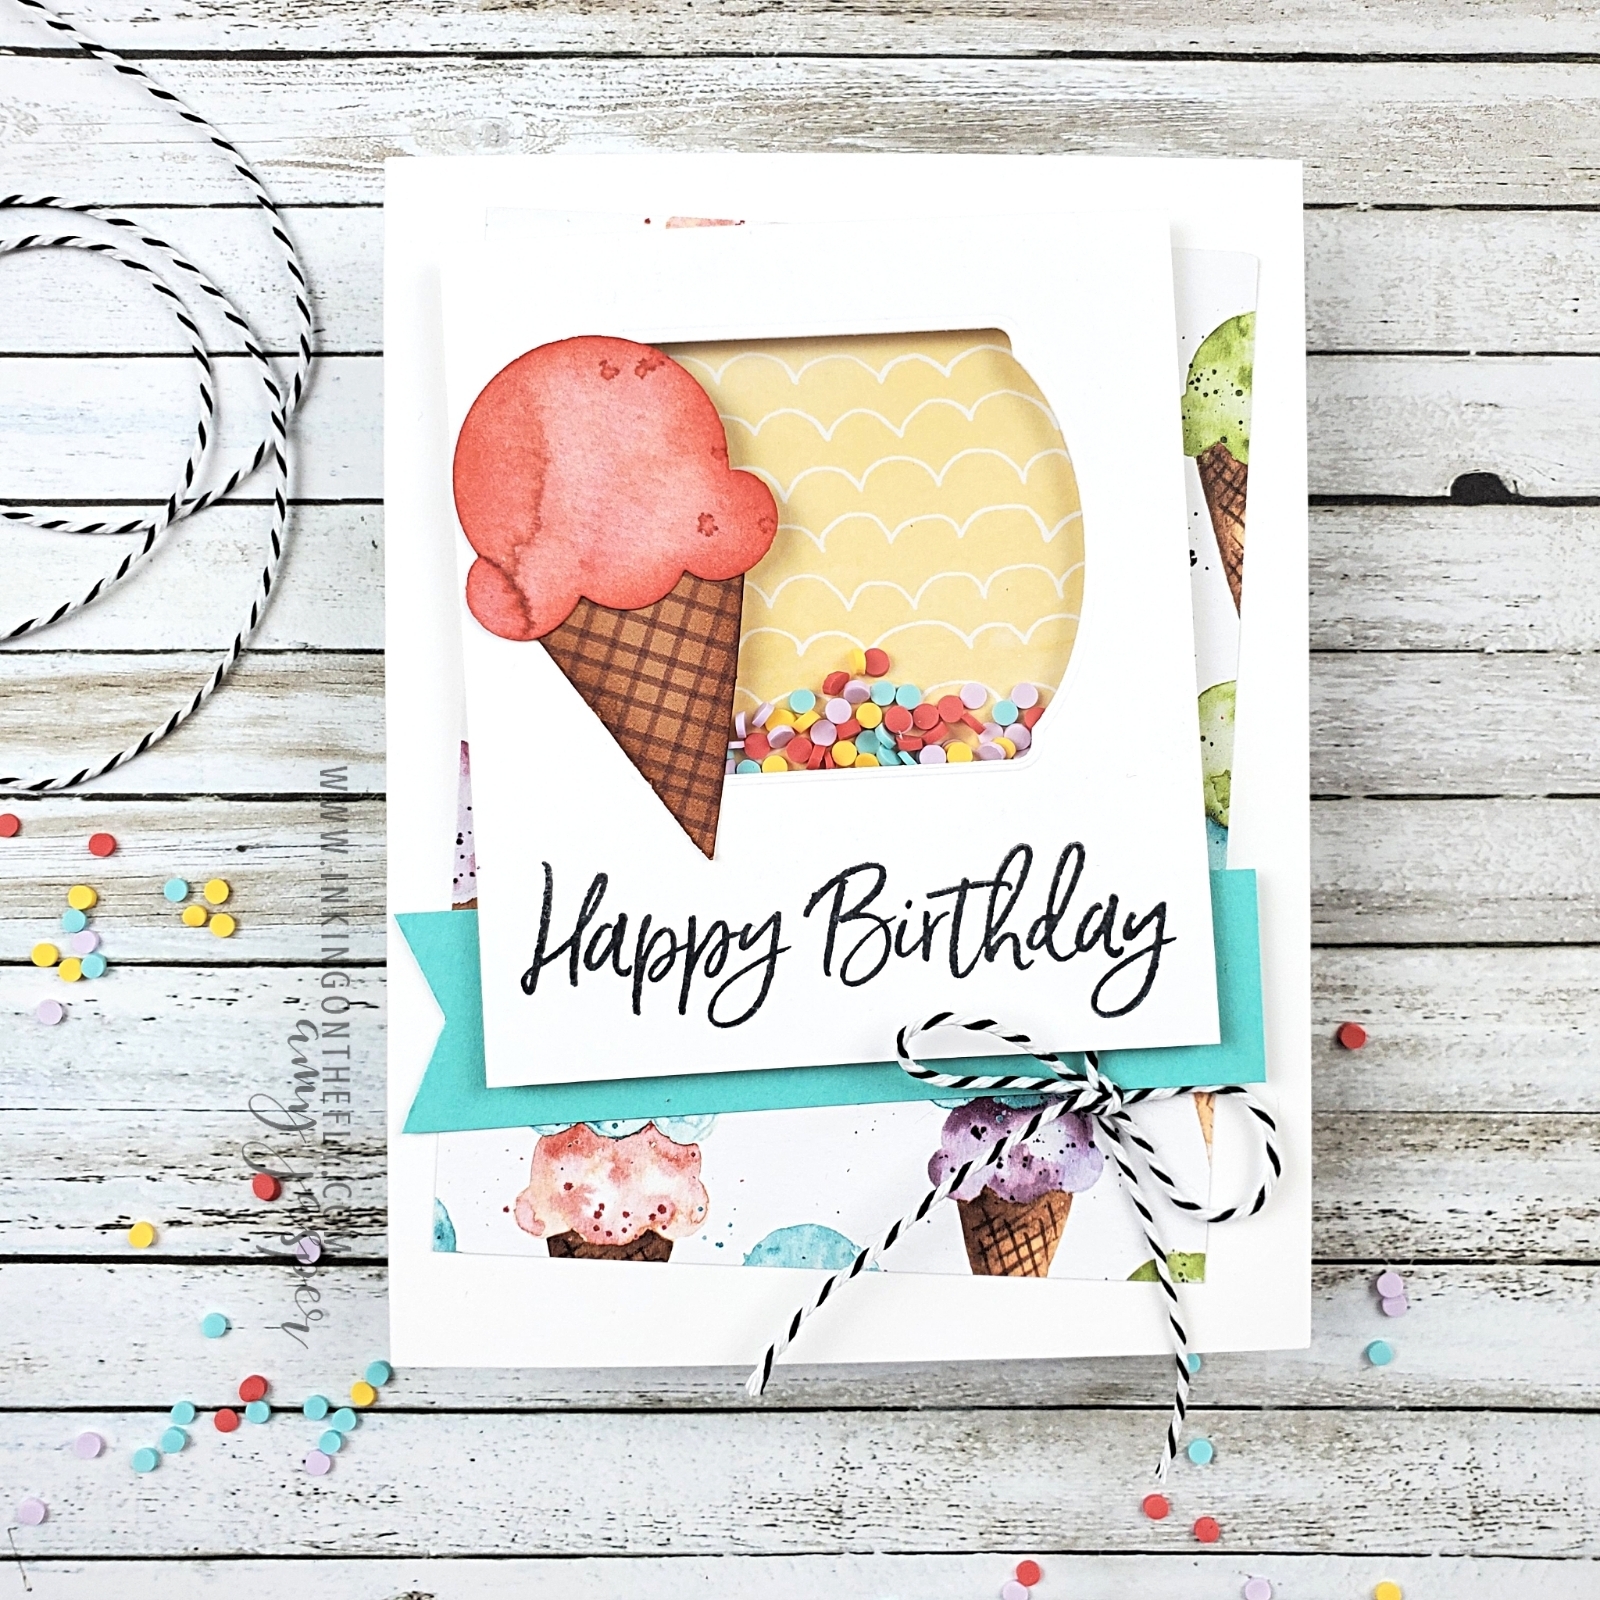
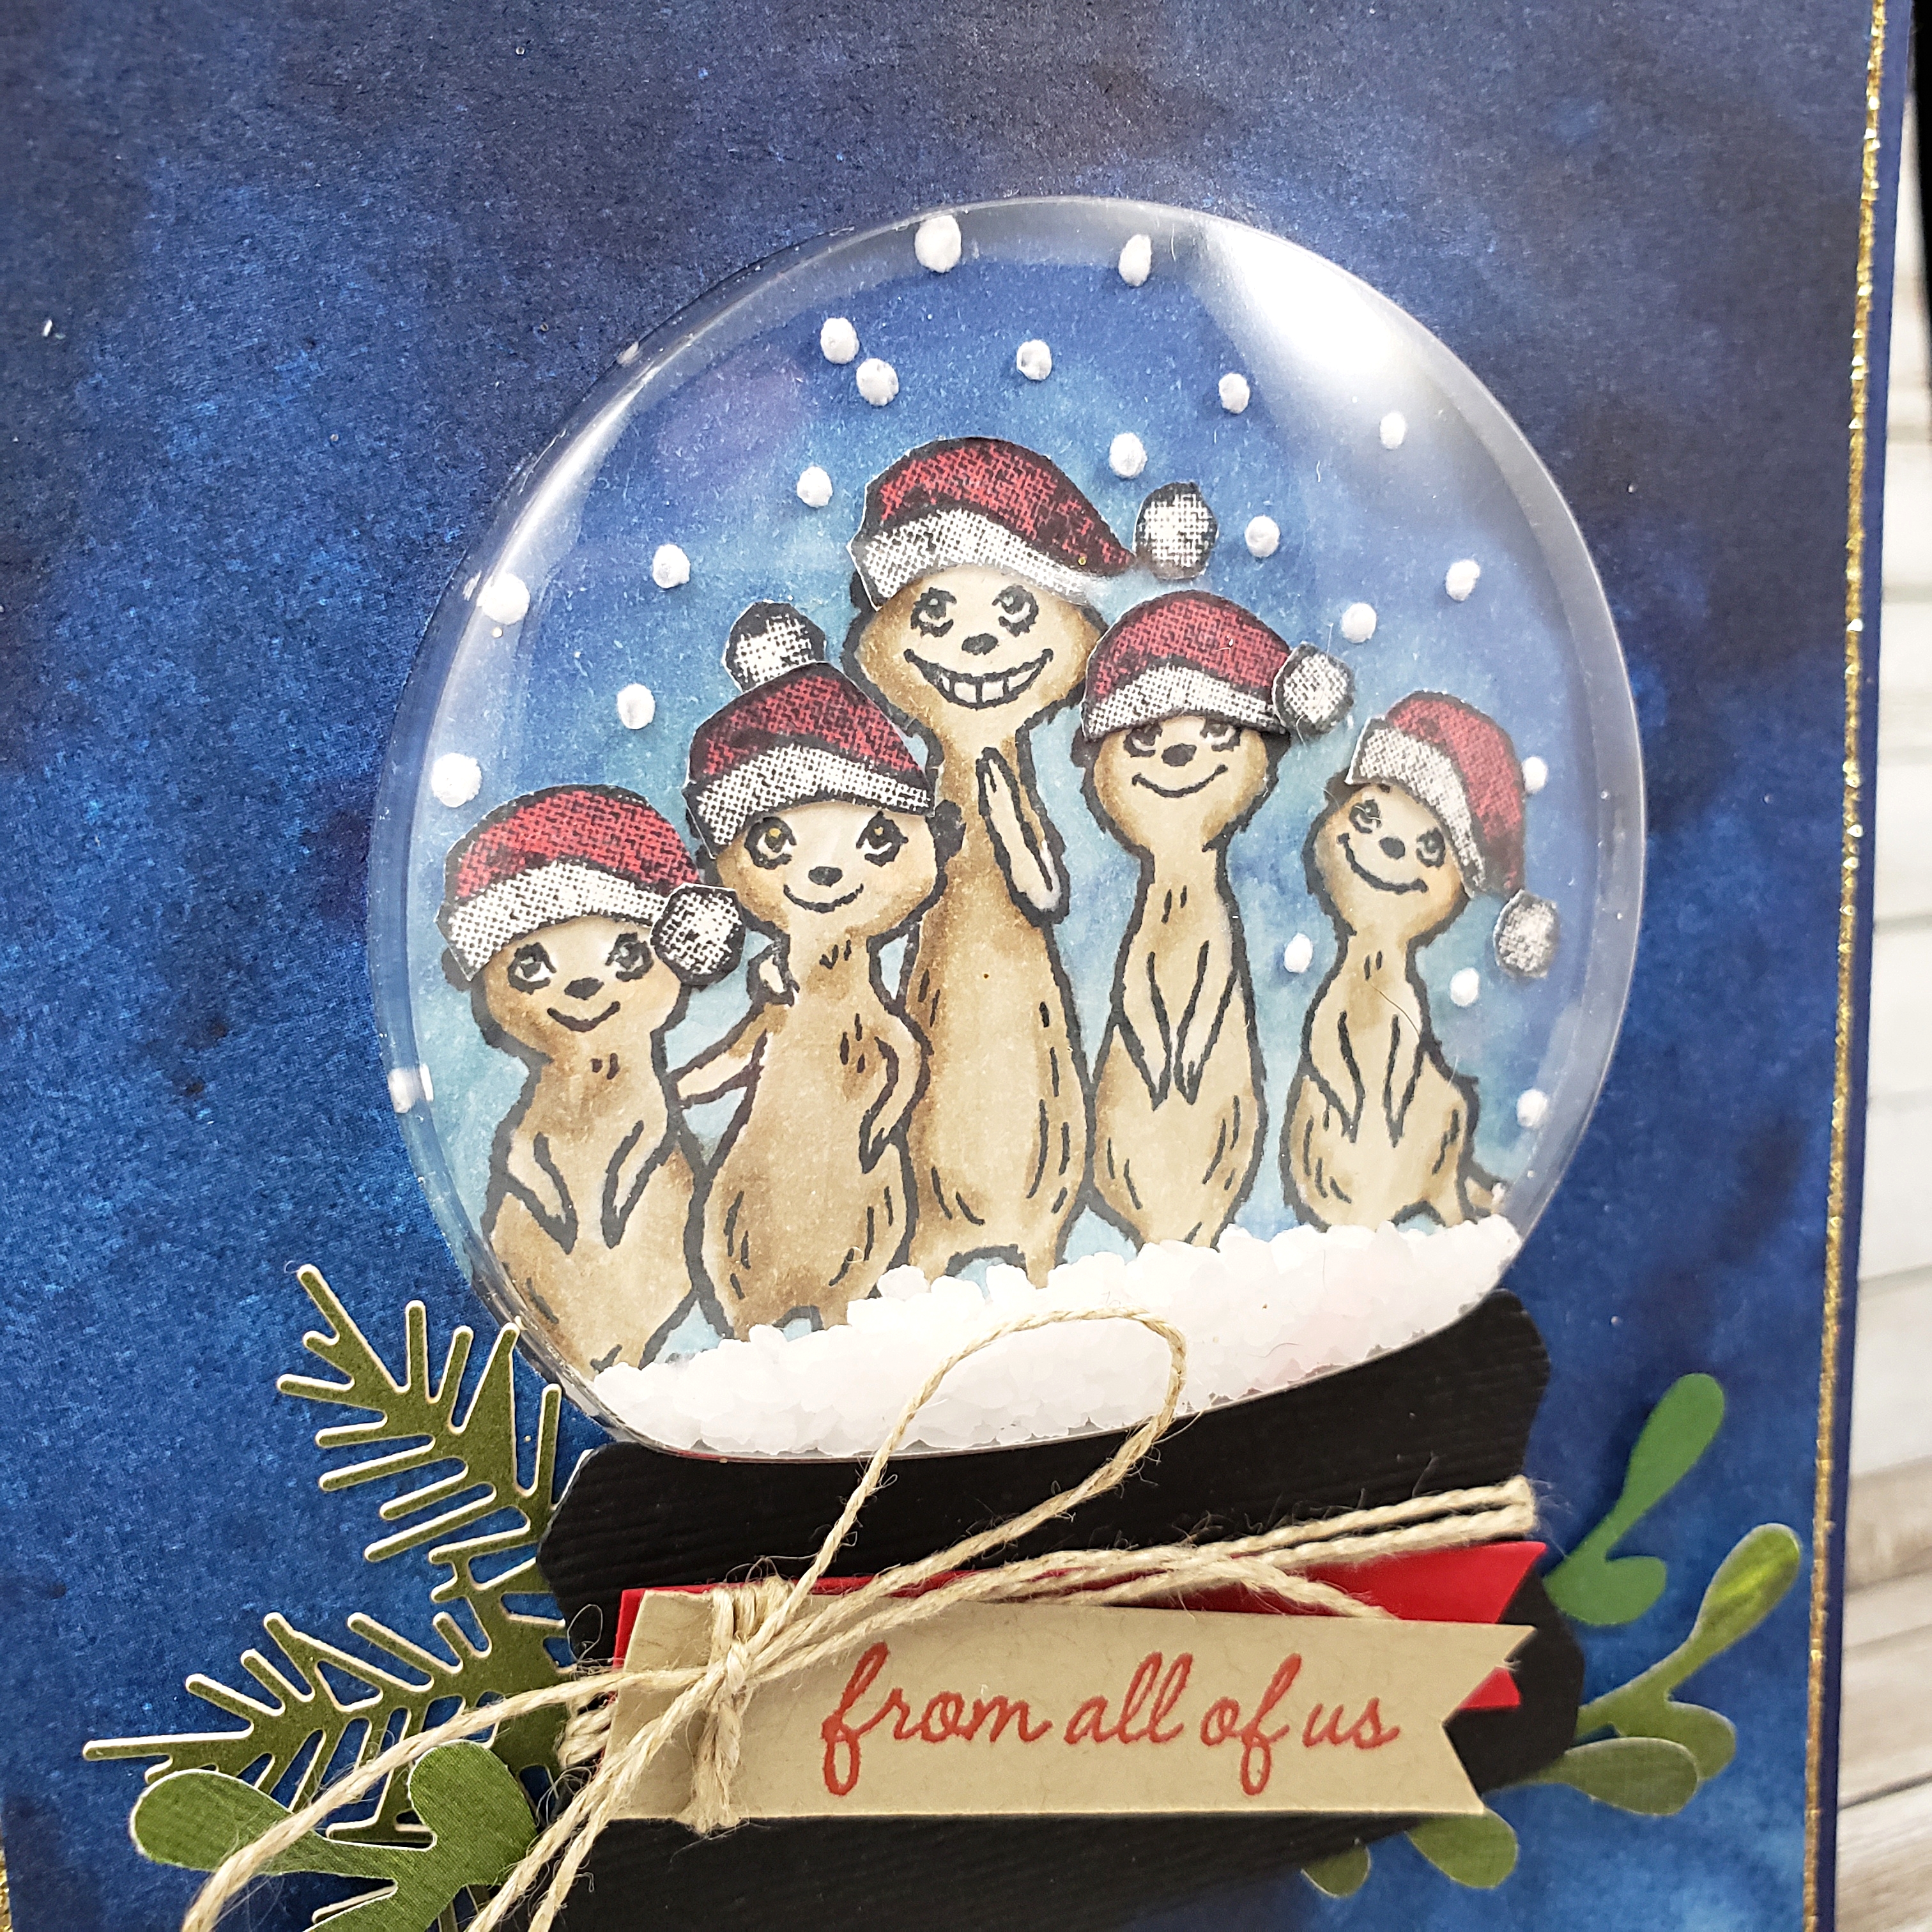
On my Facebook Live last Monday, I made a shaker card using the Ice Cream Corner Suite. This card features the Ice Cream Corner Designer Series Paper, the Sweet Ice Cream Stamp Set, the Ice Cream Cone Builder Punch, and the Ice Cream Corner Sprinkles.

You can watch the video on Facebook, but I also have it up on YouTube and here on my blog. What can I say, I like to make things easy for you!

Did you know that the Ice Cream Corner Designer Series Paper and the Ice Cream Corner Sprinkles will soon be gone forever? They are products in the January – June Mini Catalogue, which means that they will not be available to purchase after June 30th. In fact, they might run out of stock before then, so If you love them, go to my Canadian online store and add them to your cart before it’s too late.

If you like my content, I would love to know! Your comments, replies, and interactions with my posts make my day and encourage me to keep sharing. If you make any of my designs (or use them as a spin off for your own amazing creations), please tag me in your posts on social media. I also love when you share a photo with me through Facebook Messenger. I get so pumped when I see your take on one of my designs or techniques. Thank you for boosting my spirits and supporting my passion.

I think you’re pretty amazing!

Shake the Globe

The Snow Globe Scenes Dies and the Shaker Domes used on this card are retiring AND they’ve been significantly discounted! If you like them, order them before they’re gone forever! There are two stamp sets that go with these dies as well: Zoo Globe and Still Scenes. My card is an example of how you can use the dies to create a card that has nothing to do with winter.

The As You See It Challenge today is a colour challenge which makes me think of ice cream! However, I really wanted to showcase these retiring dies before they’re gone, so I didn’t follow my ice cream instincts.

Ice cream is kind of a big deal to me – I loooove good ice cream!

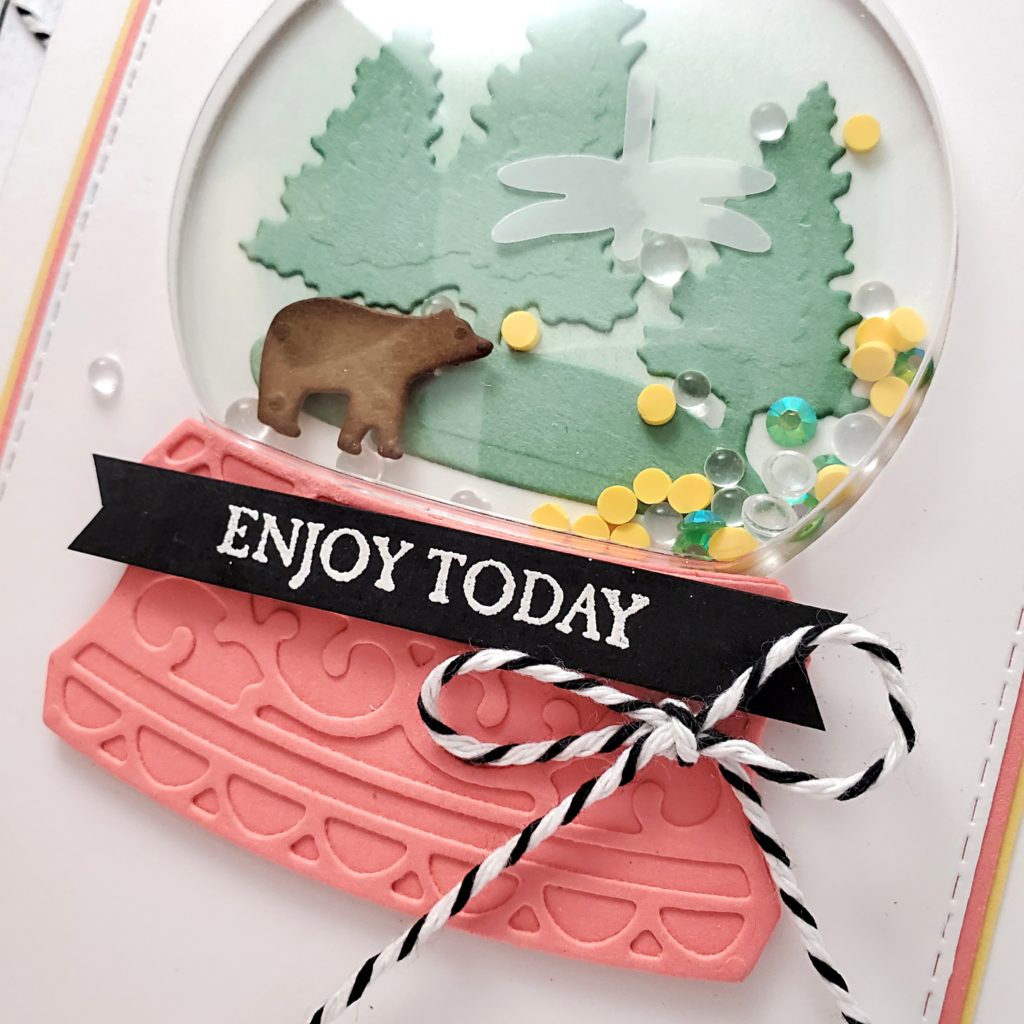
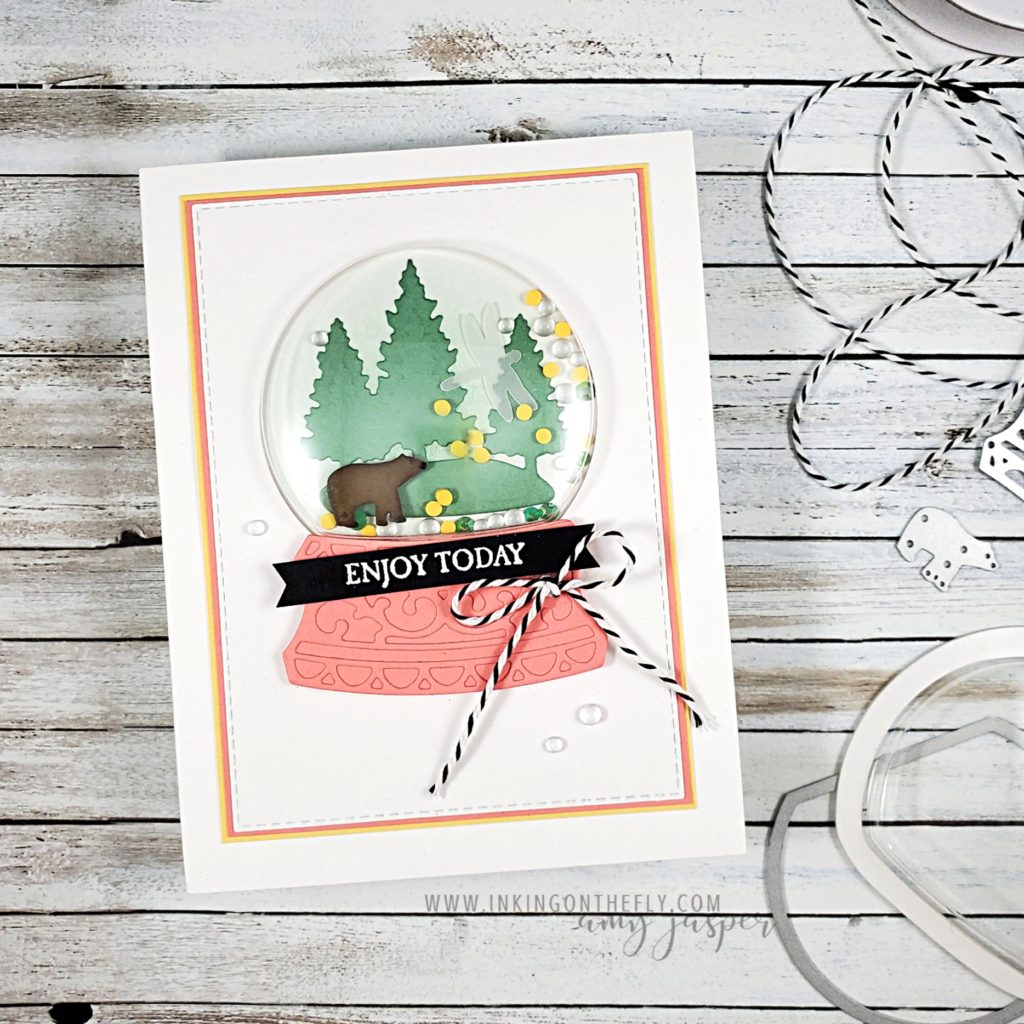
To create my card, I used a Blending Brush to apply Mint Macaron Ink to the front of the Thick Basic White card base. Mint Macaron Ink was also sponged on the edges of the Mint Macaron die-cut trees before adhering them to the front of the card. A bit of Soft Suede Ink sponged onto the edges of my little Soft Suede die-cut bear gives him a bit more definition before placing him where he could meander below the trees.

Adding the bit of colour on the edges gives these die-cuts a bit of a pop!

The next steps took some forethought as I wanted the three layers of cardstock to frame the shaker dome. I didn’t want to put in the effort to die cut the dome shape in all three layers AND have them line up with one another.

To avoid this, I used the die to cut the dome shape out of the top layer of Basic White only, which I had also cut with my Stitched Rectangle Dies. Knowing that the next two layers of Flirty Flamingo and So Saffron cardstock would be conveniently hidden behind that top layer, I used that first layer as a stencil and drew a pencil outline to indicate where I needed it. I cut around that area (no need to make it pretty), and did that with both of those layers.

Ah! So much easier than trying to line up all three layers with a die-cut centre!

With my layers ready, I added a few little shaker pieces on my trees. There are some yellow pieces from the Ice Cream Corner Sprinkles, some of the Flowers for Every Season Gems, and one little Vellum dragonfly, punched using the Dragonflies Punch. It’s fun to have some variety! I peeled of the backing of the Shaker Dome and laid it down to stick to the card base. The three cardstock layers were adhered together before peeling off the backing from the front of my Shaker Dome and adhering those layers to the card front around the dome.

SO CUTE! I love how pretty these colours are together.

The base of my globe was cut with the dies using Flirty Flamingo cardstock. The two pieces were glued together and attached to the cardfront using Stampin’ Dimensionals. I added the heat embossed sentiment from the Campology stamp set and tied on the black and white trim from the Playful Pets Trim Combo Pack.  As a finishing touch, I adhered a few of the clear gems from the Flowers for Every Season Gems to my card front with my handy dandy Multipurpose Liquid Glue.

This design makes me want to get out and meander beneath the trees, just like that little bear is doing!

I think the mountains are calling me. 🙂

Don’t forget to grab these dies and the shaker domes on my online store before they’re gone forever. The stamp sets and the gems are soon to retire as well. If you love them, don’t miss your chance. They will be available until May 3rd or until they sell out, whichever comes first.

Access my Canadian online store by clicking on the SHOP circle on my blog. You can also go to the menu at the top of the page and click on the SHOP option.

Christmas is Family

What brings you joy during the holidays? For me, it’s spending time with my family. I love the time together playing games, opening gifts, sitting by the fireplace, and just existing together.

My card today is inspired by the As You See It Challenge: it’s a fill in the blank!

At first, I wasn’t sure what I would do on a card for this one. How would I depict family on a holiday card?

Then I remembered a stamp set that I got in my pre-order for the upcoming Stampin’ Up! catalogues! “The Gang’s All Meer” stamp set will be available from the Sale-a-bration Brochure in January.

I realized that there are five people in my immediate family and this image has five meerkats!! I saw someone put Santa hats on the critters for a card, so I decided to give it a go!

I stamped the meer cat family on some Whisper White cardstock with Tuxedo Black Momento ink. I used my Stampin’ Blends to colour the image: Light and Dark Crumbcake for the cheerful crew, Dark Balmy Blue, Light Night if Navy, and Dark Night of Navy for the background, and Poppy Parade for the Santa hats.

The Santa hat image is from the Playful Penguins stamp set from Stampin’ Up! I stamped them on Whisper White cardstock, coloured them, then fussy cut them and adhered them to the little heads. The pompom on the end of the hat was cut separately, so I could attach it in different ways to the hats. That way, I could make the hats all a little bit different.

I used the Snowfall Accents Puff Paint to create the falling snow on the background, heat setting it to make that puff paint puff!!

Then I had another thought! Would the meerkats fit in the Stampin’ Up! Shaker Domes? YES, they do!!

Now, I was REALLY excited!!

I used the Snowglobe Scenes dies to cut the hole in the piece of the See a Sillhouette Designer Series Paper by Stampin’ Up!. I used about a teaspoon of pickling salt as snow in my dome and layered my pieces together over the Night of Navy card base and a matte of Gold Glimmer Paper.

The base of the shaker globe is created with Basic Black cardstock, cut with the same die set and my die cutting machine. I also used the Subtle embossing folder to give it some texture. I wrapped a piece of Linen Thread around the base of the globe and secured it on the backside before adhering the globe base to the card with Stampin’ Dimensionals. I tucked some leaves under the globe base that I punched out of Garden Green cardstock and a random scrap of Perennial Essence Designer Series Paper. You might also notice the pine bough on the left side, which is a sticker left over from my Christmas Countdown Calendar kit.

Finally, I stamped the sentiment from “The Gang’s All Meer” stamp set in Poppy Parade ink on Crumb Cake cardstock. I flagged the end and tied a Linen Thread bow on it and adhered it over a strip of Real Red cardstock, also flagged on the end.

If you like these products, you can click on the SHOP option in the top menu of this page and seek them out on my online store. If you are visiting my page from anywhere other than Canada, you won’t be able to shop with me, but you can look for demonstrators in your area. I know they would be happy to help you!

“The Gangs All Meer” stamp set is not yet available. Watch for it in January when the new catalogues come out!

Now get Stamping!