challenge

Christmas Stars

054header

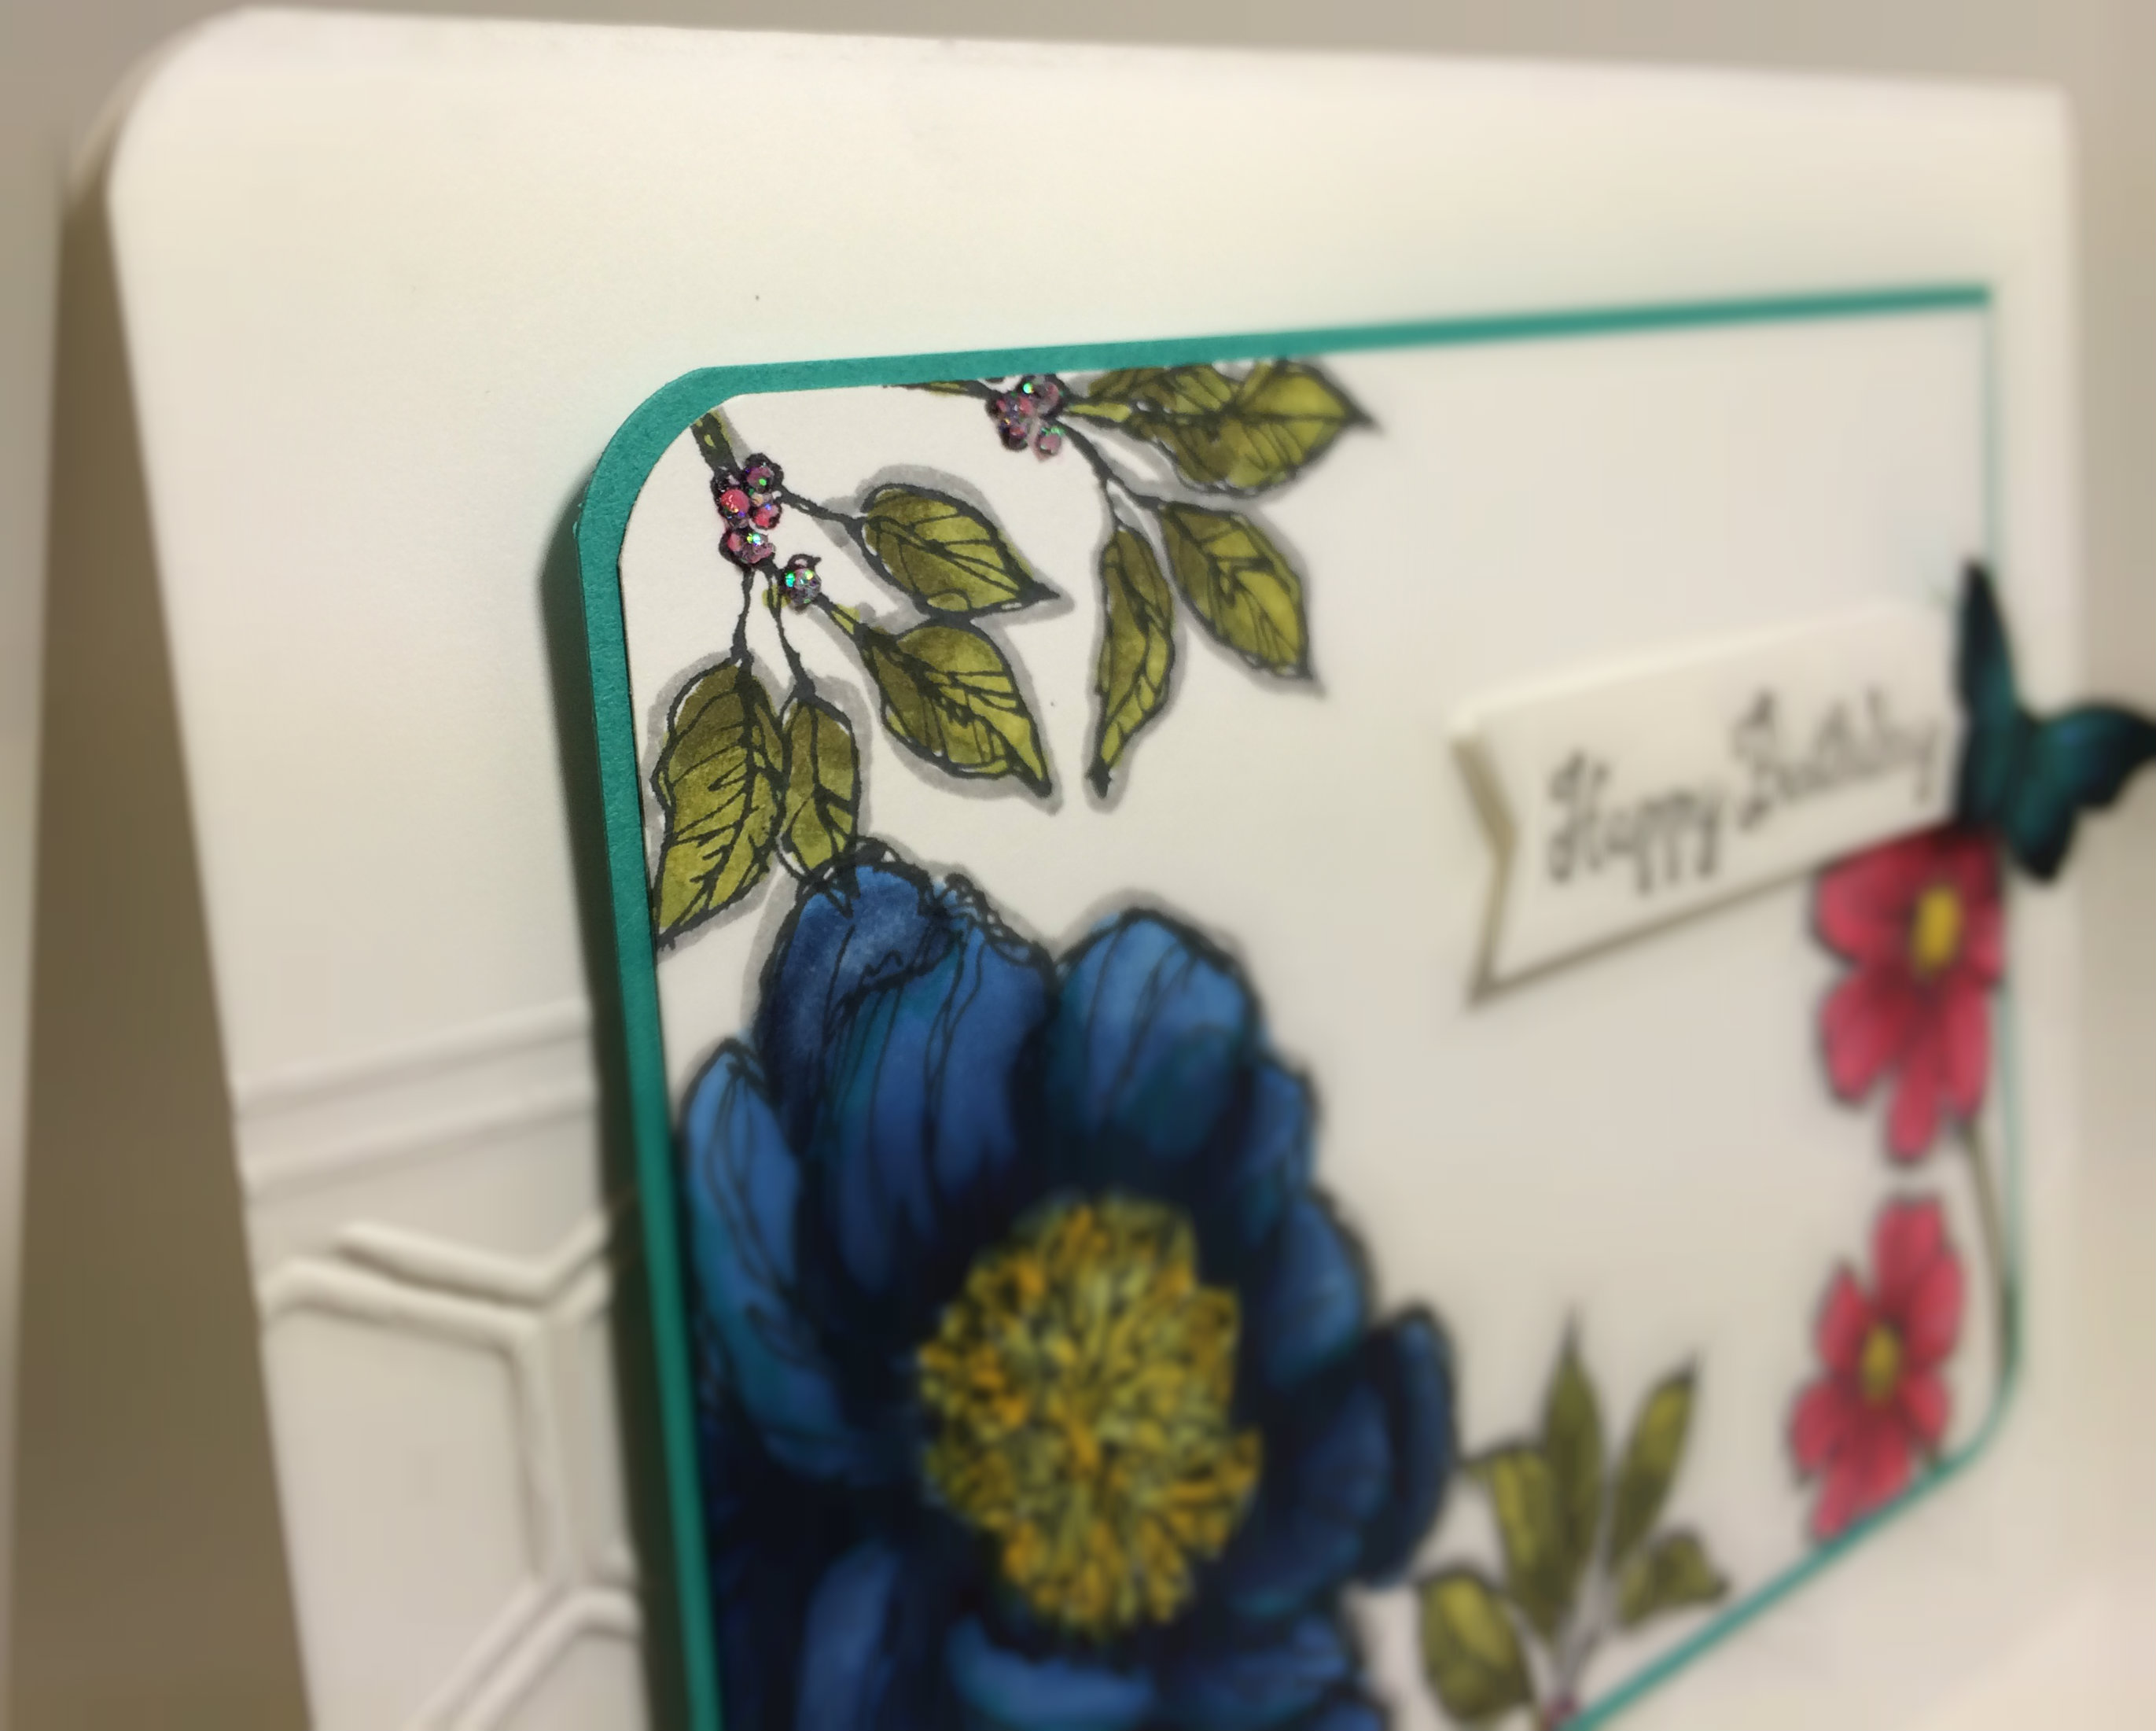
I love designing with Stampin’ Up paper, inks, stamps, and tools! Today’s card uses the Bright and Beautiful stamp set with the coordinating Stars framelits. It was inspired by a friend who just hosted her first workshop as a new demonstrator. She did great!

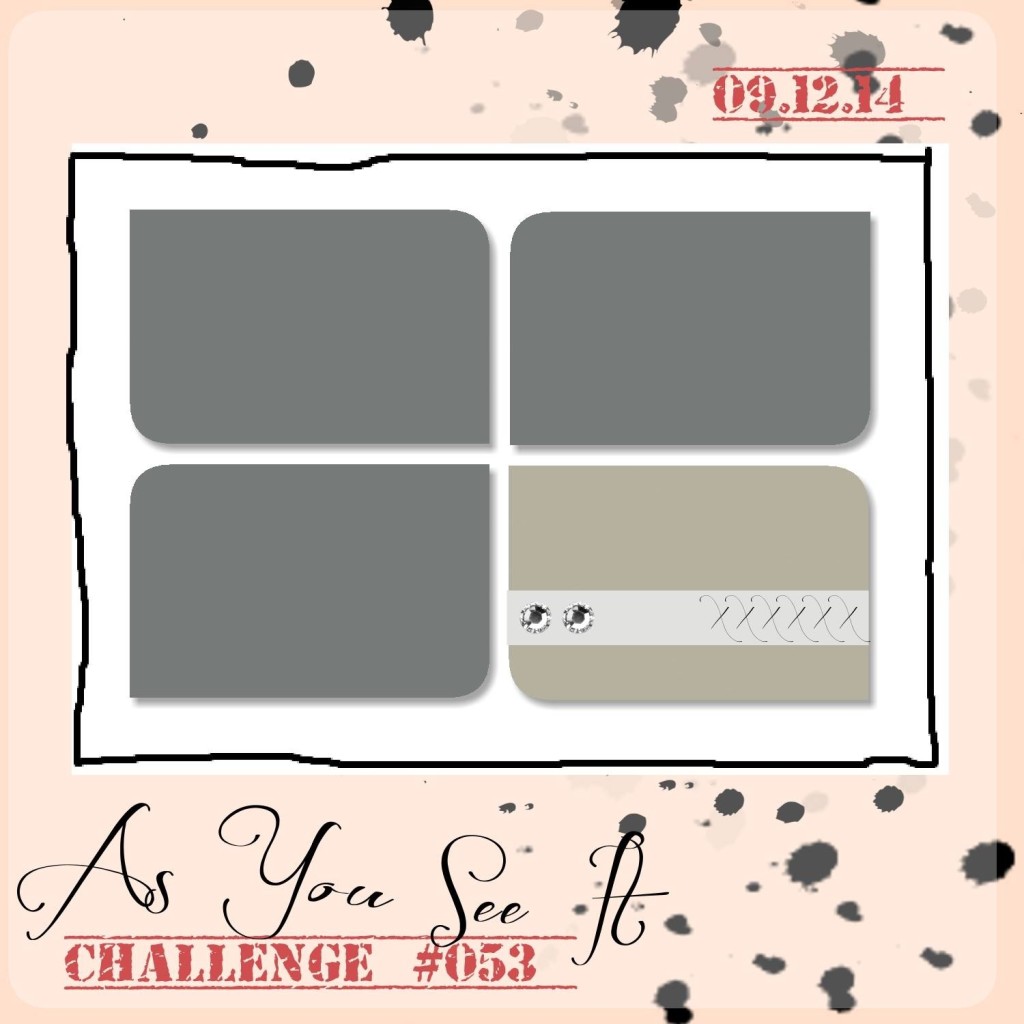
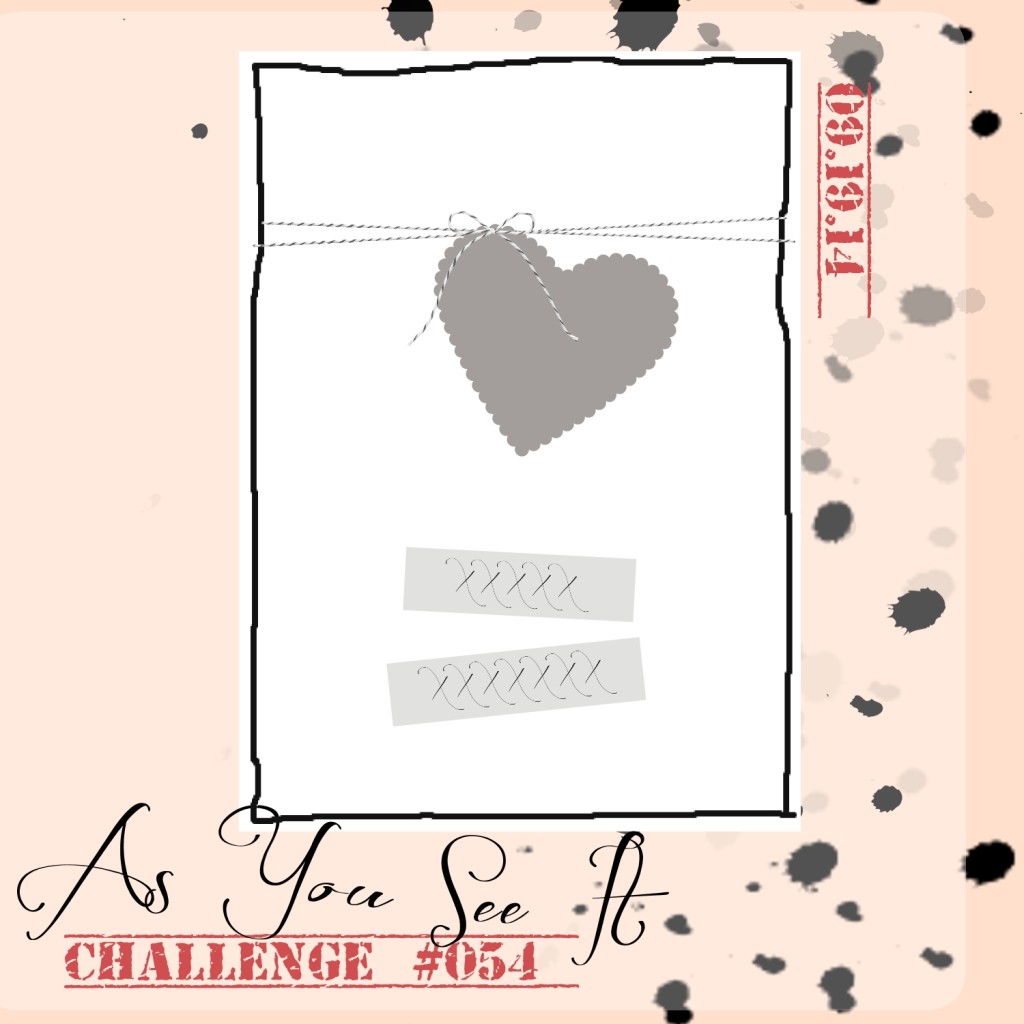
If you don’t already know this, I am a designer over at the As You See It Challenge blog and each week I get to share my As You See It card or project design with you! This week is a very cute sketch.

AYSIChallenge054I usually start thinking and planning my Christmas projects in September, so I have another Christmas card for you this week. I love that Stampin’ Up has lots of stars in their Holiday catalogue this season: Star framelits, a star punch, a star embossing folder, star masks, confetti stars border punch, star stamp sets, and star boxes (oooh, not available until October 20th)! I still haven’t used my star embossing folder, but you might see that next week.

054Amy
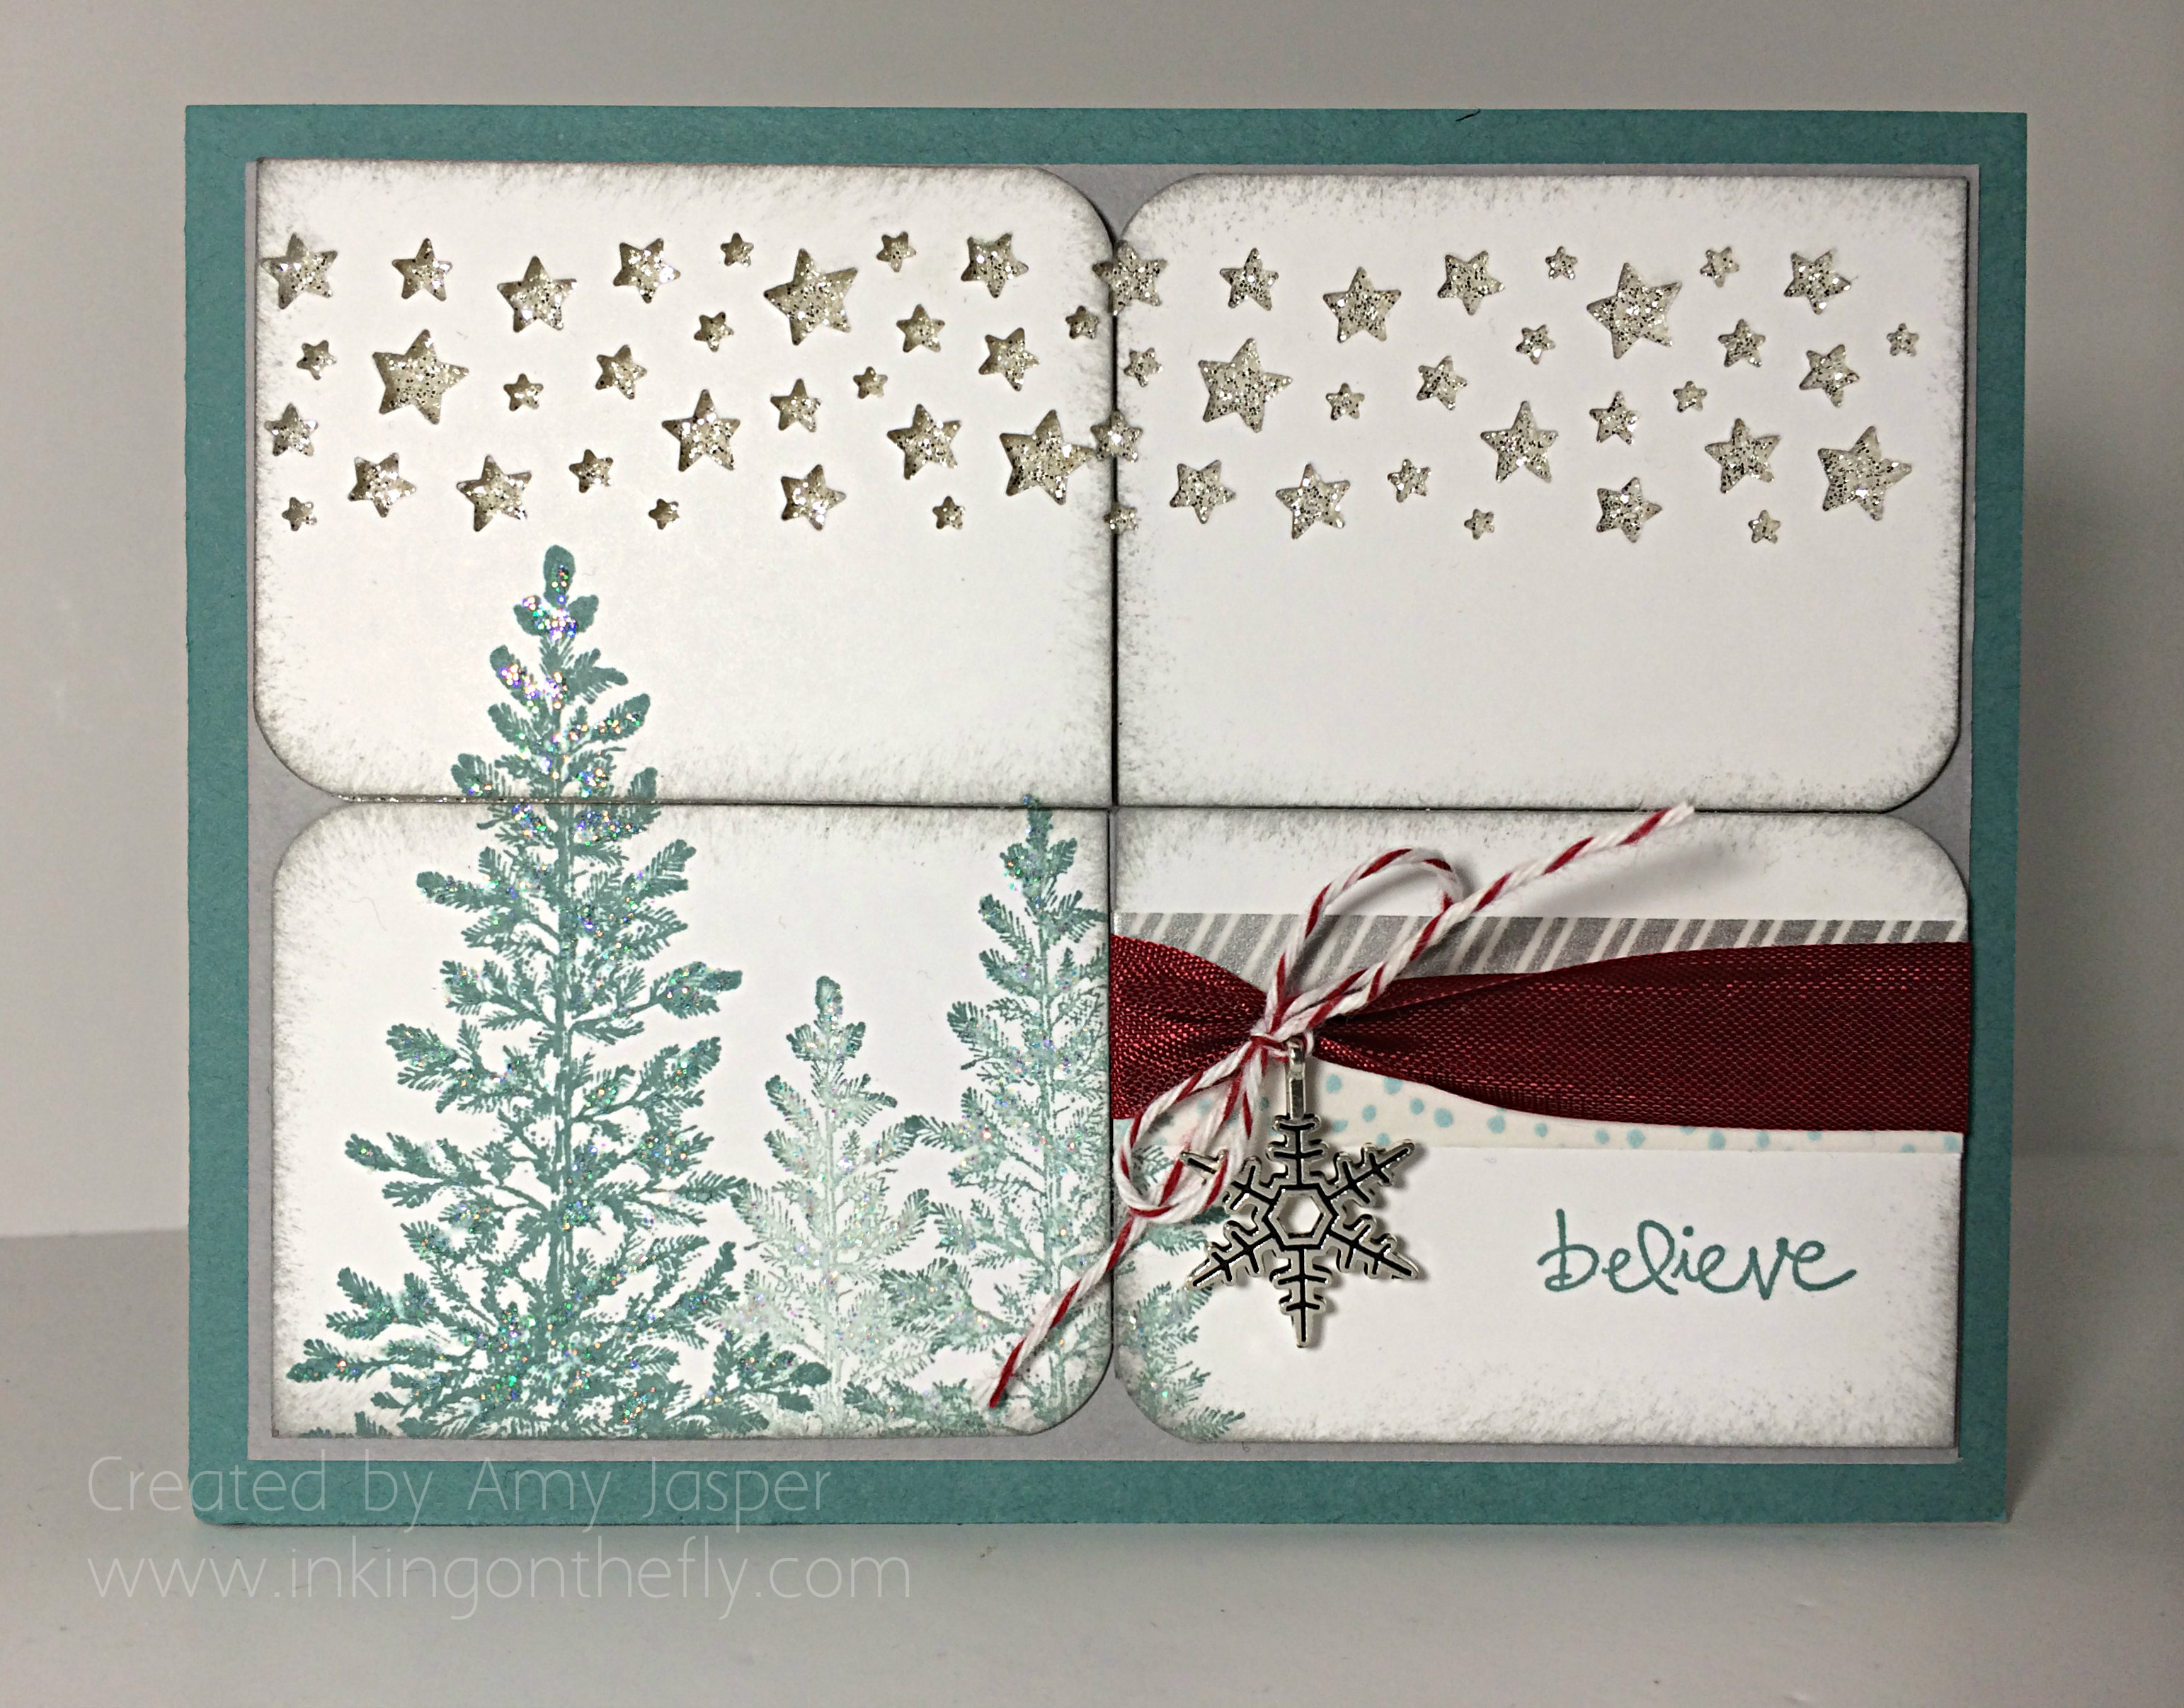
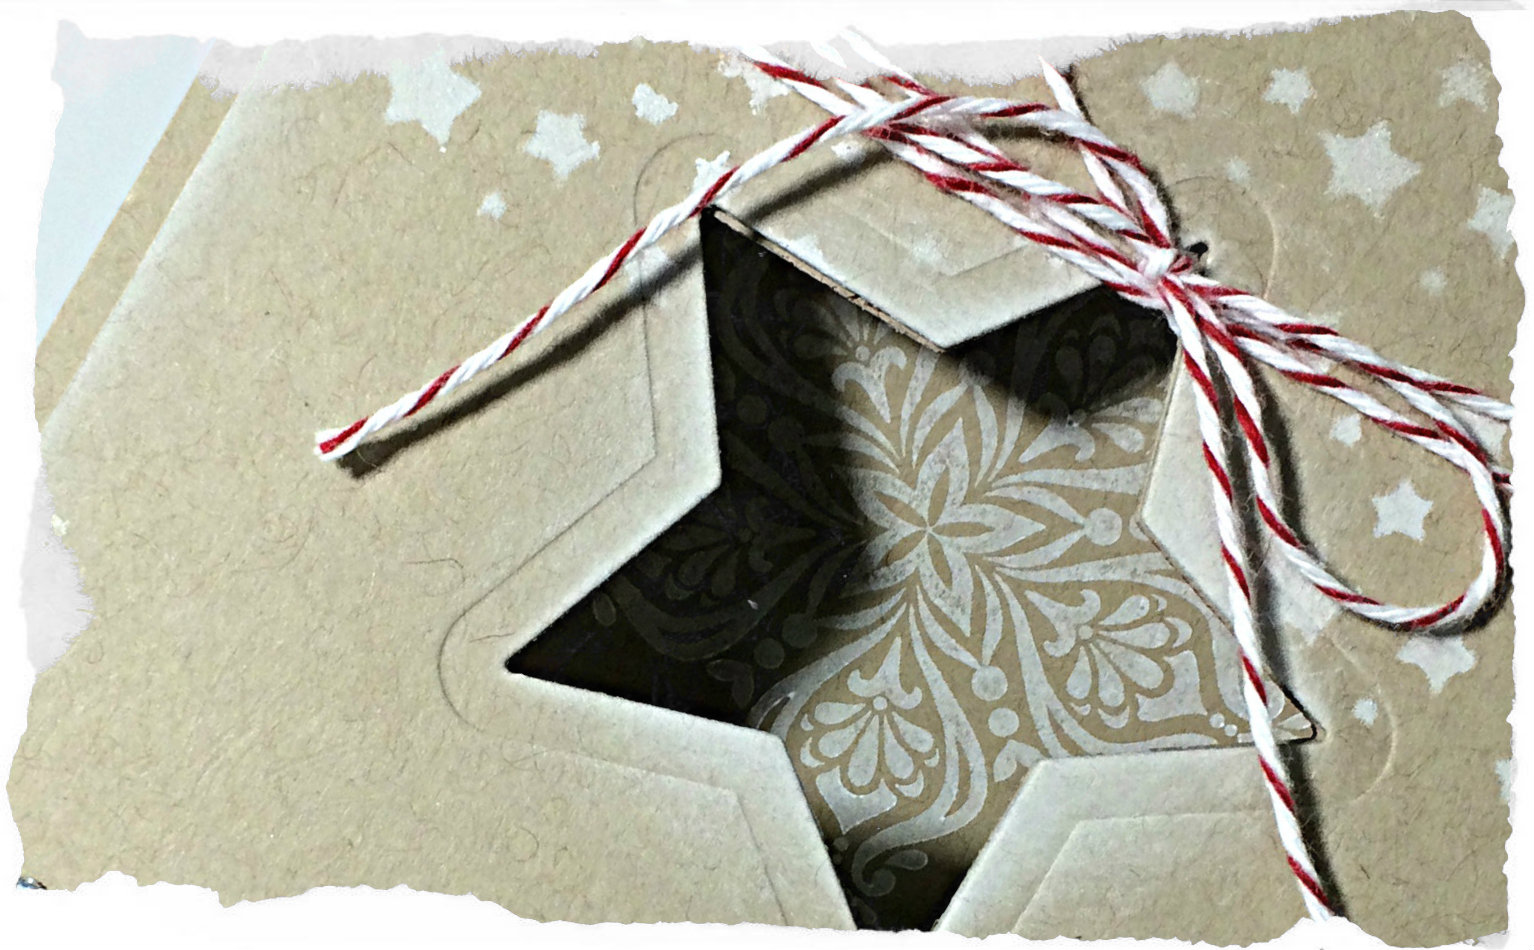
I used Crumb Cake cardstock for my card base and layered another piece of Crumb Cake over that. Before doing anything, I used a star framelit to cut out the star from BOTH layers for the front of the card. That way, when I completed my stamping and embellishments, I could have that peak-a-boo hole line up with the card base. I did that by leaving the card base layer open (not folded as I don’t want to cut through the back of the card, too!).

I stamped the medium-sized star from the Bright and Beautiful stamp set on the inside of the card using Whisper White craft ink so that it would line up with my star cut out on the front of the card. I made a few pencil marks through the star opening as a guide for where I wanted my stamp to be placed.

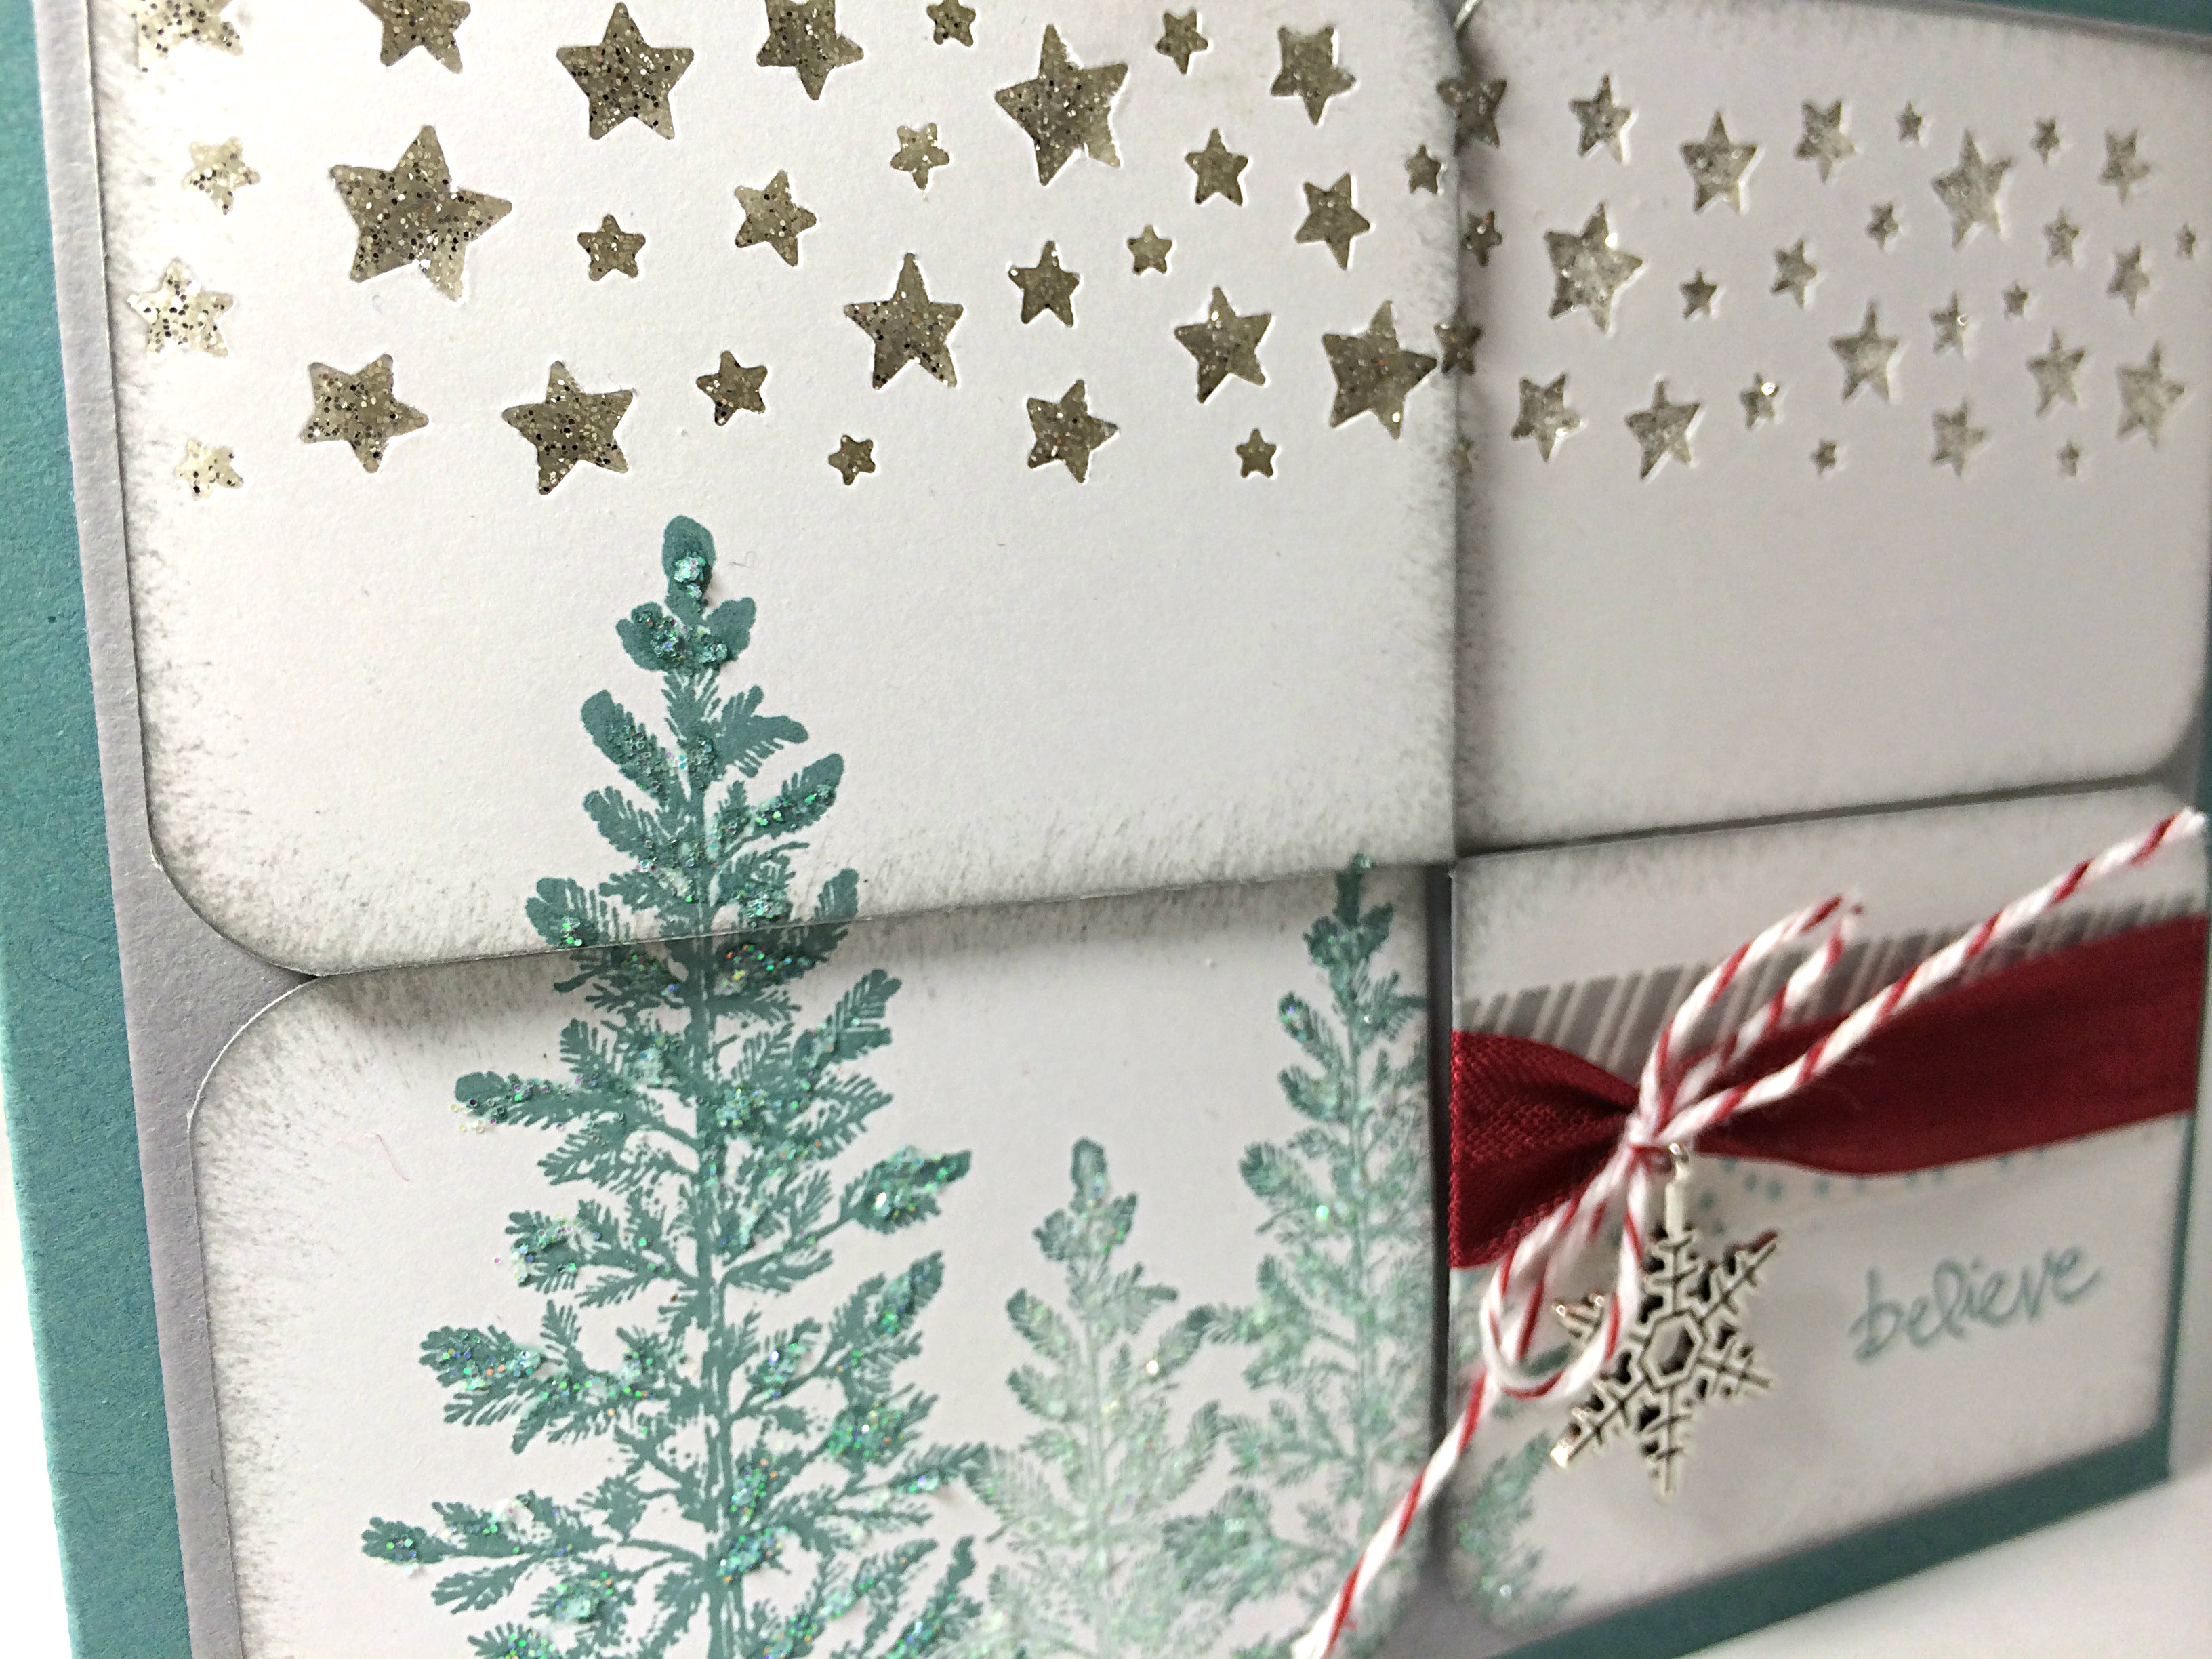
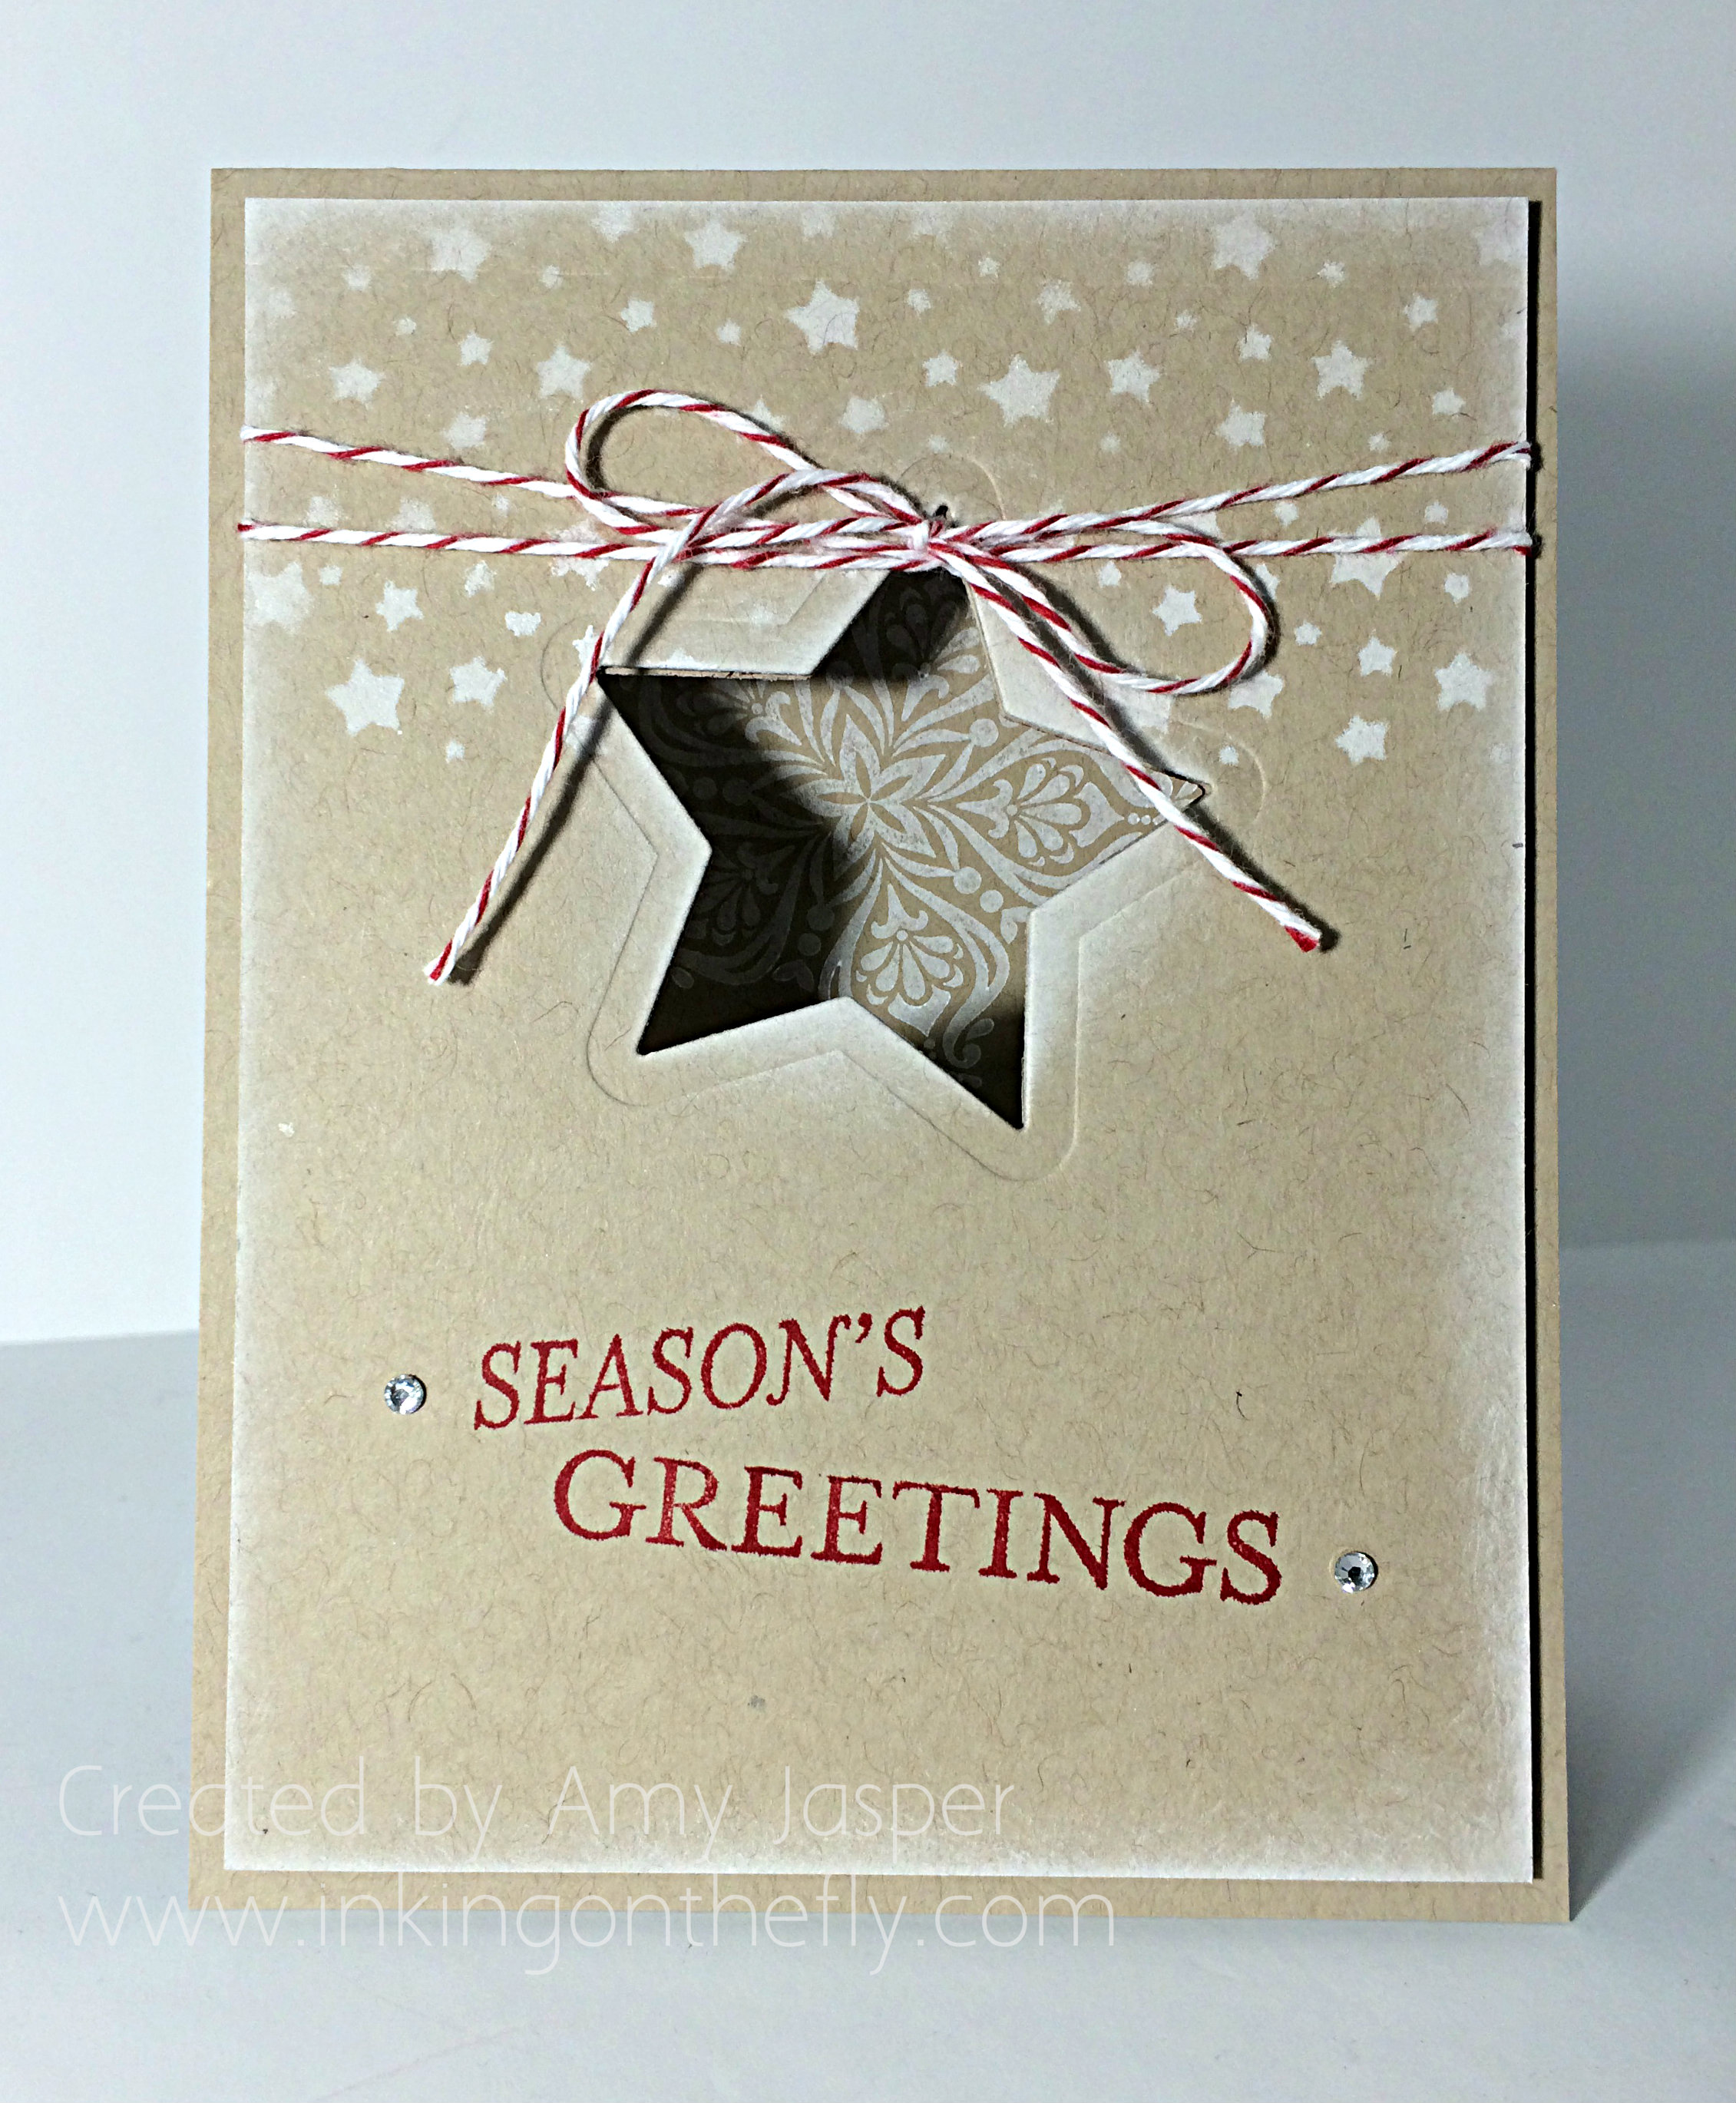
I sponged Whisper White Craft ink all around the edge of my front layer and around the star opening. Then I used my Confetti Stars Punch on a separate piece of cardstock to use as a mask and sponged through the mask on my Crumb Cake cardstock to place the adorable little stars on my card. I love them!

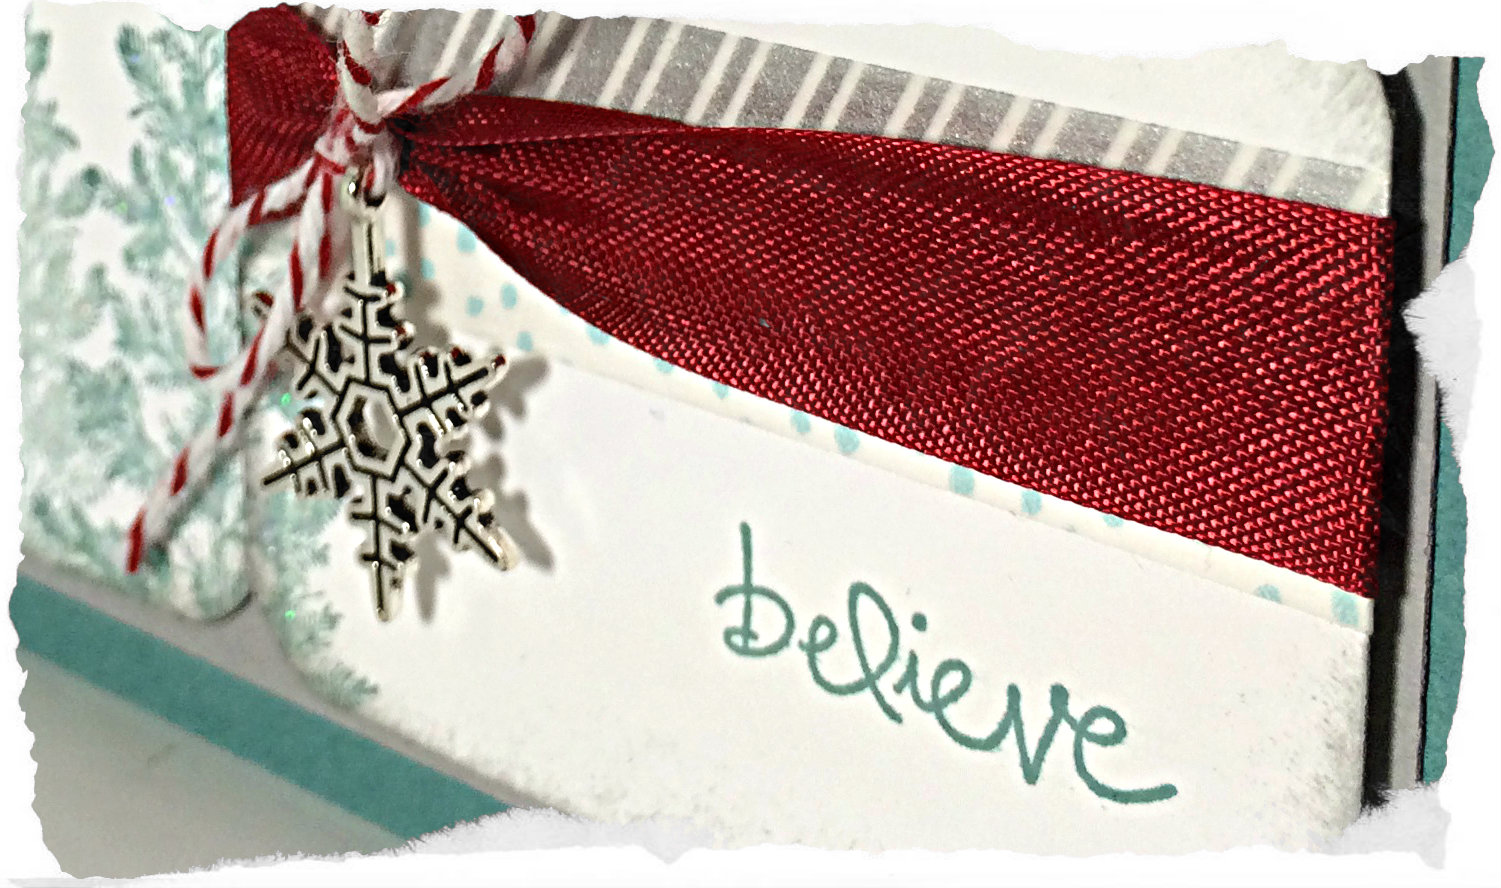
Next step, I added my Cherry Cobbler baker’s twine by wrapping it around the Crumb Cake layer two times so that the ends were at the BACK side of the star opening. I then pulled the ends through the star to the front so that when I tied the first knot, it tied around the twine with the bow holding it all together at the top of the star. I hope that makes sense, lol! I did it that way so that the twine would stay right at the top point of my star.

Finally, I used the Season’s Greeting stamp twice on the card front to toggle each word and fit the sketch a bit more. I used masking tape to cover one word while I inked up the other, then removed the tape before I stamped, so that I could place each word separately with the Real Red ink.

054fromtheside

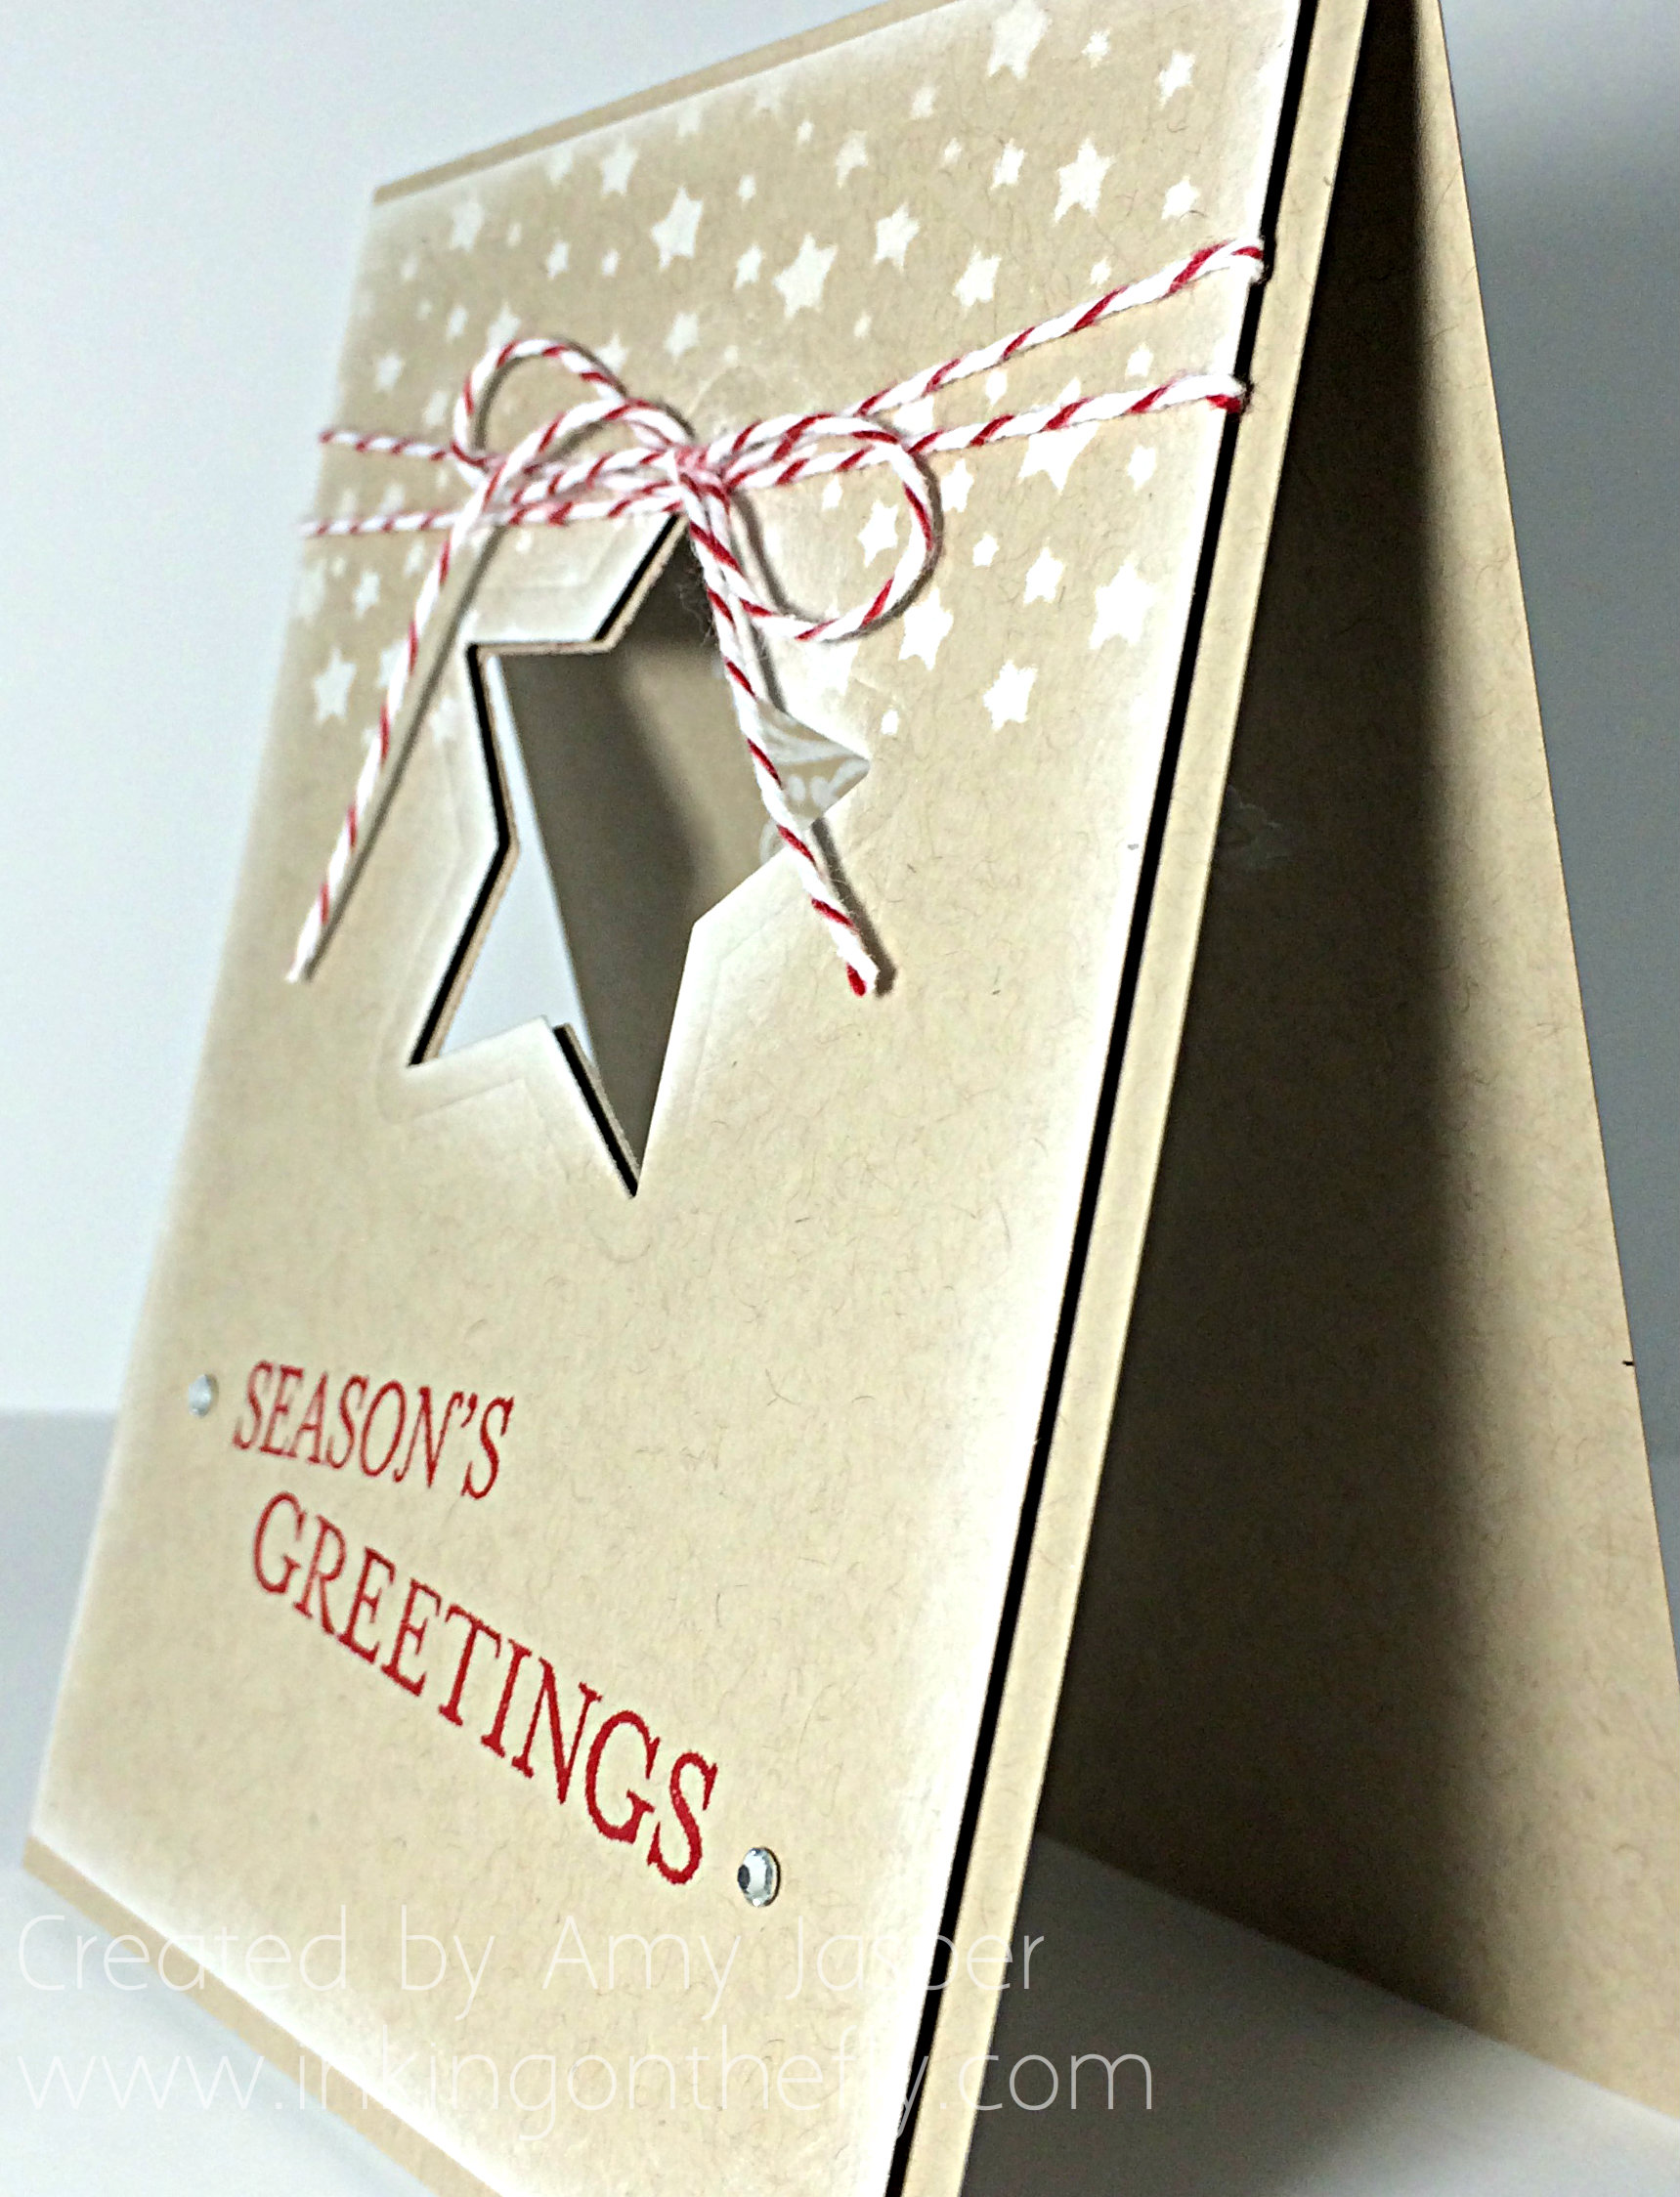
The Rhinestones add a finishing touch to the toggled greetings. I also used Stampin’ Up Dimensionals to pop up the top layer of the card to add further interest. Have I ever told you how I love using Dimensionals, lol!

I hope you’ll try the sketch this week and put your own creative spin on it! Don’t forget to link it up at the challenge blog and play along!

Amy

Designer-Badge


Lovely As A Tree Christmas

053headerI’m so glad you stopped by to check out my latest design for the As You See It Challenge Blog! Stampin’ Up makes designing easy and fun with their inks, stamps, paper, and tools. This week’s card was created for my Monthly Stampers Group.

I’m afraid my post will be short and sweet today. I’m writing this at 11PM on Thursday and am exhausted after a busy week. I hope you’ll be able to figure out the details of the design if my explanation is too brief! Just ask any questions you may have in the ‘reply’ section and I can give you more info if you need it.

Here’s the sketch challenge that I was working with:

075And here’s my Lovely As a Tree Christmas card:

053AmyColours include Lost Lagoon, Smoky Slate, Cherry Cobbler, and Silver Glimmer Paper. I used the Confetti Stars punch to show my Silver Glimmer paper. The sentiment is from the beautiful hostess exclusive set that is available with a minimum party total for FREE this month! It’s not too late to book your party!

053dimensionClose up shows off the Dazzling Details and the use of Stampin’ Up! Dimensionals to pop out the first and last panels. See that Washi Tape behind the ribbon? It’s from a beautiful selection of 5 rolls called All is Calm. And I LOVE the All is Calm Snowflake charm. So fun!

Don’t forget to play along at the As You See it Challenge Blog with this super cute sketch challenge!

Amy

Designer-Badge

A Trip Around the Sun

052headerI’m excited to share with you my love of designing using Stampin’ Up stamps, paper, ink, and tools! I love playing with the Blendabilities and wish they were available in EVERY colour! Alas, I had to use my Classic Ink and a blender pen for some of this project. Colouring is therapeutic, though, no matter what tools you use!

I decided to combine the As You See It cqc257Challenge with another challenge this week. I loved the colours for Colour Q #257, so I thought I’d play along.

I sure do miss Lucky Limeade. It was my favourite green while it was available. Sadly, it has retired, so I used Old Olive instead.

As You See It Challenge #52 is a theme challenge!! You can use any colour you want, you can choose any layout you want, and you can make anything you want! Maybe use paper though, lol!


#52

Can you believe that the challenge blog has survived an entire trip around the sun?!! 52 weeks of challenges. One whole year of fun! YOWZAUZ!!

(that’s how you say “yowzers” with a poor British accent, in case you’re wondering, lol!)

I have to admit, I was not feeling the creative mojo for this challenge. I just couldn’t get started! I wanted to try to keep it simple, as everything seemed like too much effort. But one stamp on a single layer of paper was not going to get me by, lol! So I started with my colours and a stamp.

It’s funny how you can’t get going until you get started. After a couple of false starts, I was able to get into a groove and ended up with a decent card (actually, I quite like it!). Can I just say, as a reminder to myself, that this process isn’t unlike exercise. How often do you just not feel motivated to get going for a walk, or jog, or whatever. But if you get your running shoes on and get out the door, you find it’s not so bad after all and you actually feel pretty good about yourself once you’re done.

sigh.

guess I’ll strap on my shoes and get out the door tomorrow morning. Time to “just do it”.

052Amy

The one thing that I don’t like all that much with this card is the outlining that I did around the images with a Smoky Slate marker. In hindsight, I should have had a much lighter hand, or I should have used Sahara Sand for the shading. Not terrible, but something to remember for next time.

I used the Night of Navy Blendabilities for the large flower of the Bloom with Hope stamp set. I added some subtle touches of Bermuda Bay Stampin’ Write marker over top in some areas as well. The centre of the flower is mostly Old Olive, but it needed some highlights of Daffodil Delight in there as well. I used the Old Olive Blendabilities for the leaves, and painted the daisies with a Blender Pen and Strawberry Slush ink as there are no Strawberry Slush coloured Blendabilities.

The butterfly is stamped with Stazon Black ink on Bermuda Bay cardstock, punched out with the small butterfly punch, then sponged along the edges with Night of Navy ink. I added a bit of sparkle to that little guy as well. Just globbed on a small bit of Dazzling Details and smudged it around with my fingertip. There’s some glitter on the berries that you may be able to see in the photo below. No smudging for them, just a little dollop for each berry.

052dazzlingdetails

The sentiment from the Bloom with Hope stamp set is stamped on the strip of Whisper White cardstock with Jet Black Stazon ink and I flagged the end of the strip of paper by using my Banner punch.

My center piece of Whisper White cardstock has the opposing corners rounded by using the corner punch on my Envelope Punch Board, as does the matting Bermuda Bay piece of cardstock. These are attached to the card base with Dimensionals for added interest. The card base was embossed only 2/3 of the way up the card front using the Honeycomb embossing folder. I then used my Simply Scored tool to score two lines above the embossed area just to give it a defined edge.

I also used the Envelope Punch Board to round the corners on the card base so it would coordinate with the centre pieces.

I’m so glad you stopped by today to see what I’ve been up to. Why don’t you give the challenges a try? Click on the images above and they will take you to the websites. Make your project and link it up to inspire others with your take on those challenges. I can’t wait to see what you come up with!

Amy.

Designer-Badge