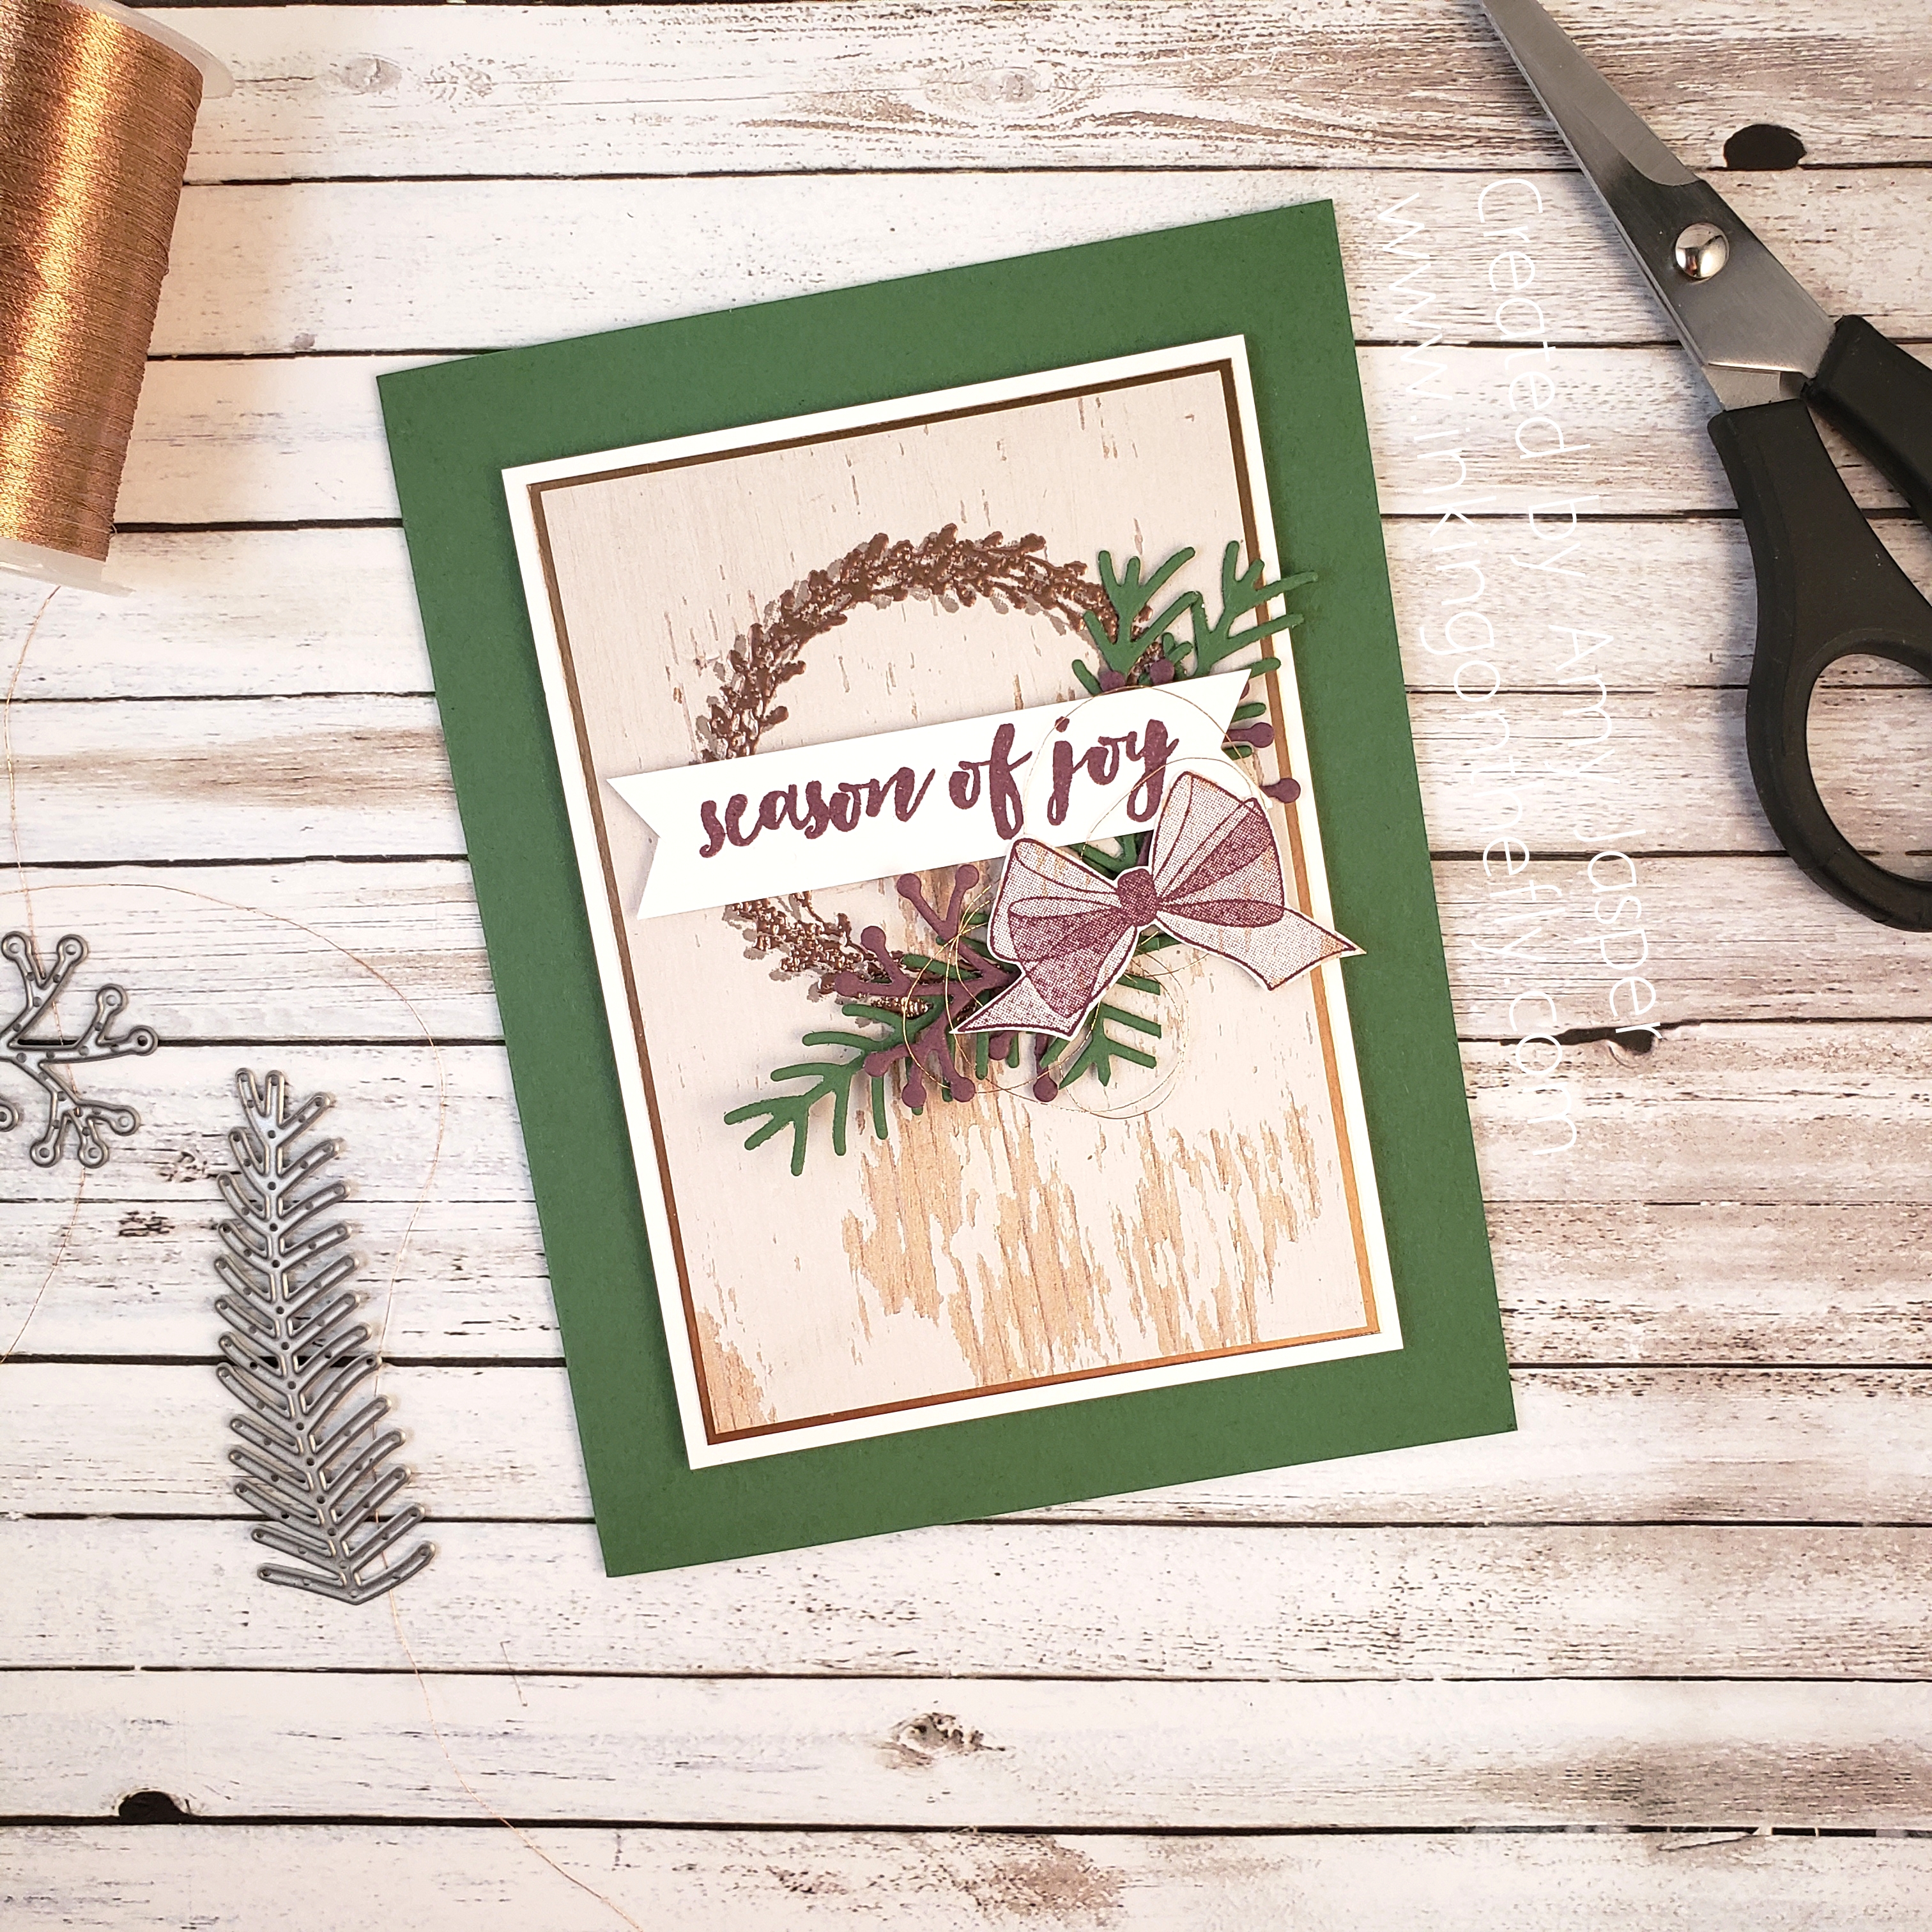
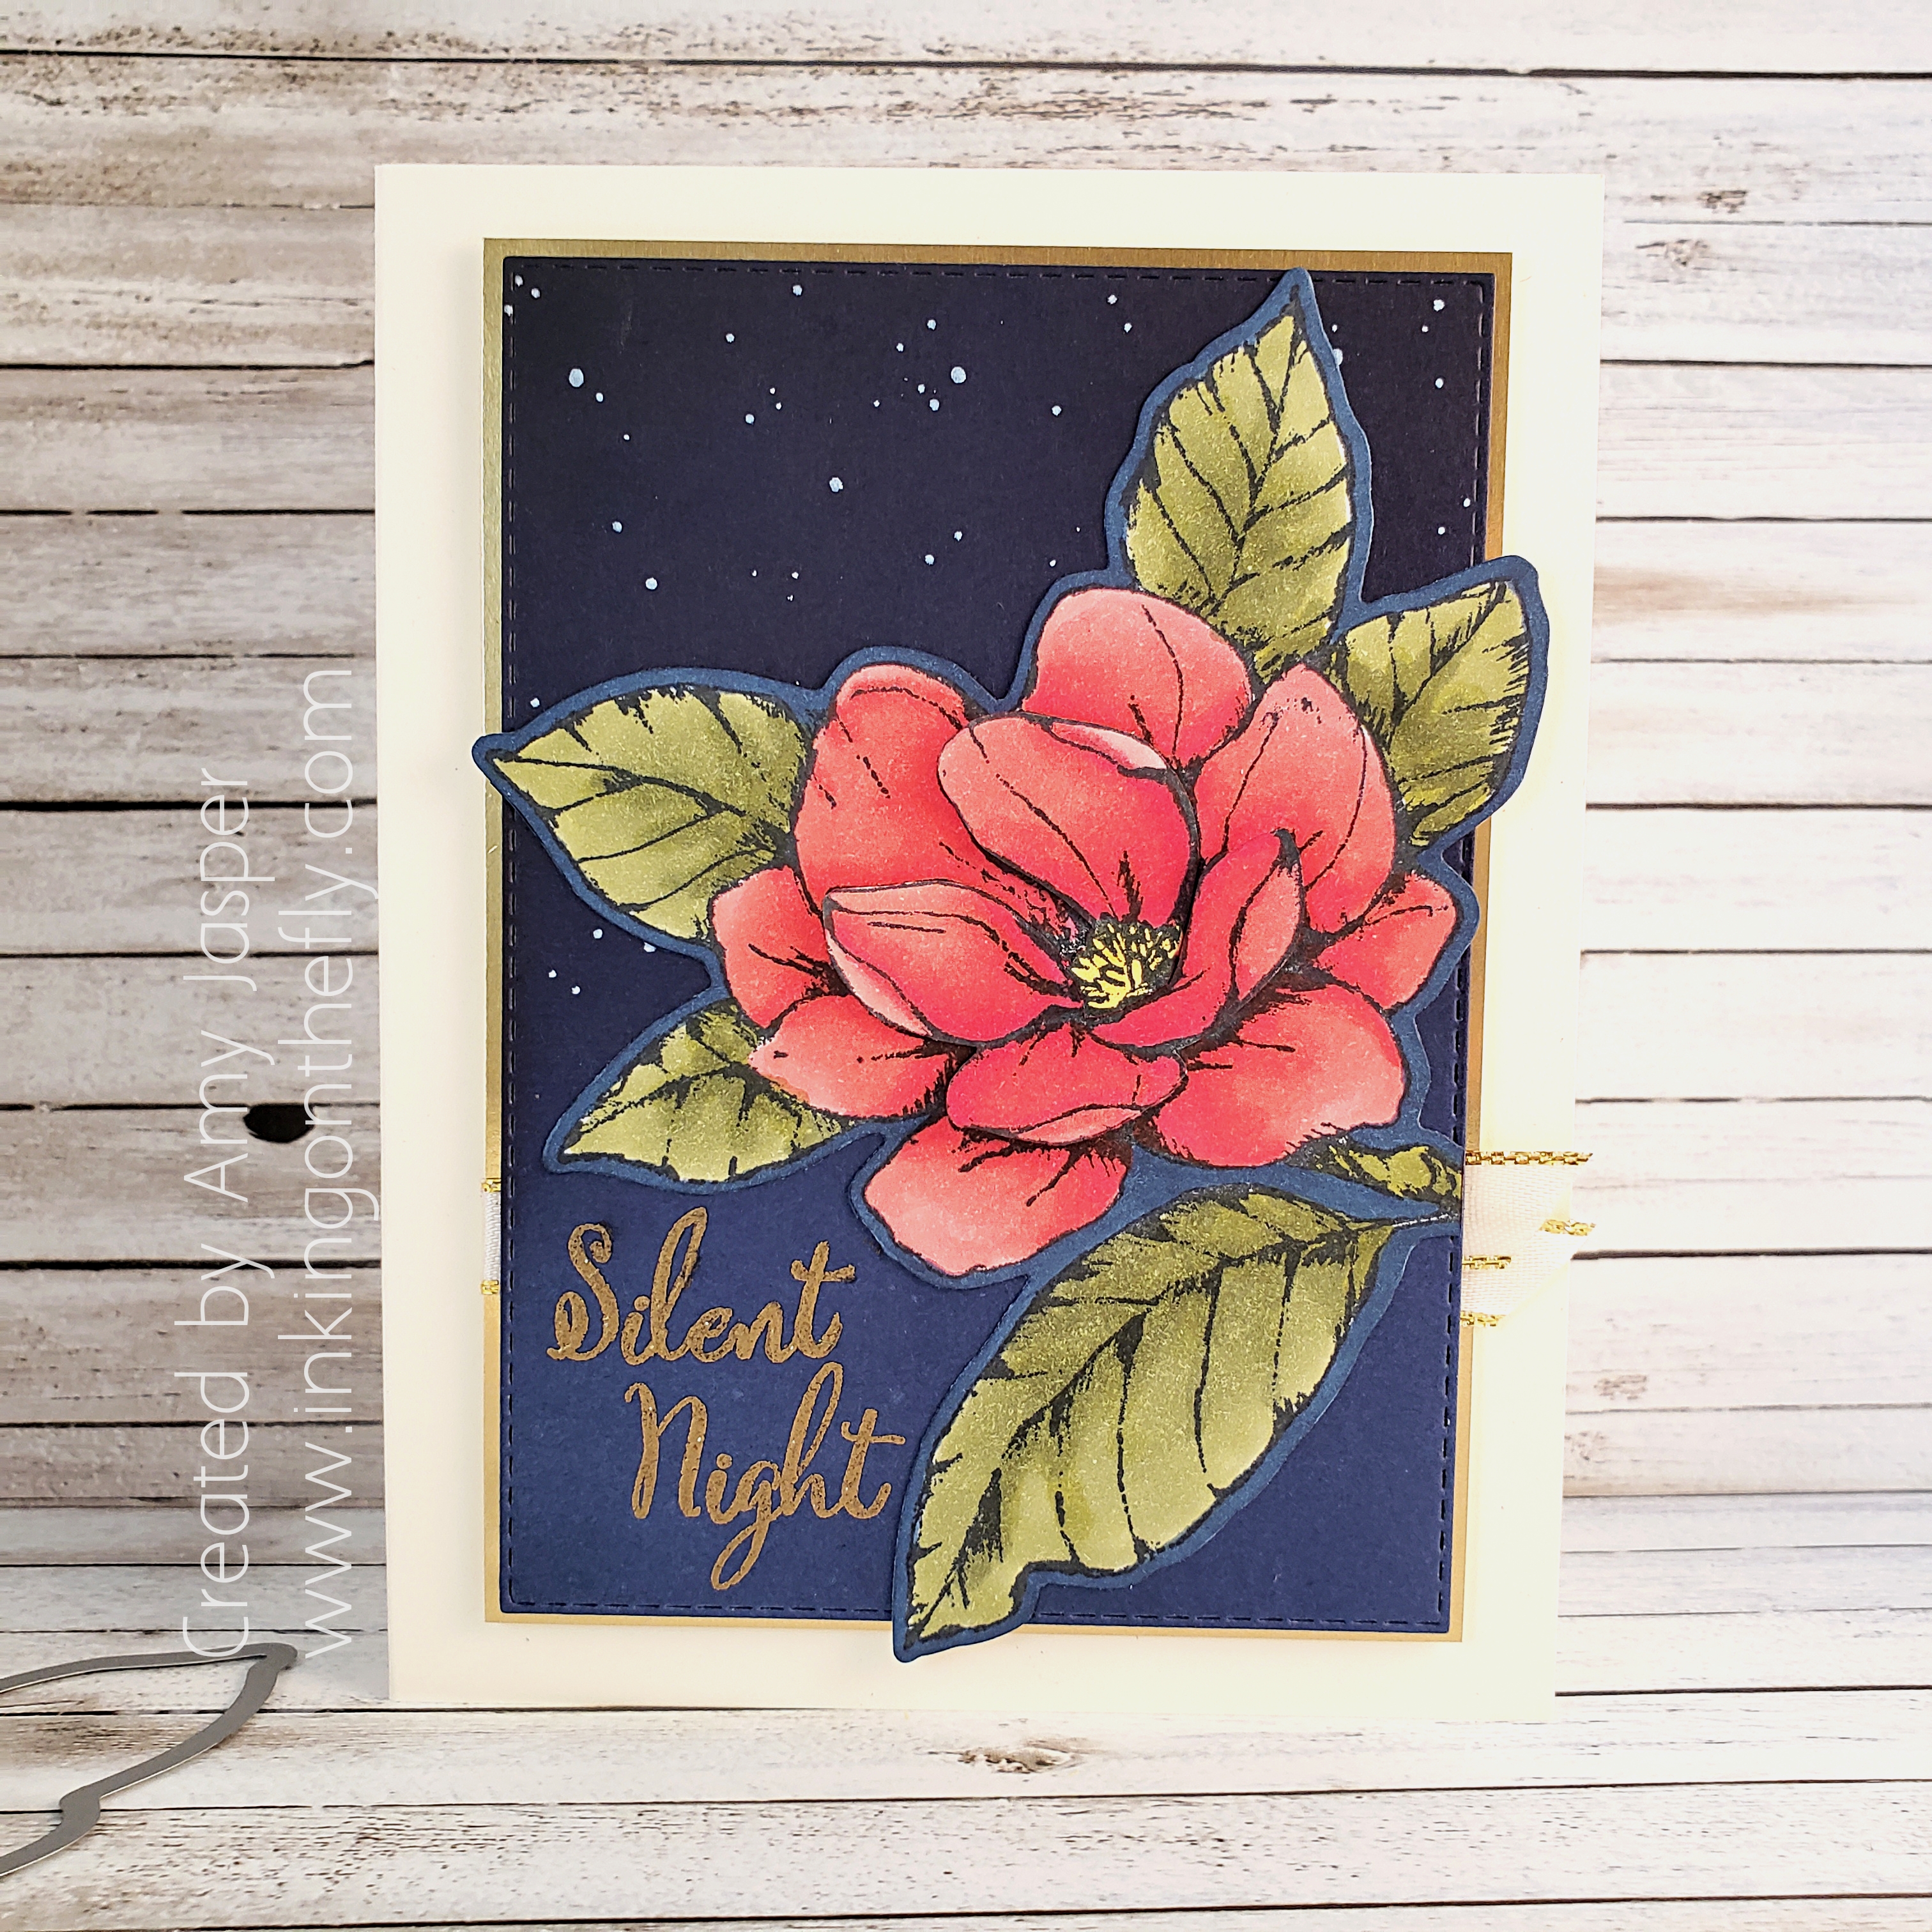
Christmas

Christmas in July

I just can’t get enough of the Good Morning Magnolia stamp set!

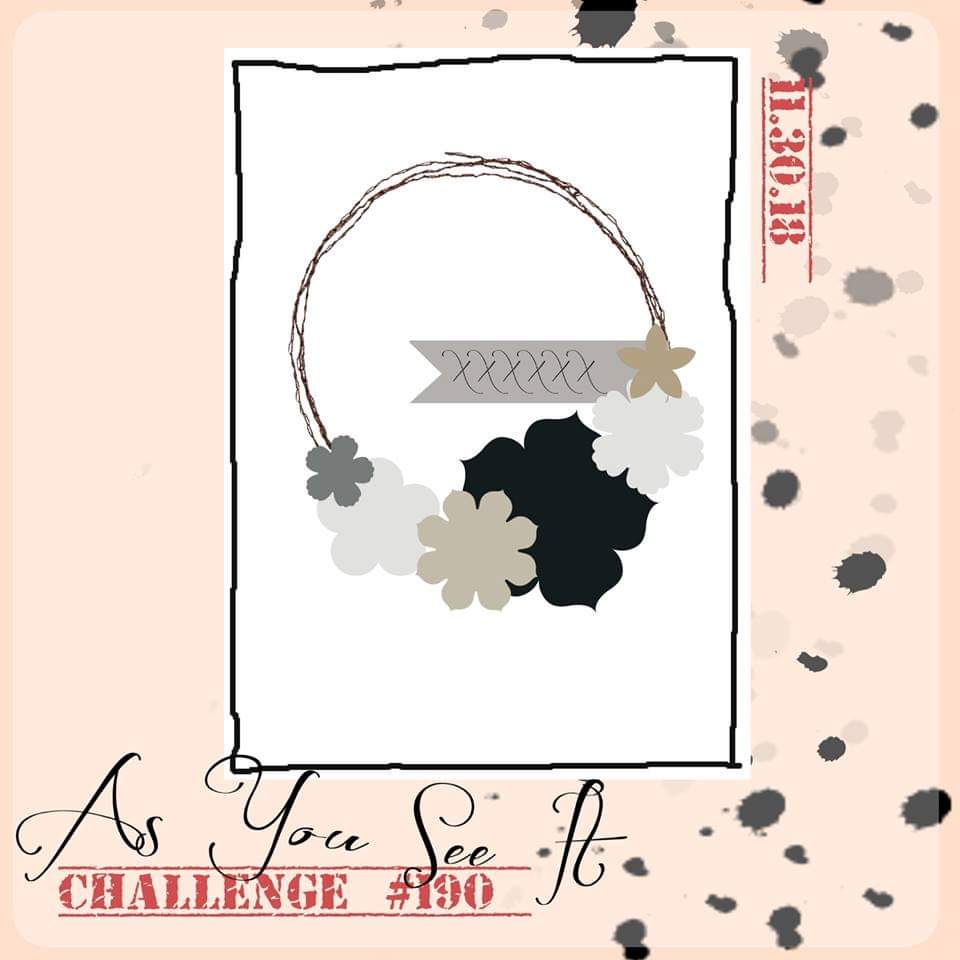
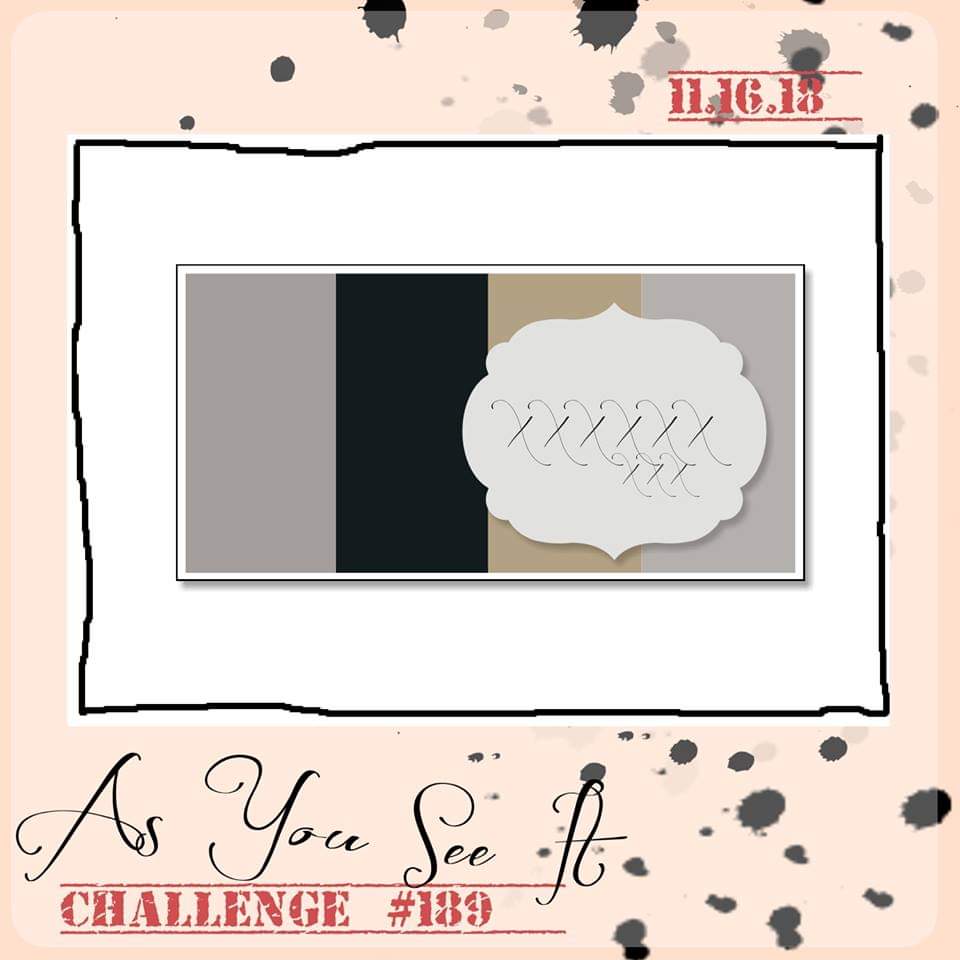
The As You See it Challenge this week is what we call an assortment challenge. You have to include all of the listed elements on your card design.

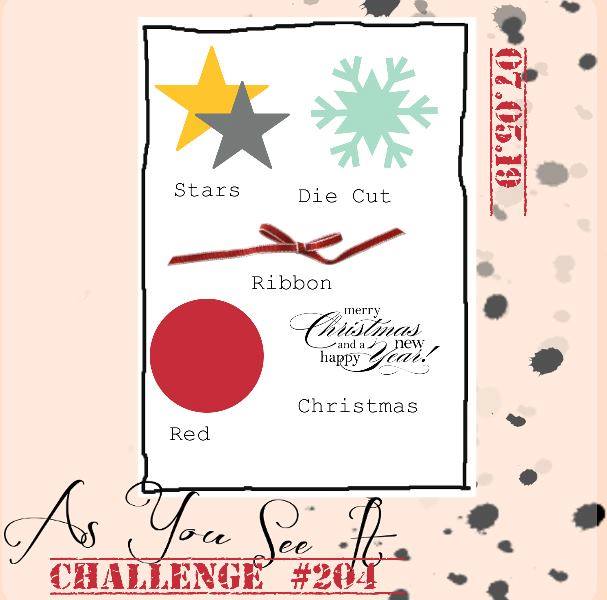
I wasn’t sure how to pull this one off as I like to use current Stampin’ Up! product for the cards I post on my blog and I didn’t have ANY stars!! Not a single current stamp set or die cut with a star. I’m a little bit shocked at this finding. It appears that I need to make a purchase, lol!

Since I didn’t have stars, I remembered a technique using the Chalk Marker to dot the background to look like stars in the night sky. That was the beginning of this card.

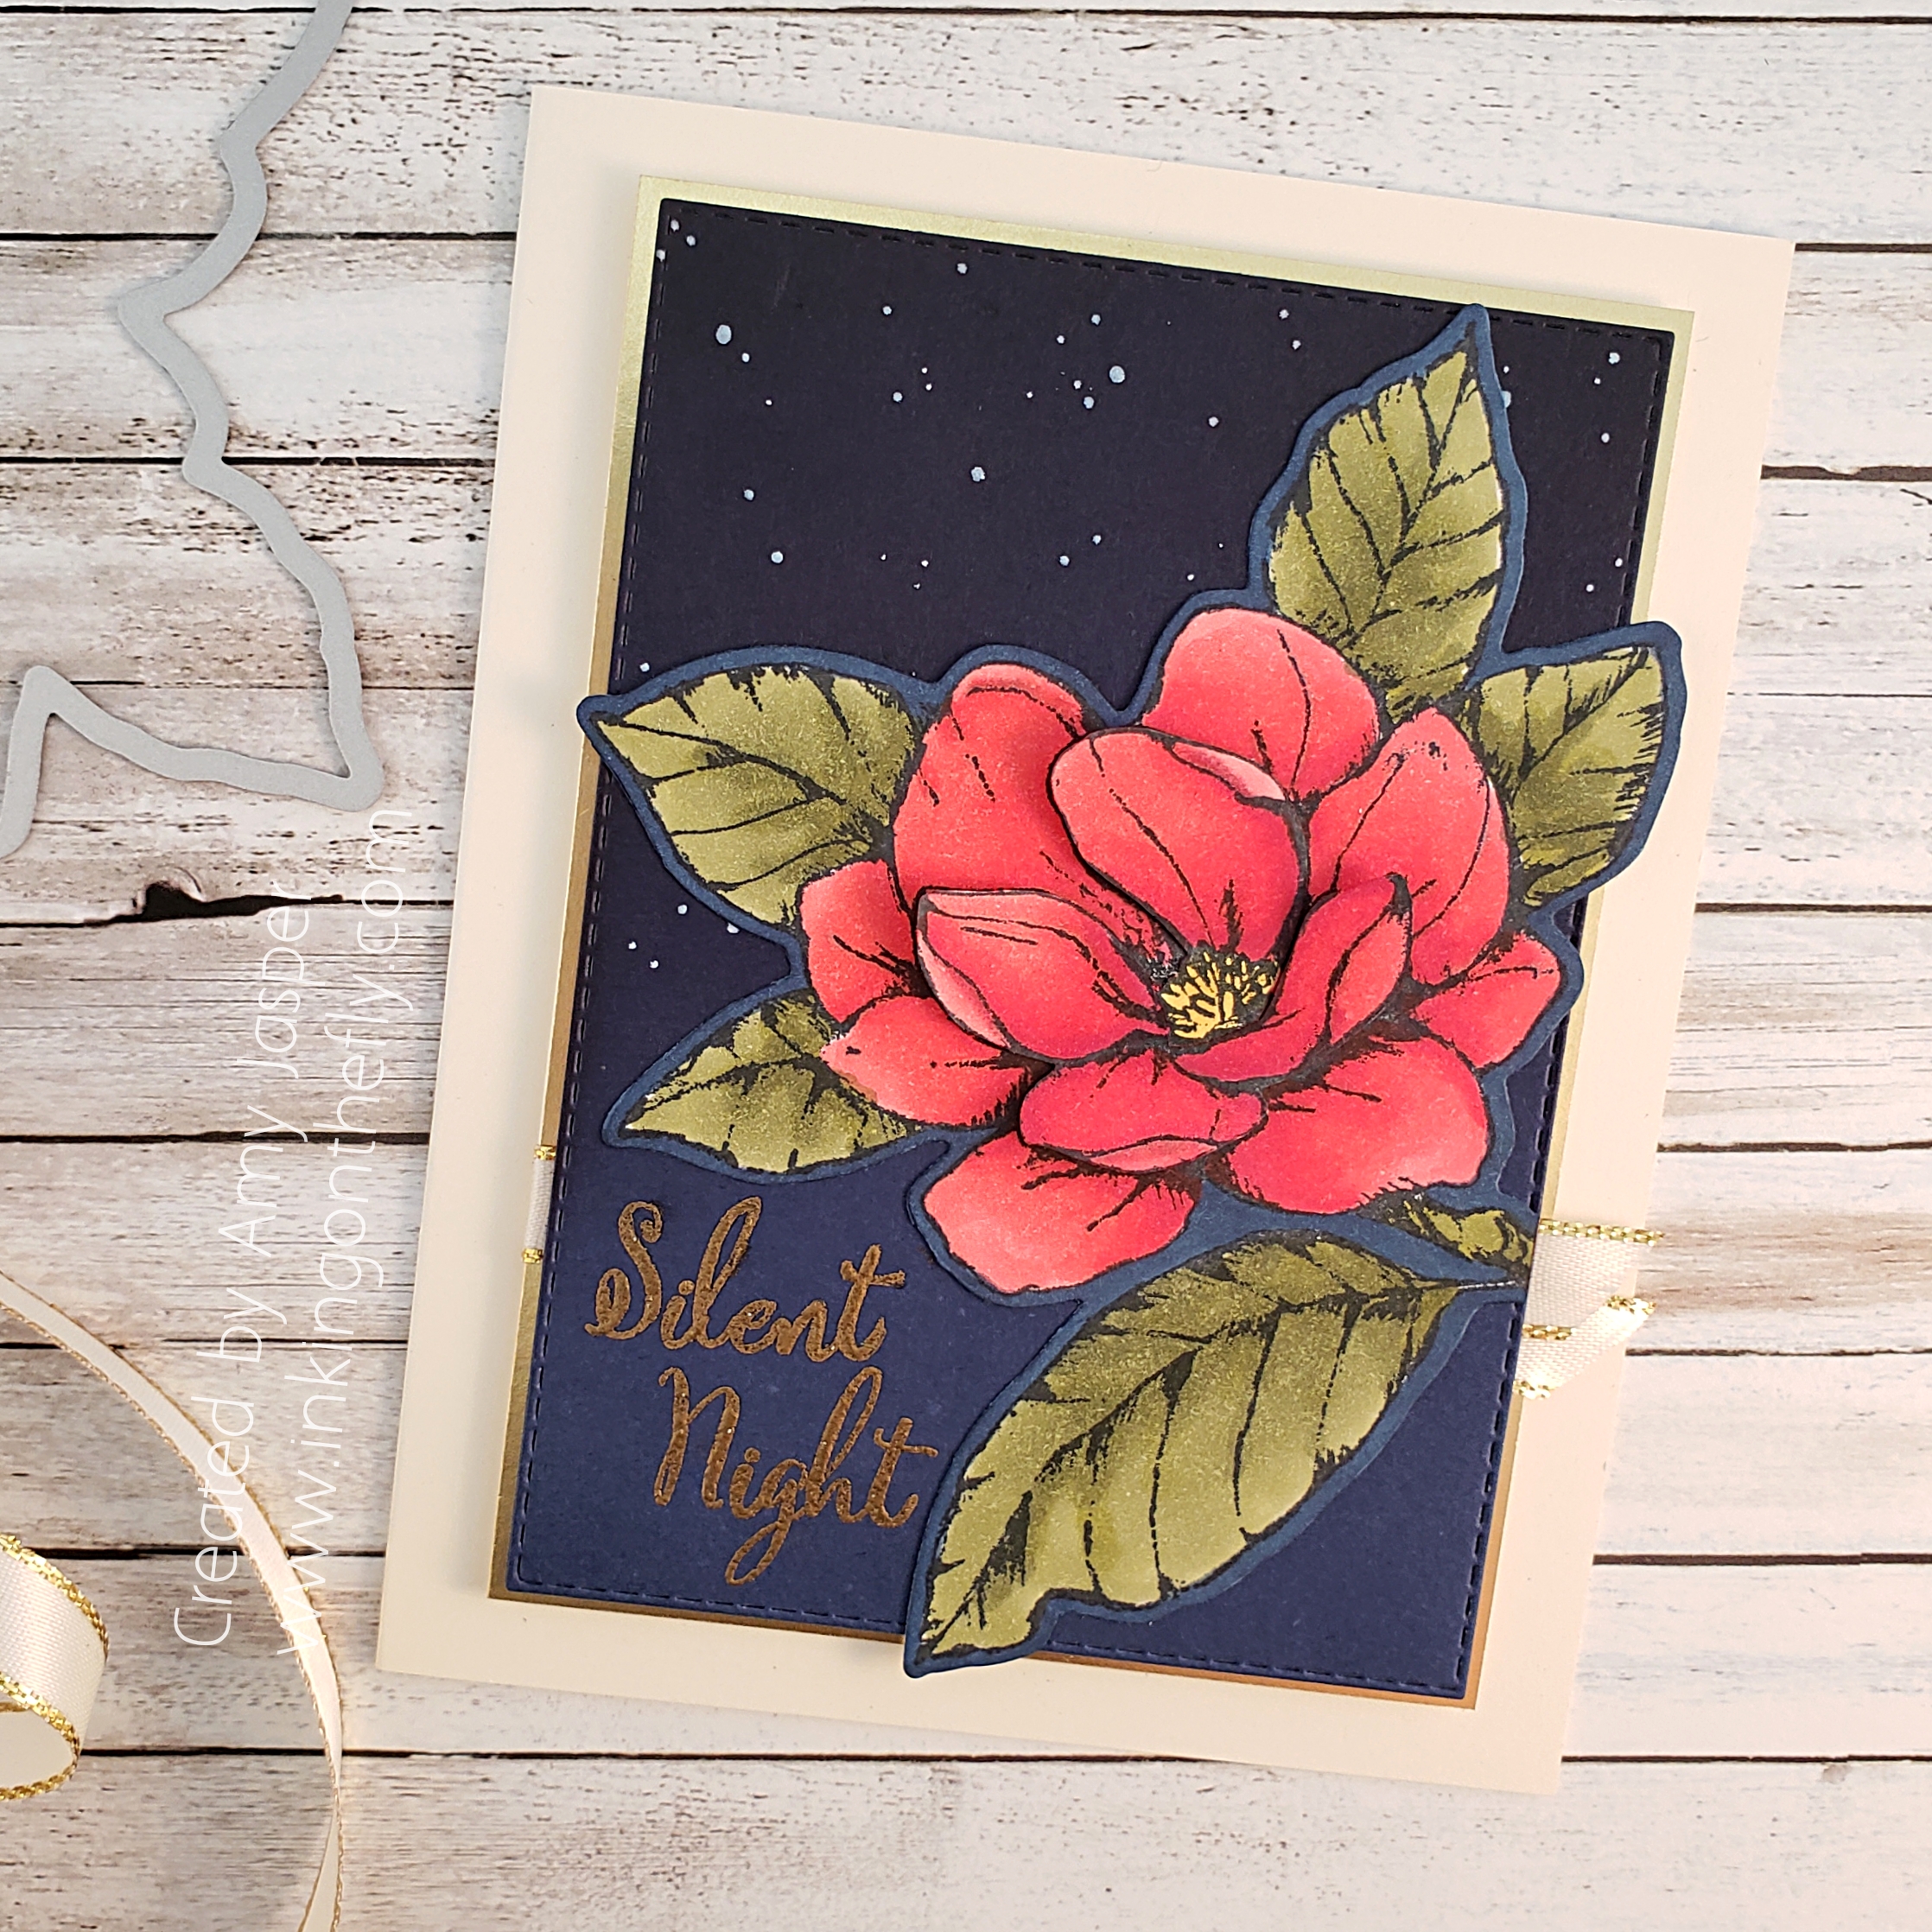
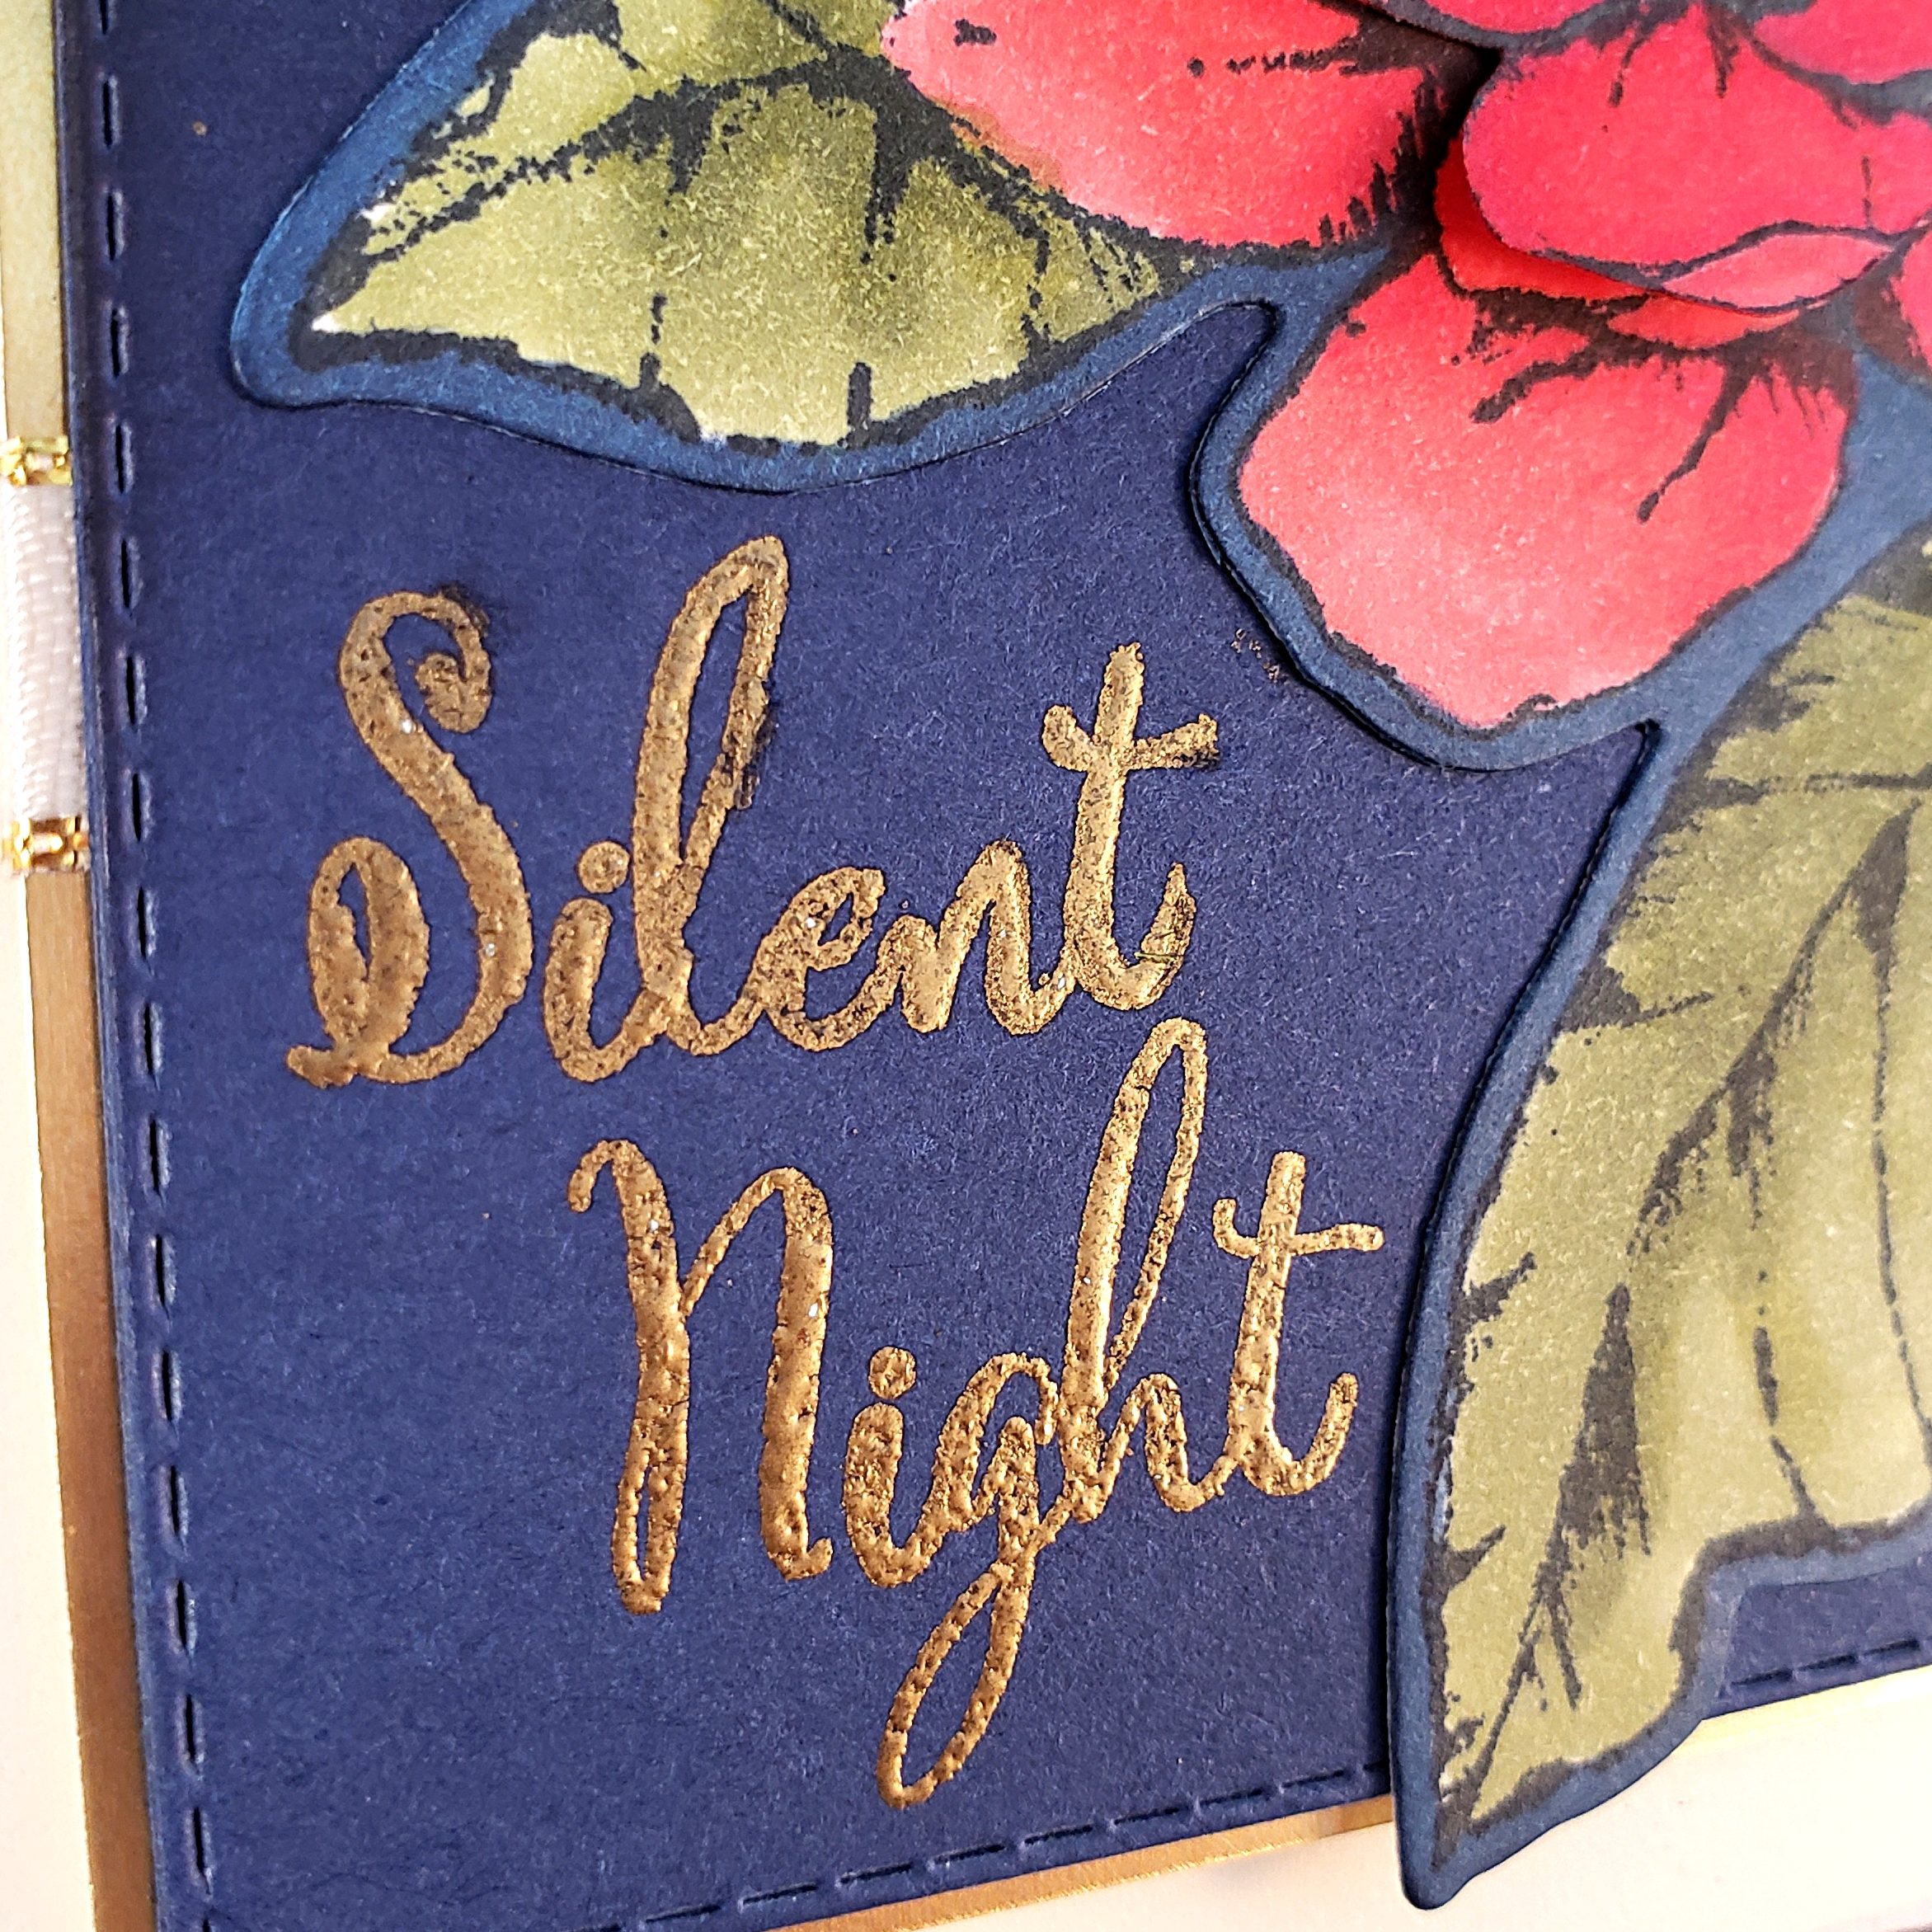
I sponged some Night of Navy ink on to Night of Navy cardstock fading it lighter as I moved down the paper. The Chalk Marker dots were then added to make the starry night sky. The sentiment is another problem that I came across as I couldn’t find any Christmas sayings that were the right size for that small space. So I created my own using the Make a Difference Photopolymer Stamp Set. It’s a bit more effort, but it allows you to write whatever you might choose. I stamped each letter with Versamark ink, then heat embossed with Gold Embossing Powder.

I used the Rectangle Stitched Dies to cut the Night of Navy piece to the size I wanted. That was attached to a piece of Gold Foil Paper on which I added a little peek-a-boo amount of the Gold Metallic Edged Ribbon. Both of those layers were added to the Thick Very Vanilla cardstock card base.

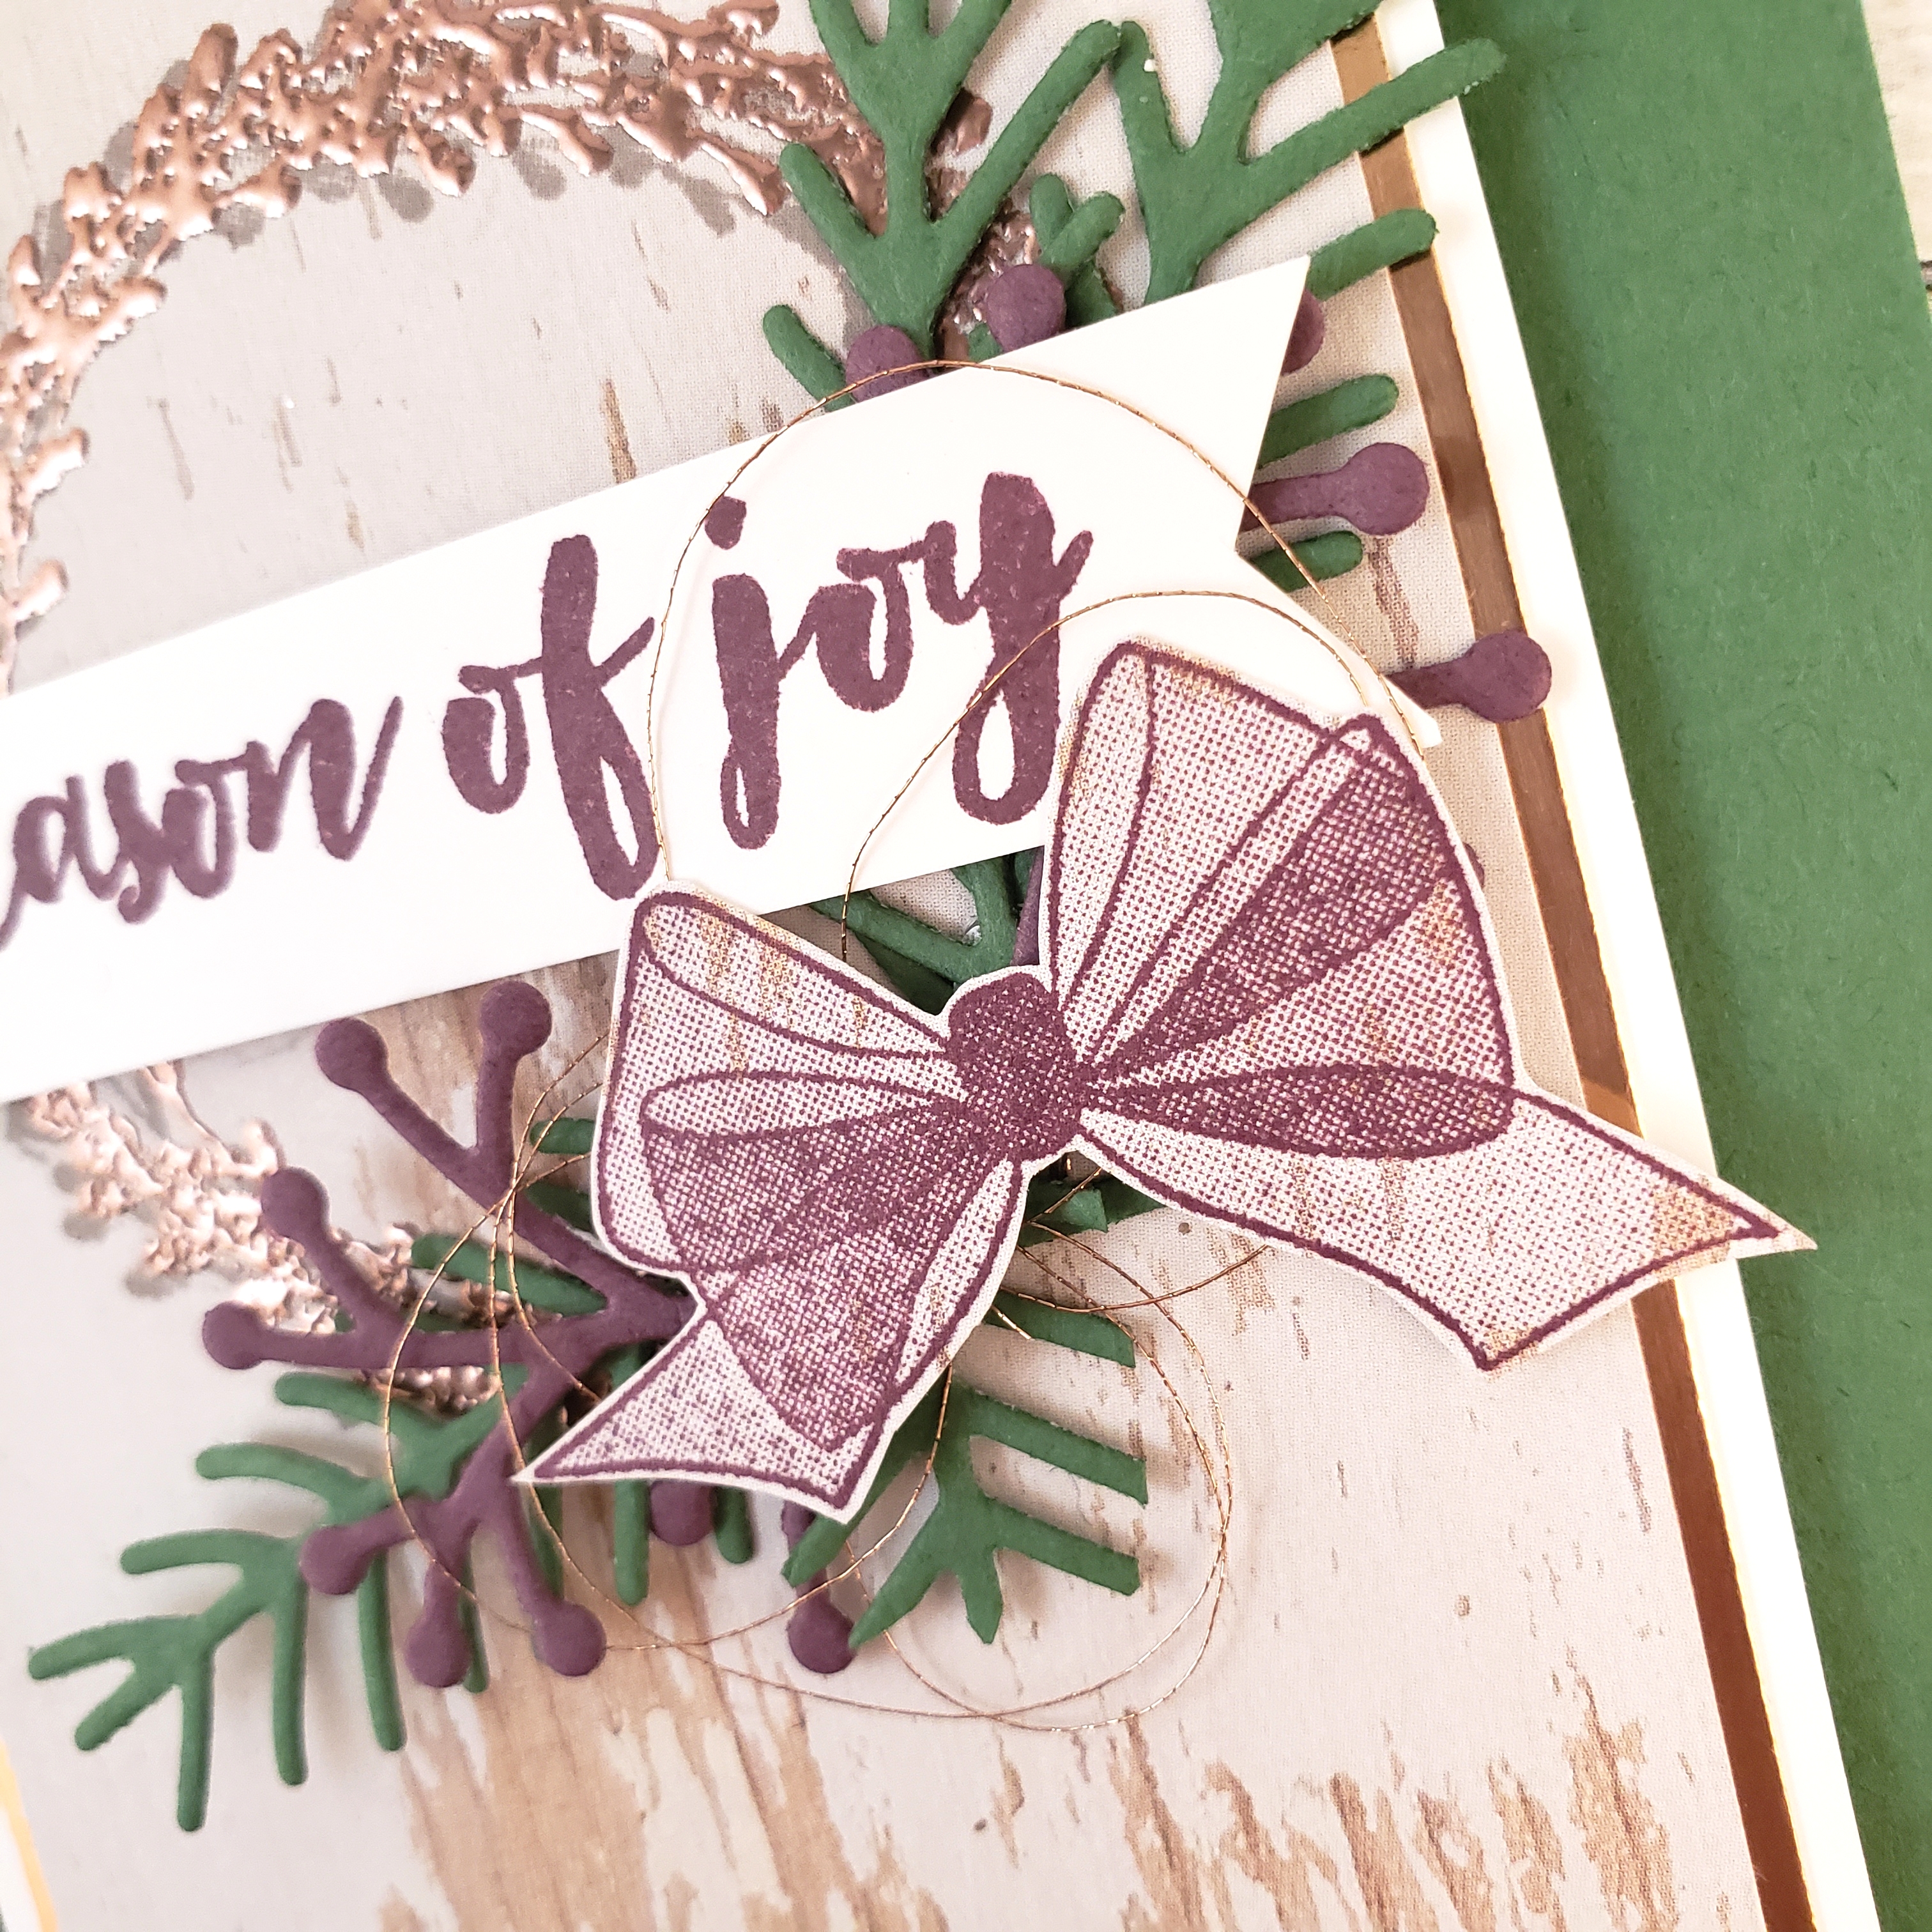
The magnolia image is the main attraction on this elegant Christmas card. I stamped the image on Whisper White cardstock with Tuxedo Black Momento ink, then coloured it using my Stampin’ Blends Markers: Poppy Parade (light and dark), a tiny touch of the Cherry Cobbler (I think it was the light one, but I can’t remember now, sorry), Mango Melody (dark) for the centre, Mossy Meadow (light and dark), and the Color Lifter Blends Marker to intensify some highlights on the petals. I then coloured around the outside of the flower with the Sark Night of Navy Blends Marker so that when I die cut the image, it would blend more with my background colour. I attached the die cut magnolia with Multipurpose Liquid Glue.

But that’s not all!

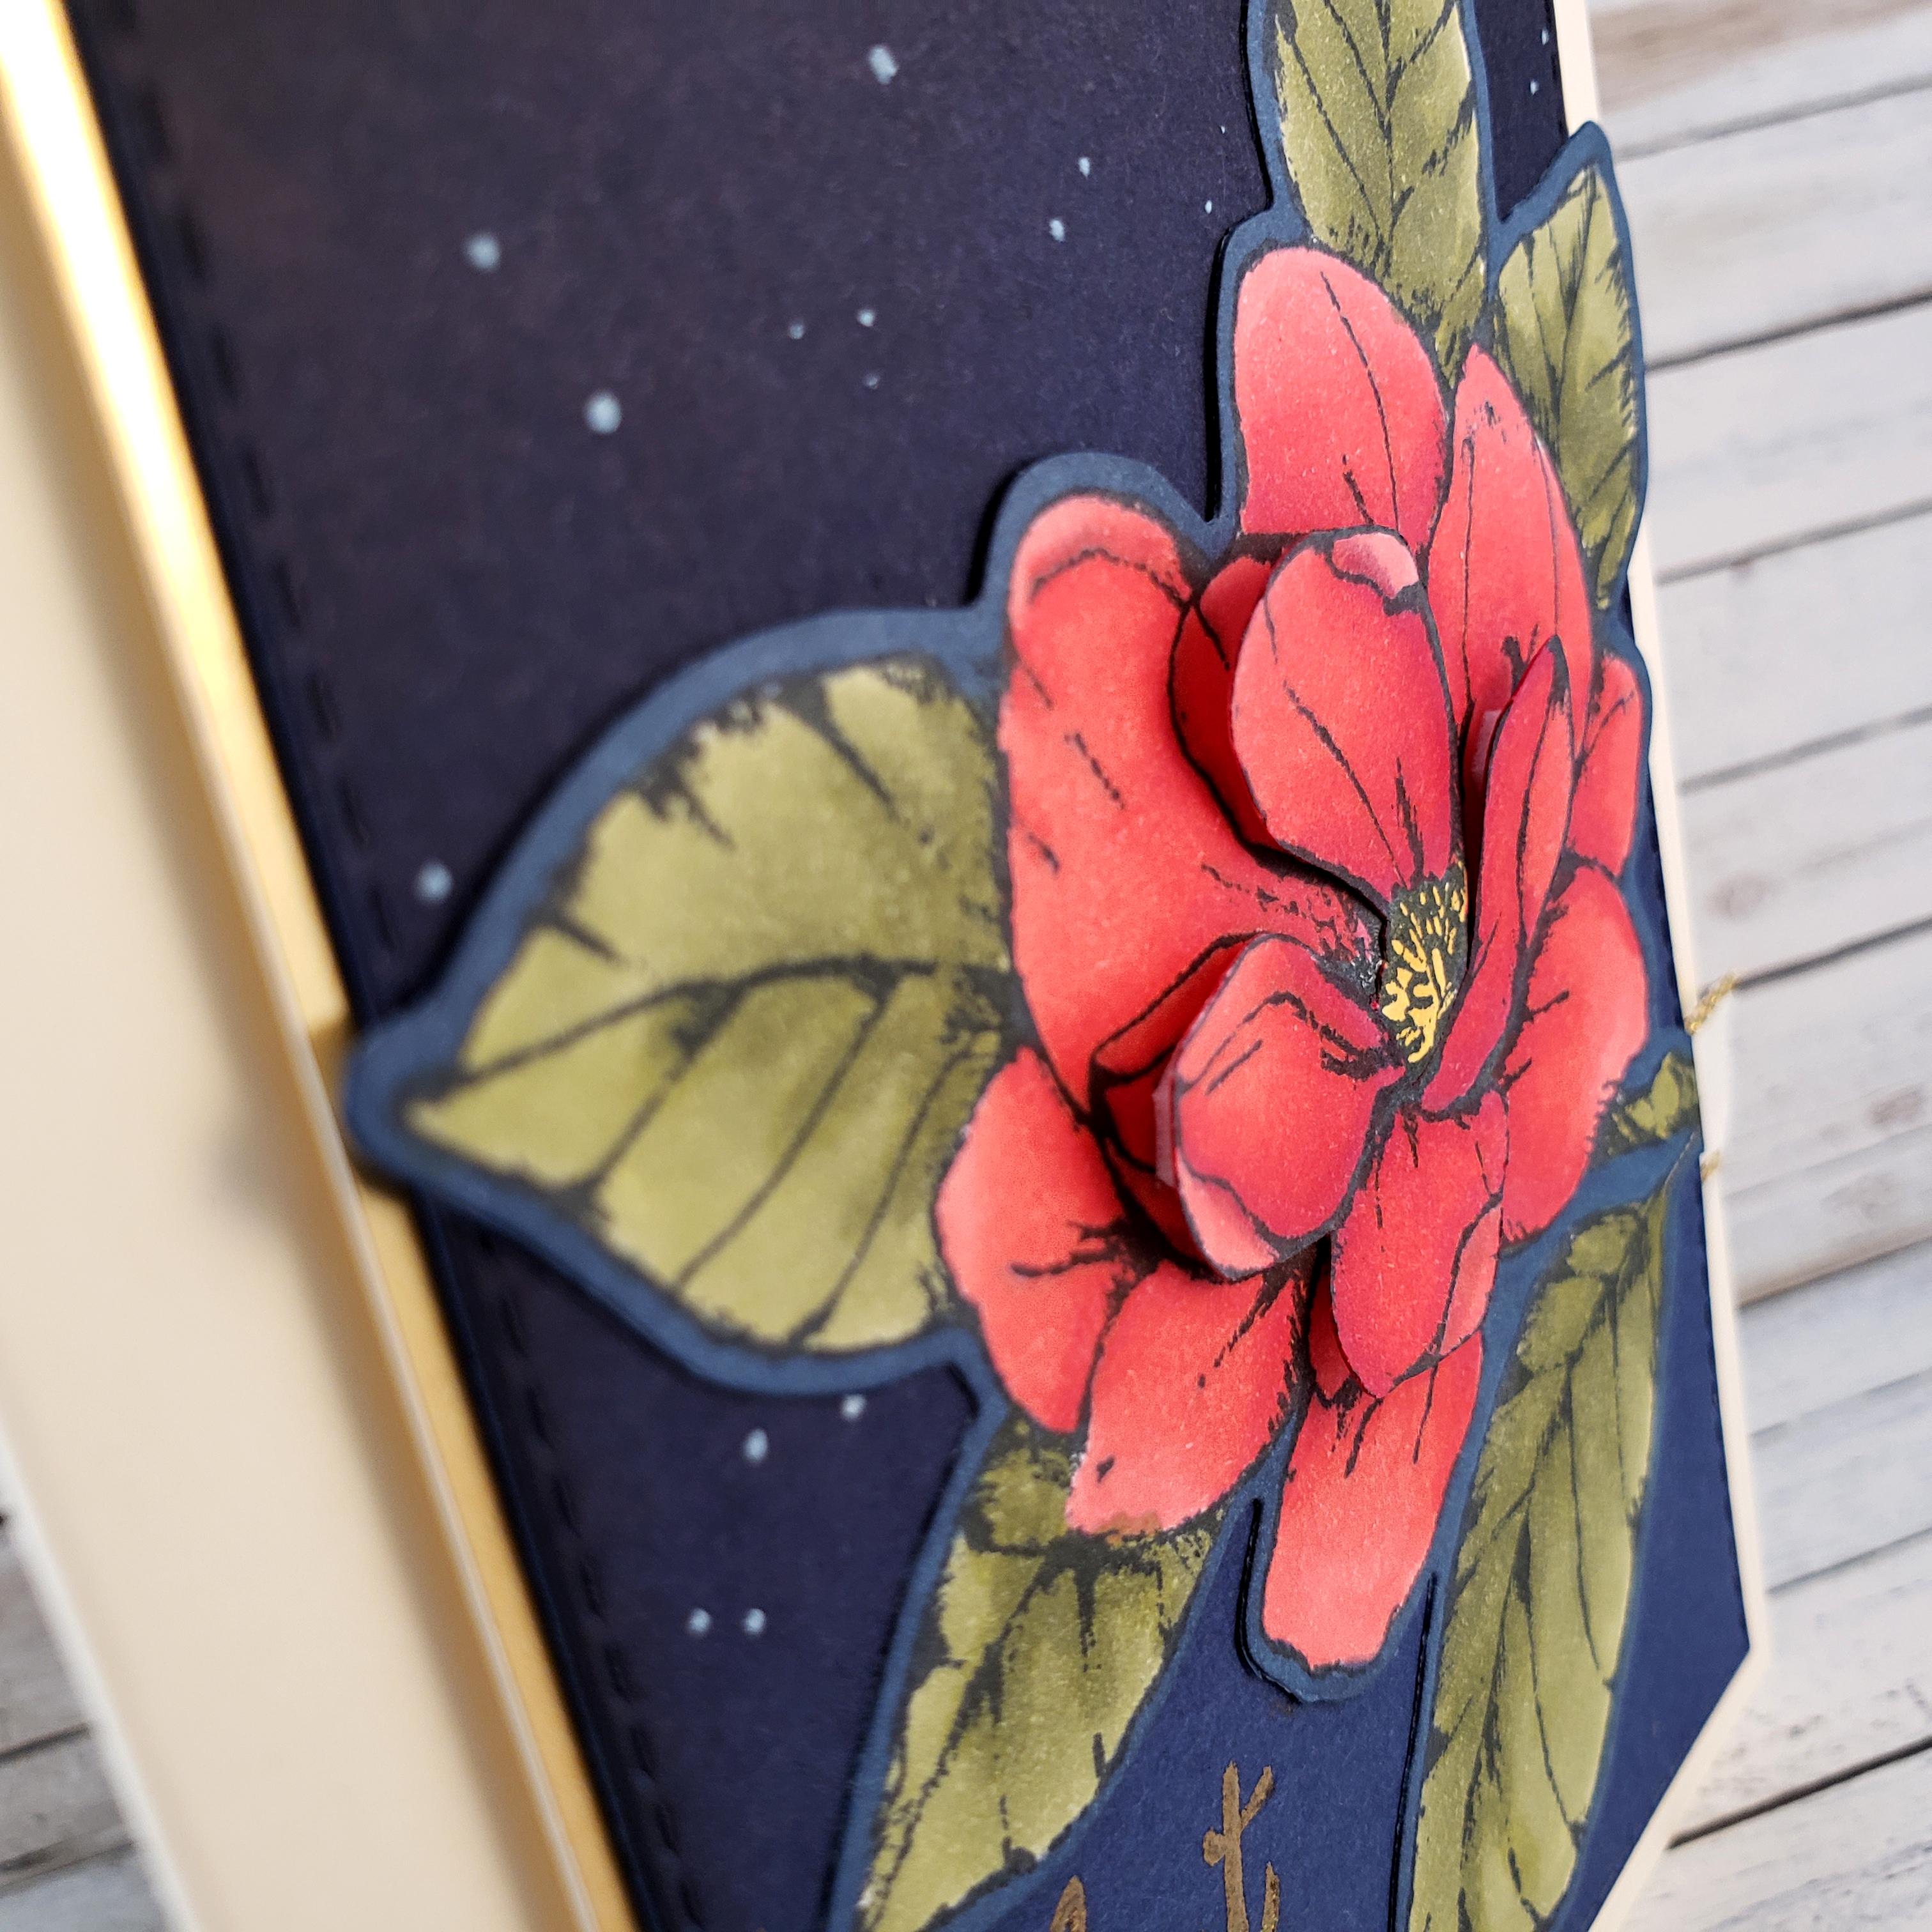
I stamped the magnolia a second time on Whisper White cardstock, colouring just the flower centre and four centre-most petals. I then fussy cut around those four petals. I attached them with Multipurpose Tombo Liquid Glue under the centre of the group of petals, and with Mini Stampin’ Dimensionals under the outer-most area of the petals, giving the flower more of a 3D look.

I love how it turned out!! I am definitely going to share this 3D look with my technique class in the future. I think they’ll really like it!

Now it’s your turn to give this assortment challenge a try and share it with us on the As You See It Challenge Blog! We would love to see how you pulled all of those elements together.

And if you like this Good Morning Magnolia stamp set as much as I do and you are in Canada, why not go over to my ONLINE STORE and add it to an order. You’ll probably love the whole Magnolia Lane Suite! It’s all just gorgeous!

Copper and Figgy Joy

Making Christmas cards is a huge source of joy and creative satisfaction for me. I love the themes and the colours. I love trying different colour schemes that still feel like Christmas to me. The colour combination today is inviting and peaceful, yet somehow warm and cozy, too.

It starts with a sketch from the As You See It Challenge Blog.

Garden Green, Copper, and Fresh Fig are a beautiful colour combination. The Wood Textures Designer Series Paper adds to the cozy, rustic feel of this winter wreath design. Sometimes, the traditional red and green – though beautiful, cheerful, and cozy – can become tiresome to work with in over and over again. It was refreshing to still feel traditional, but pull in the Fresh Fig to liven things up a bit!

The card began with stamping the wreath image from the Wishing You Well stamp set. I wanted to give the illusion of depth, so I stamped it first using Gray Granite ink. Then, after rubbing the surface with my Embossing Buddy to remove the stickiness of any oils from my fingers or from the ink I just applied, I stamped the wreath image again using Versamark ink, being sure to stamp it slightly offset from my original image. Then I could apply the Copper Embossing Powder and heat set it with my Heat Tool. Once the embossing was finished, I assembled my card layers to the base: the piece of Wood Textures Designer Series paper is adhered to matte layers of Copper Foil and then Whisper White. All of which are adhered to the Garden Green cardstock base of the card with Stampin’ Dimensionals.

Next came the swag and banner for the front of the card. I die cut the Garden Green boughs and the Fresh Fig accent foliage using the Pretty Pines Thinlit Dies and attached them to the wreath with Mini Glue Dots. I added a swirl of Copper Metallic Thread under the bow. The bow itself is an image from the Wishing You Well stamp set and was stamped on a scrap piece of the Wood Textures Designer Series Paper with Fresh Fig ink. I fussy cut that beautiful gauzy bow with my handy dandy Paper Snips and it was adhered with Stampin’ Dimensionals.

The final piece of this card is the banner. The sentiment from the Christmas Pines stamp set was stamped in Fresh Fig ink on Whisper White cardstock. The ends of the strip of cardstock were flagged by hand with my Paper Snips.

If you like this card, please understand that YOU can make cards just like this. If you are a Canadian resident, head on over to my online store to purchase all the supplies you need for great cards and scrapbook pages! If not, then you can go to stampinup.com to access a demonstrator in your part of the world. I hope you do!

Happy stamping!

Colour Block Deer

It’s a sketch challenge!! Whoohoo! As a designer for the As You See It Challenge blog, I love where the sketches lead my creativity. This card is an example of a design that I would have never come up with if I wasn’t guided by a sketch. I always enjoy a unique layout that is also pleasing to my eye and this one has hit it on the head!

The sketch:

I knew right away that I wanted to use the Detailed Deer Thinlit for this card design. It took a while to find it in my disaster of a craft room, but I finally uncovered it under a pile of cardstock on my paper cutting station. Phew! (A craft room clean up is WAY overdue!)

It’s difficult to tell in the photos, but the deer is die cut from Glossy White cardstock, which gives such a nice professional look to this soft design.

I did a colour block for the rectangular background behind the deer using 1″ strips of Whisper White, Very Vanilla, Sahara Sand, and Gray Granite cardstock. The deer is attached to the colour block background with Mini Stampin’ Dimensionals. Behind the colour block piece, I placed two Gold Foil leaves, punched out with the Leaf Punch and adhered with glue dots to the card.

The colour block piece is attached to the layered card front also with Stampin’ Dimensionals.

I chose to use three layers for the card front: Thick Whisper White card stock was used for the base, then a narrow matte of Sahara Sand cardstock with a piece of patterned paper from the Festive Farmhouse Designer Series Paper. You can see in the above photo, that the greeting from the Wishing You Well stamp set, was heat embossed with Gold Embossing powder for a nice professional finish. Unfortunately, if you look closely at the photos, you can see that I did not erase my pencil line as well as I should have. This is not as noticeable in person as it is in the close up photos. I’ll probably go over that with my eraser again. *sheepish grin*

I finished the inside of the card with another narrow matte of Sahara Sand carstock under Whisper White cardstock. The deer image and the sentiment from the Dashing Deer stamp set were both heat embossed with Gold Embossing powder. So pretty.

I love the Dashing Deer bundle from Stampin’ Up! It includes the Dashing Deer stamp set and the Detailed Dear Thinlit Dies.

So, how do you see this sketch? What will you do with it? Share your cards, scrapbook pages, or home decor crafty creations with us at the As You See It Challenge Blog. We love to see what you design!