star framelits

Twist and Pop Chickens Pop Up Card

I found my new favourite pop-up card! Once you know how to build this one, it’s super easy and doesn’t take very much time at all! I had a look at a few tutorials for this particular card and found this to be the easiest way with the least amount of measuring and fuss.

When I first had a look at the Stampin’ Up Sale-a-bration brouchure for 2017, I squealed with delight when I saw the funny little chickens in the Hey Chick stamp set! I think they are so fun and silly and I fell in love with them immediately. Believe it or not, this card is the first time for me to use this stamp set.

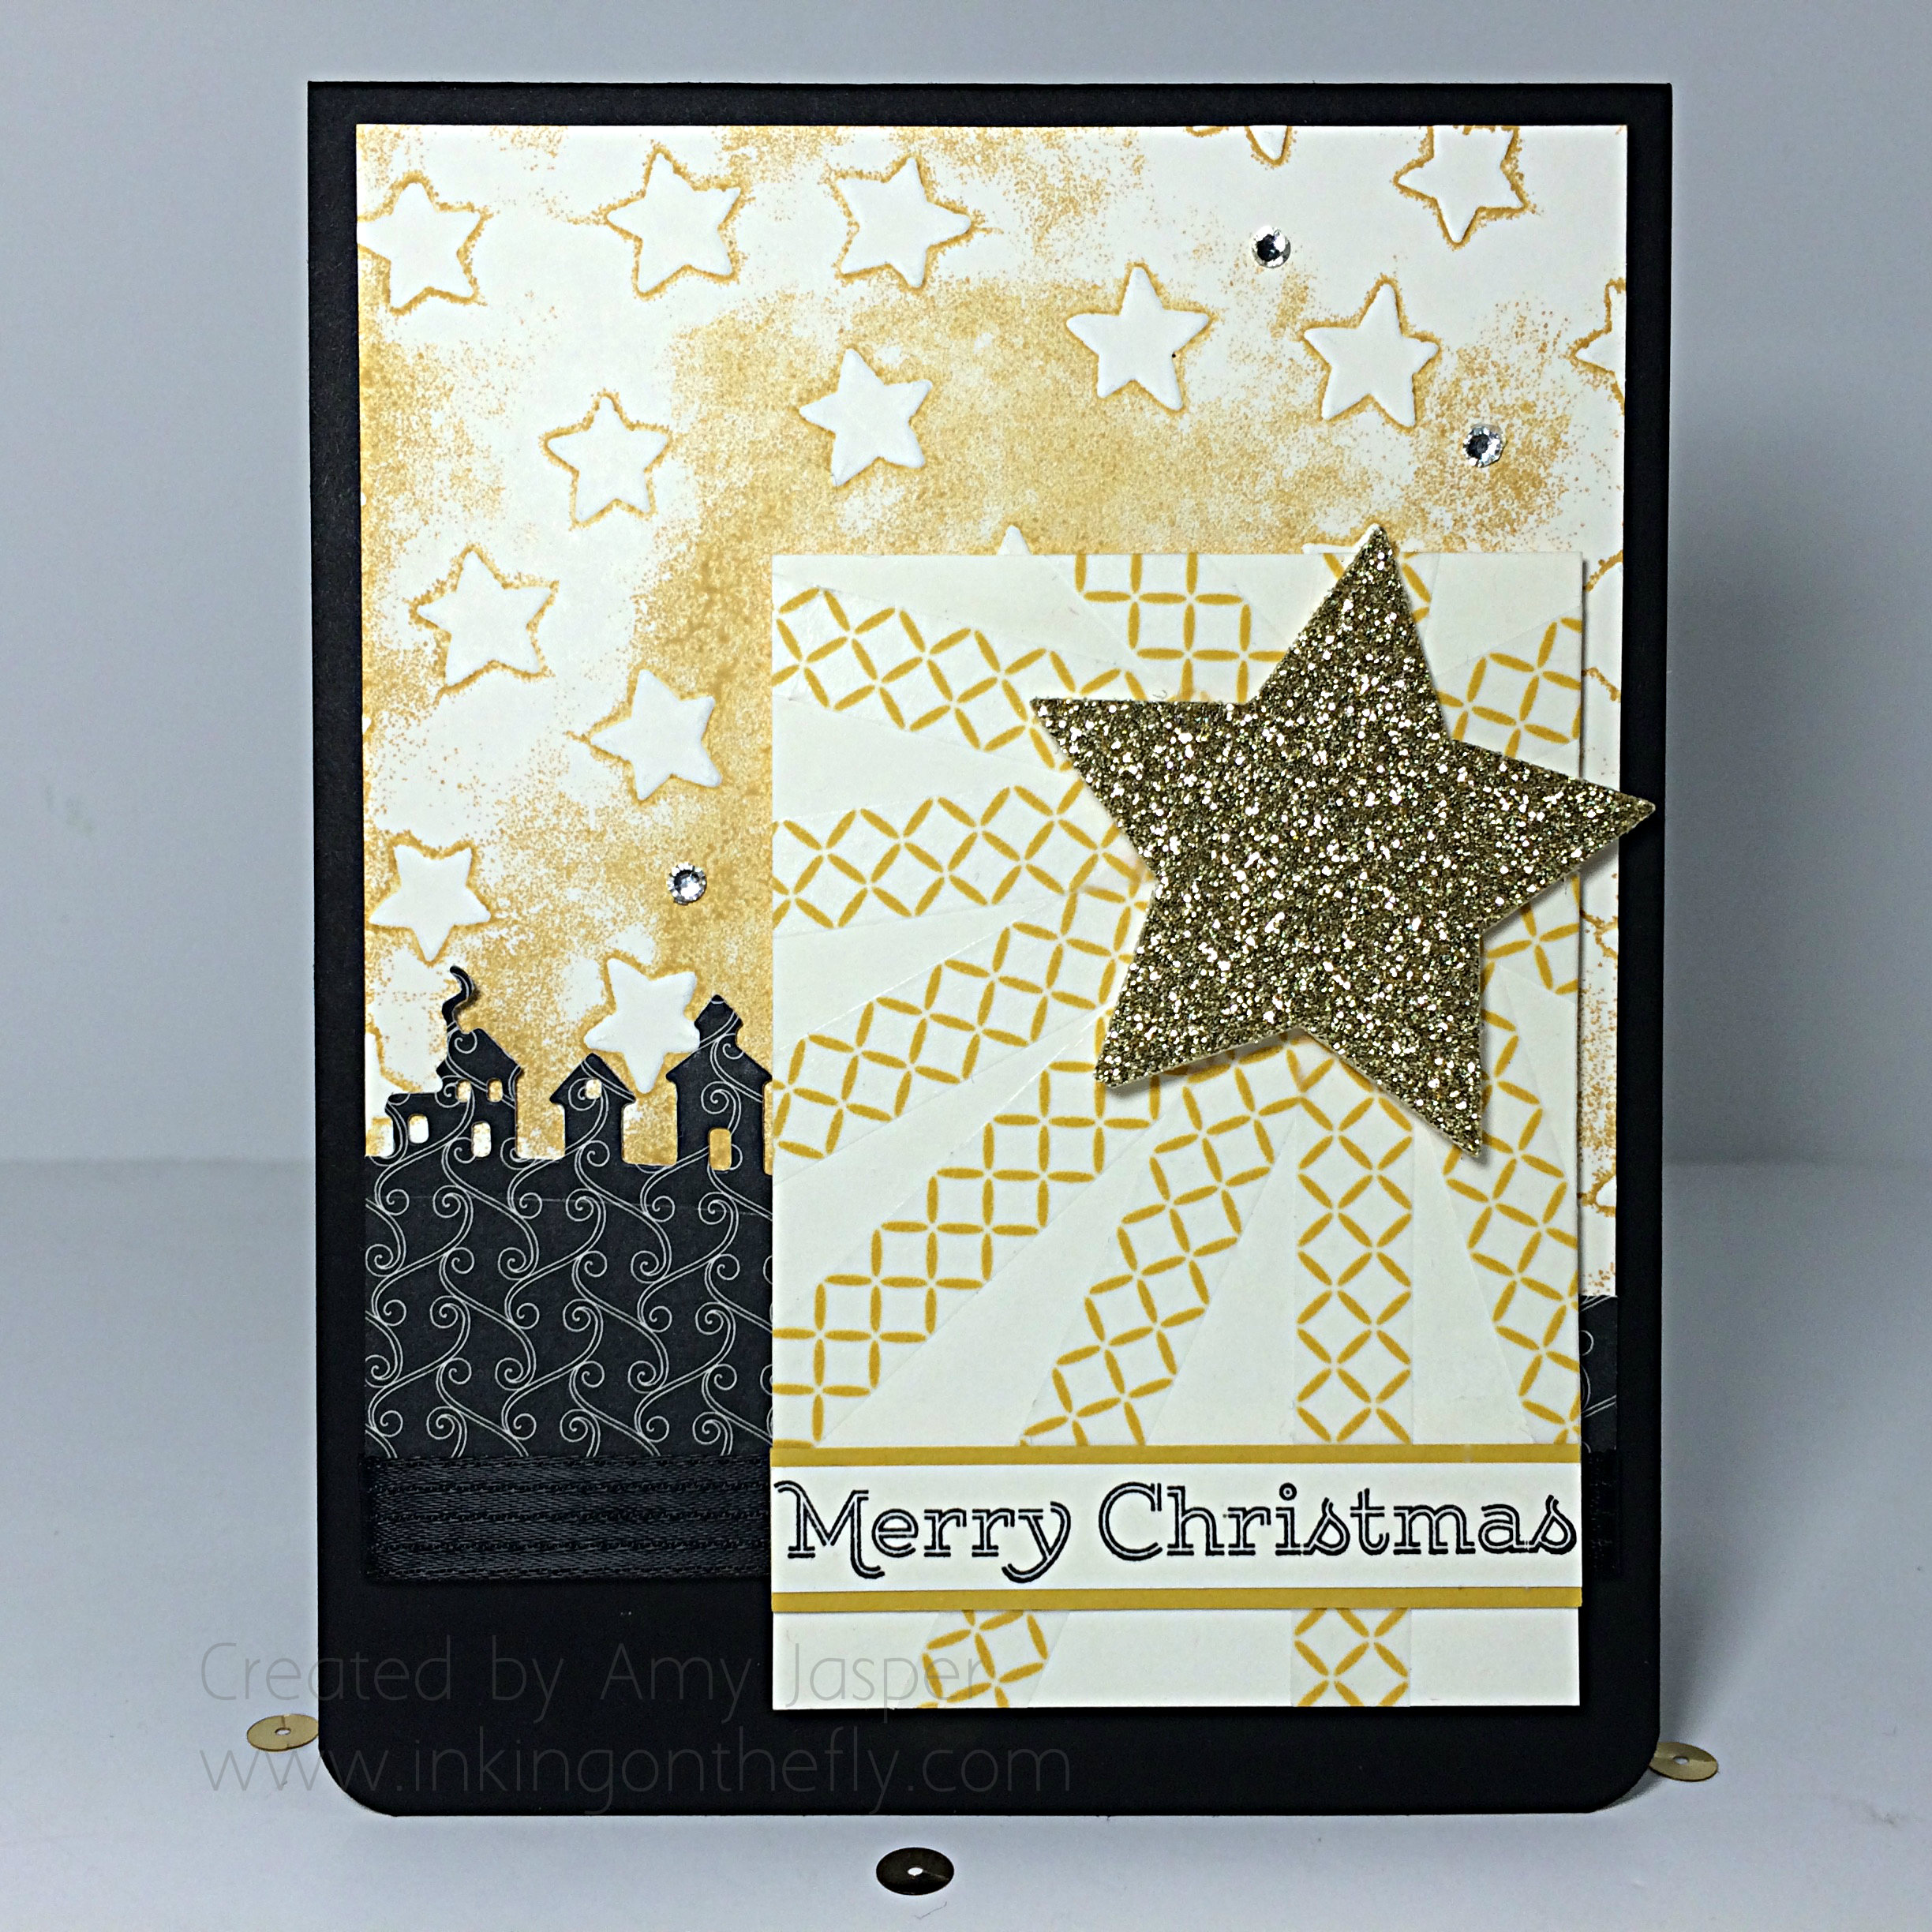
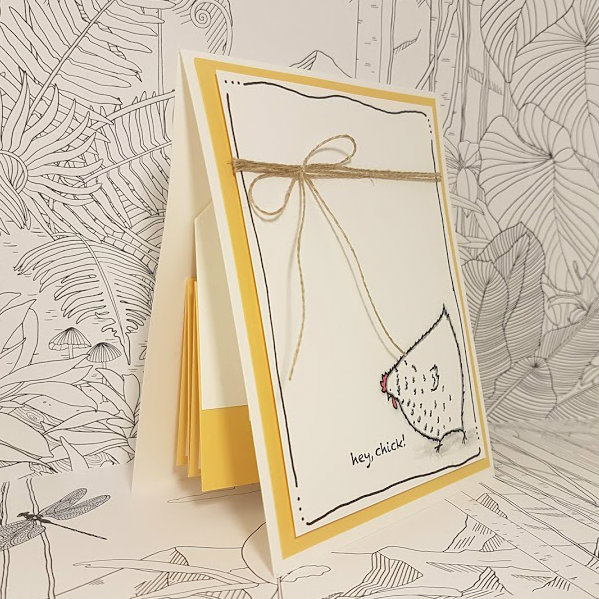
Here’s the simple card front:

twist and pop chicken card by Amy Jasper www.inkingonthefly.com
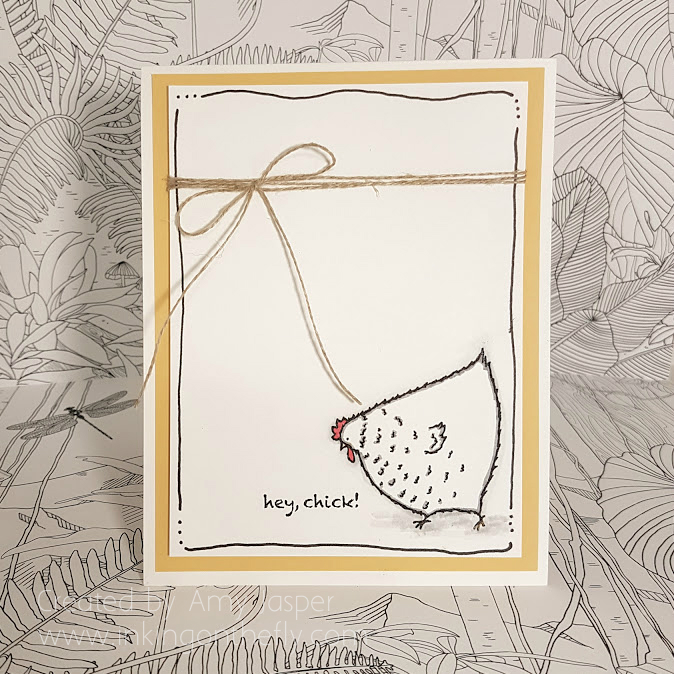
I love the simplicity of this card. The hand-drawn lines around the Whisper White layer add a simple light frame. The chicken image is stamped with Jet Black Stazon ink and coloured with Blender Pens using Smoky Slate ink, Crushed Curry ink and Watermelon Wonder.

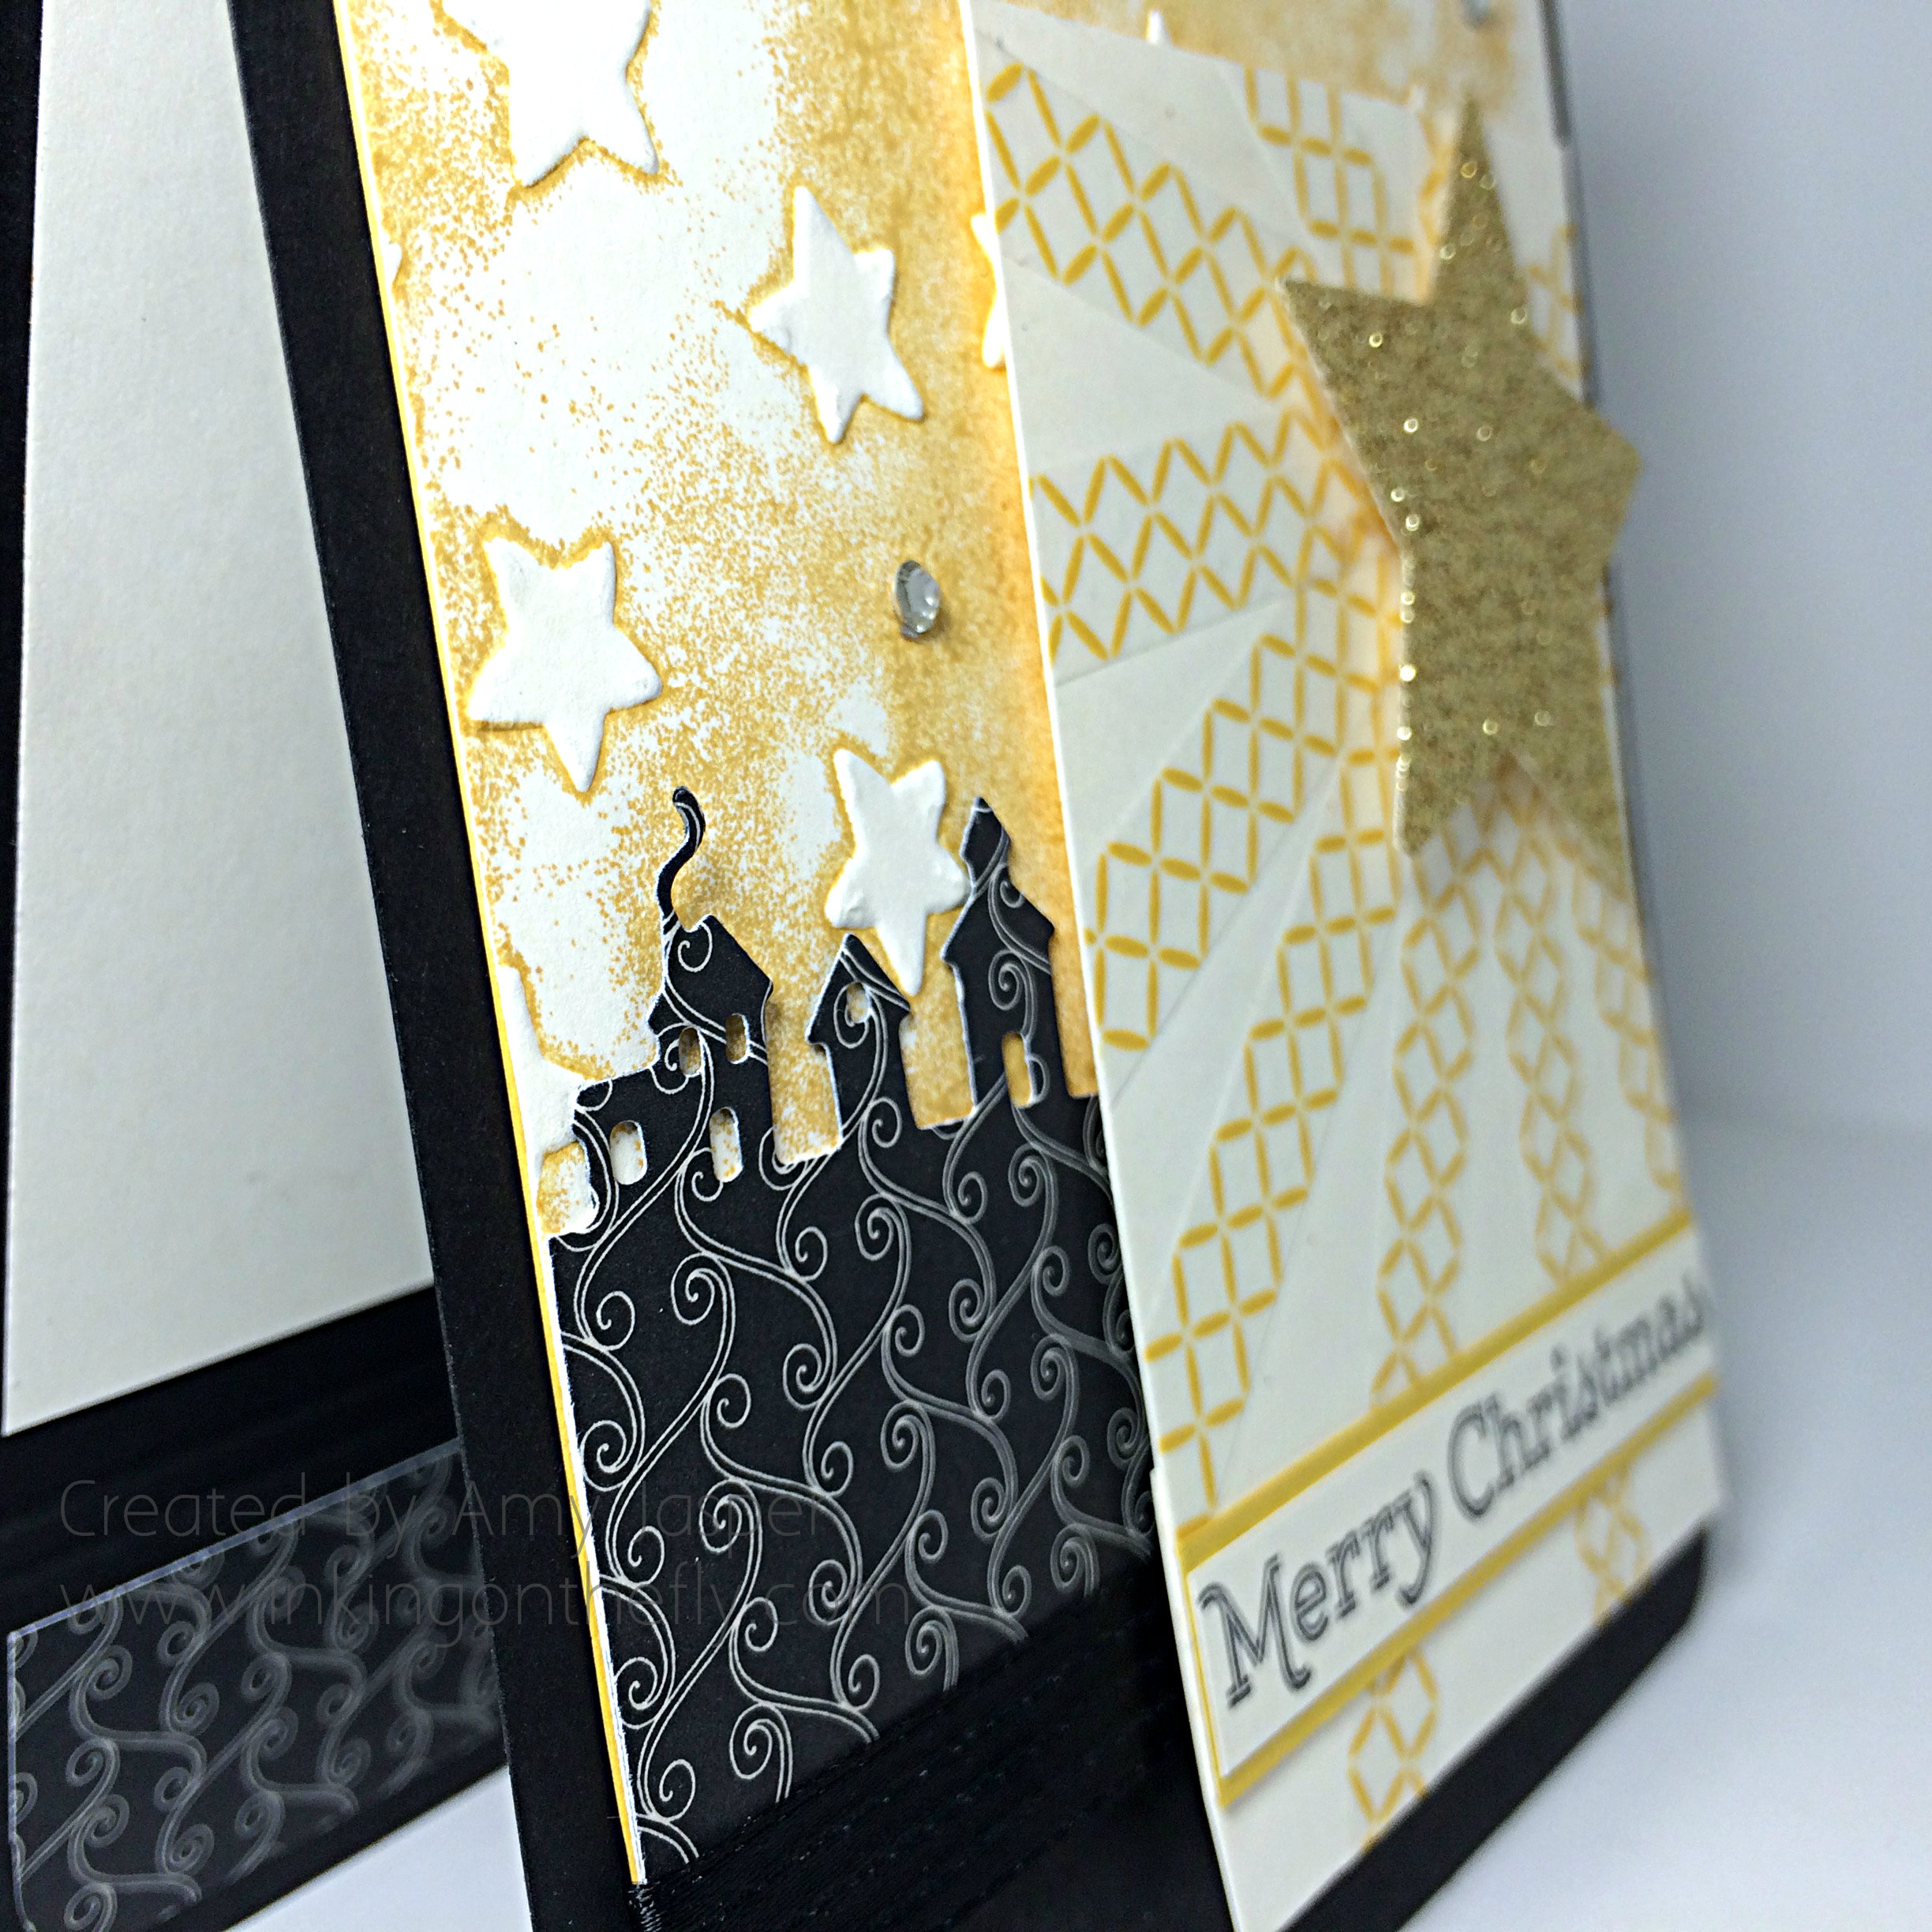
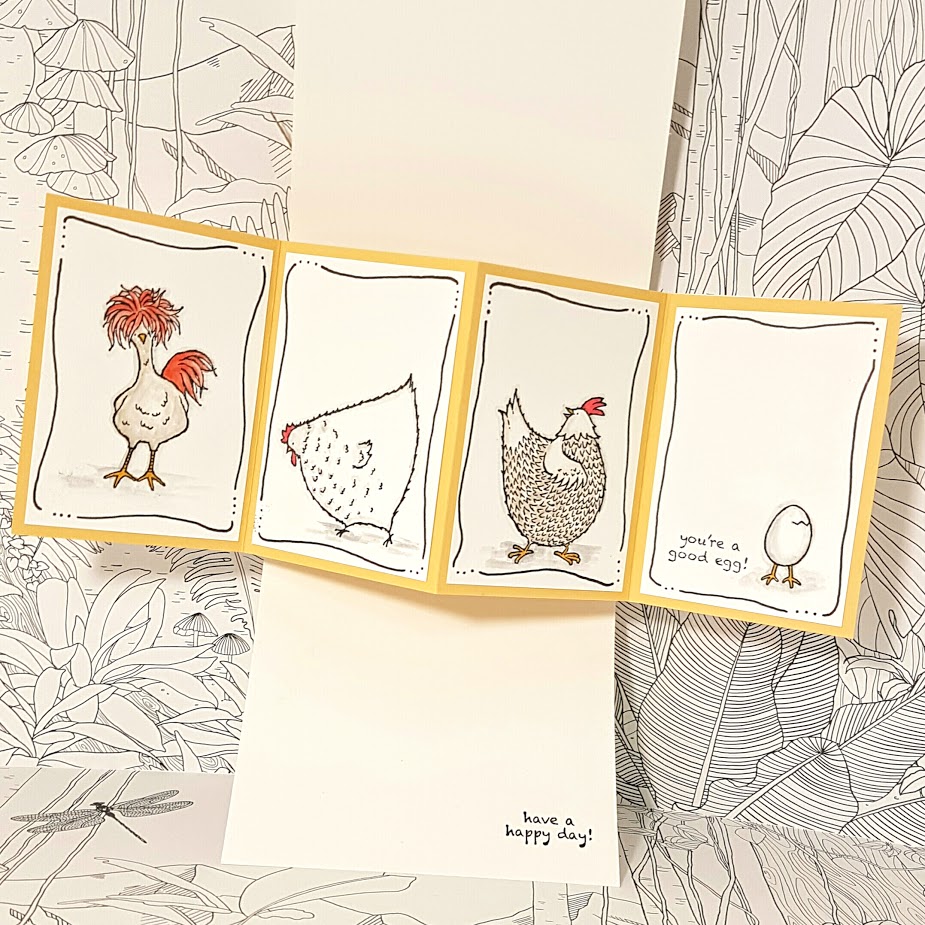
Here’s what happens when you open it:

Save

You can see that I did more of those hand-drawn lines with my Project Life pen on each of the inside panels of this card. I used some Tangerine Tango ink with my Blender Pen for the crazy chicken’s “hair” and tail feathers, some Crumb Cake ink for the body of the crazy chicken and the body of the looking back chicken. Smoky Slate ink accents the pecking chicken and the cracking egg images.

Twist and Pop inside by Amy Jasper www.inkingonthefly.com
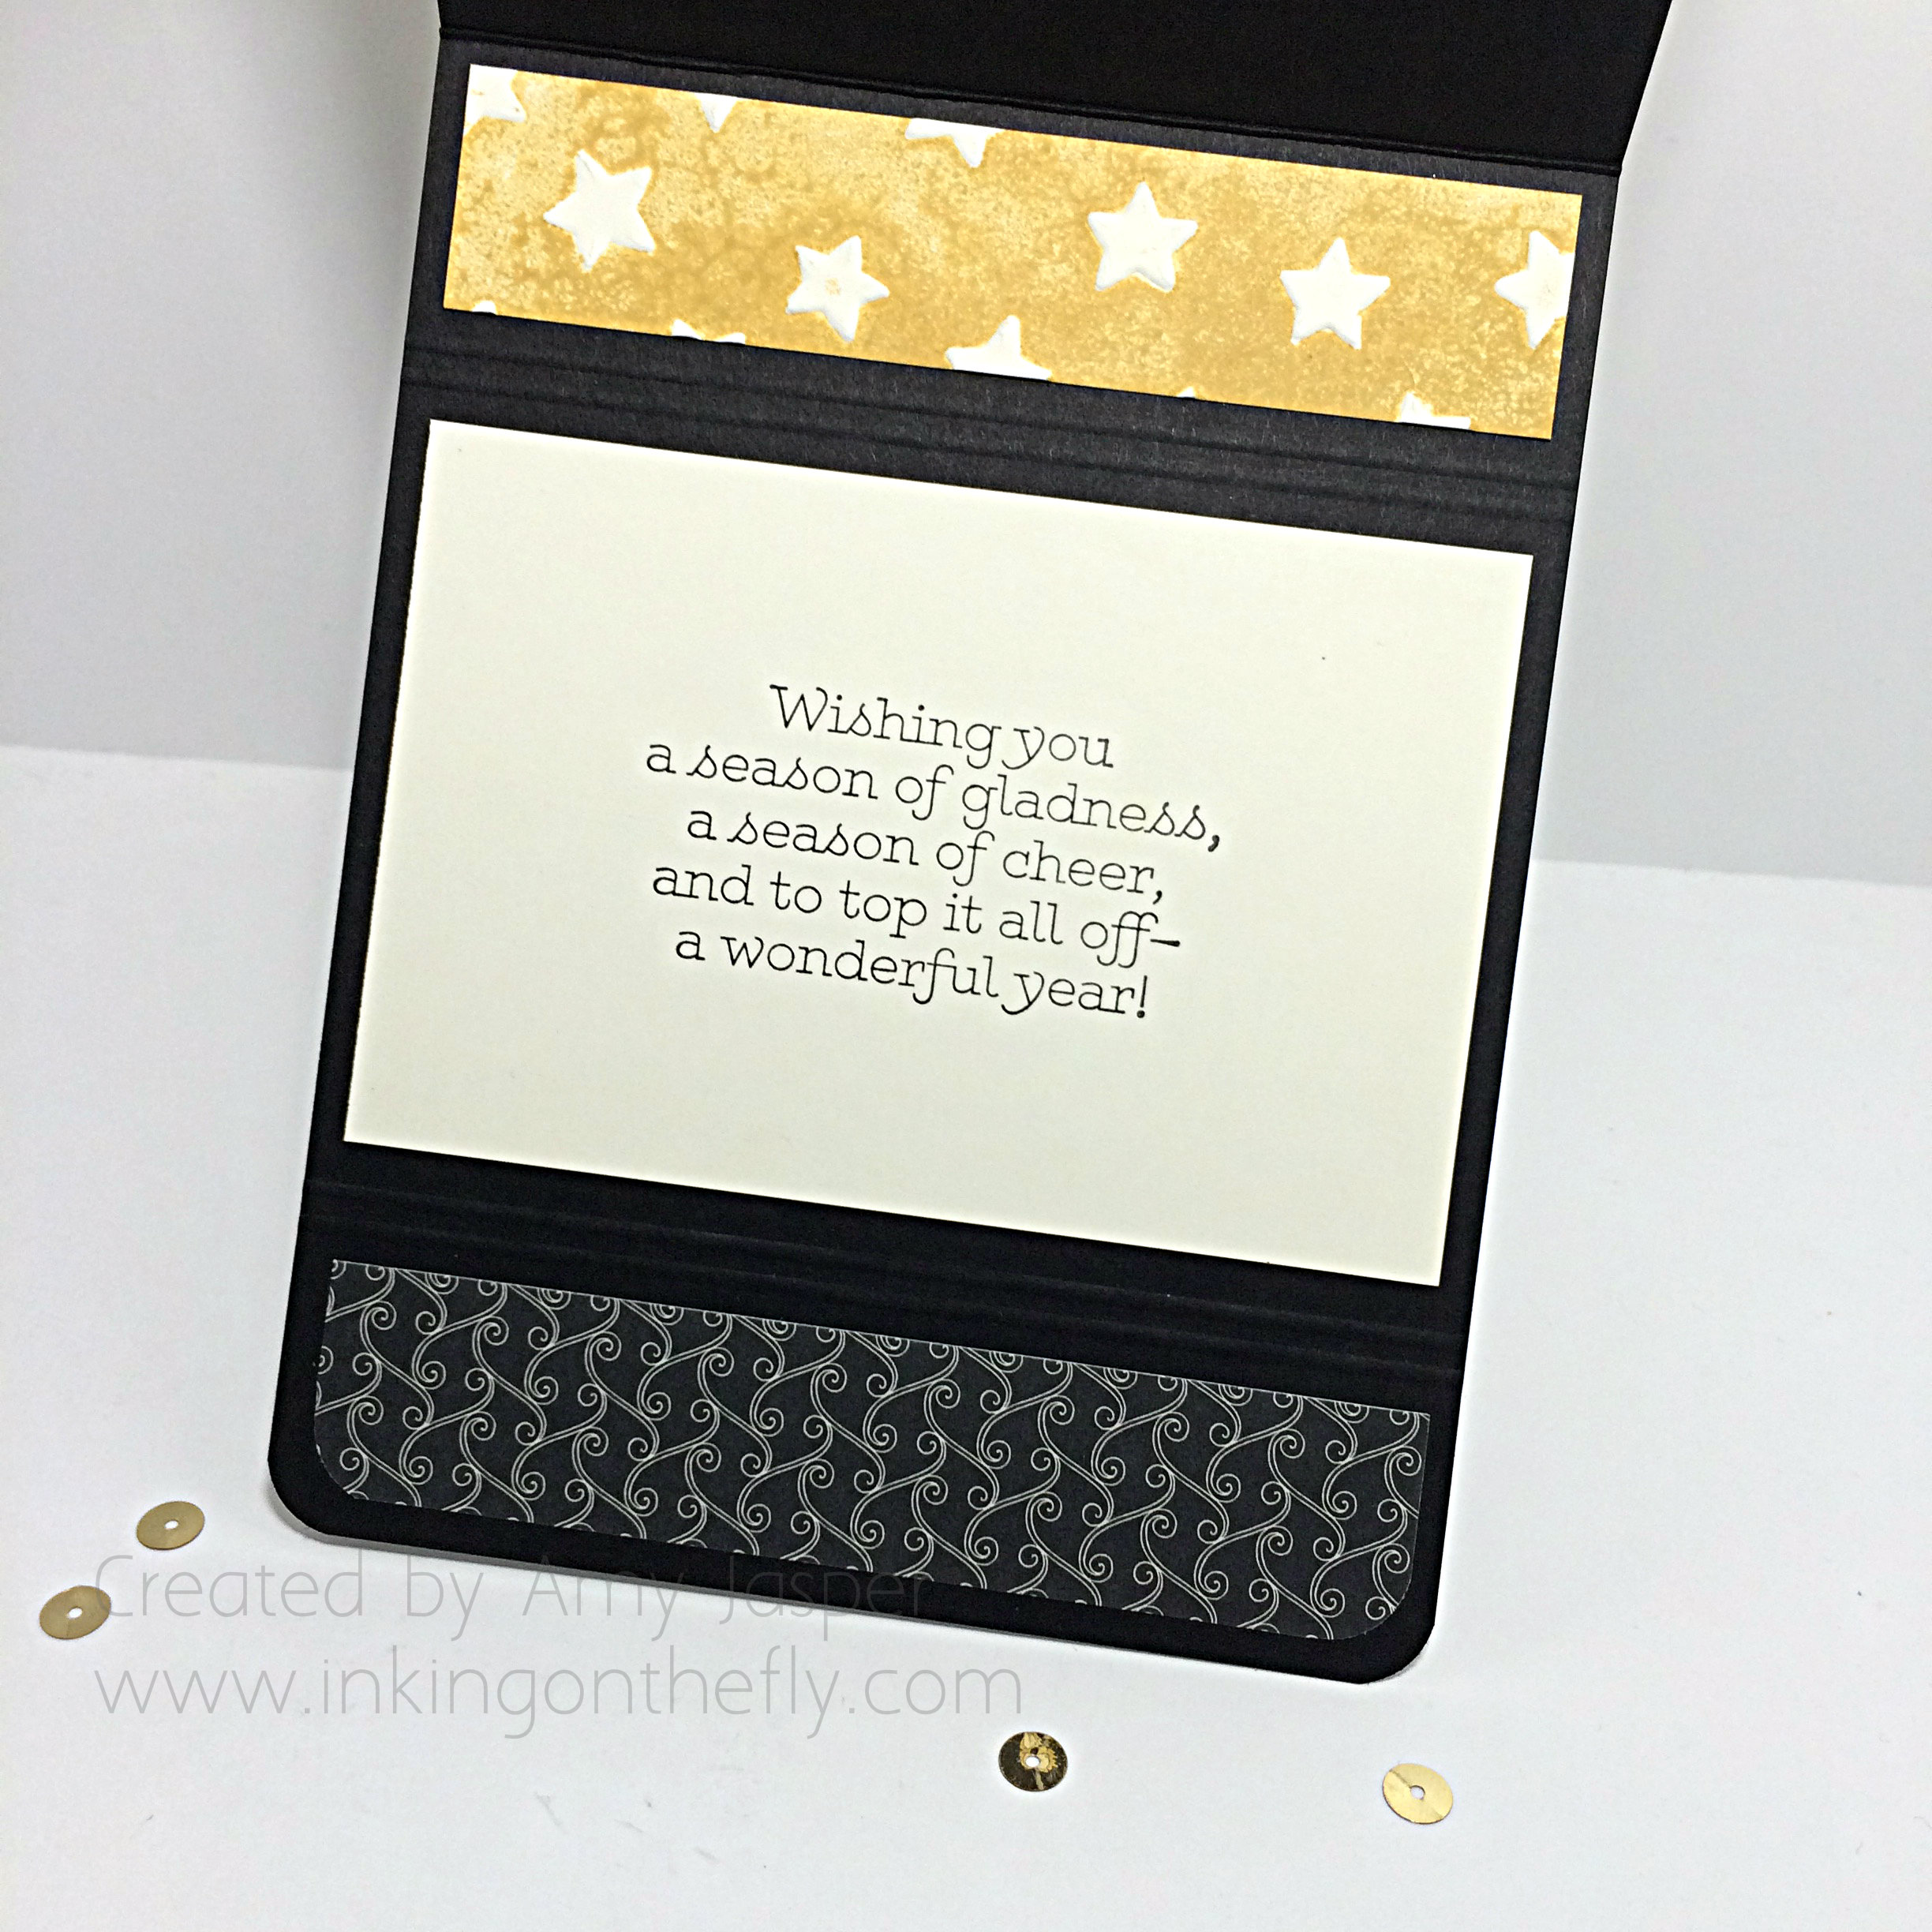
The best part about this pop-up card is that it is super easy to make. I started with preparing the piece for my inner mechanics, Thick Whisper White cardstock measuring 3-1/2″ x 8″. This piece was scored lengthwise at 1-3/4″, then I used my Simply Scored tool to make a notch marking at 2-1/4″ on the long edge of the cardstock. I did four of these marks, then used them as guidelines to score the X needed for these magical inner workings of this pop-up card. The So Saffron panel piece measures 3-1/2″ x 10″ and is scored at 2-1/2″, 5″, and 7-1/2″, then folded in an accordian fold style.

It’s not easy to explain this fun card in writing. Are you confused, yet? LOL! I thought you might be, so I made a video! Check it out on my youtube channel by clicking here.

twist and pop chicken card by Amy Jasper www.inkingonthefly.comI hope you give this super fun card a try. It’s guaranteed to delight anyone who opens it to find that it’s much bigger on the inside!

Save

Save

Save

Under a Starry Sky

So glad you stopped in for a visit. I am a Stampin’ Up! demonstrator and a designer for the As You See It Challenge Blog.

Here is the sketch challenge this week:

AYSIChallenge117-1024x1024And here is the card I designed with my Stampin’ Up! supplies, using the sketch to get my creative mojo started:

Under a Starry Sky created by Amy Jasper www.inkingonthefly.com with Sleighride Edgelits, Stars Embossing Folder, washi tapeI inked up one side of the Star Embossing Folder with Hello Honey ink, so that when pressed in the Big Shot, the ink transferred onto the Very Vanilla cardstock. I used some patterned paper from the Timeless Elegance Designer Paper for the housed that are die cut with the Sleighride Edgelits and the Big Shot.

Under a Starry Sky by Amy Jasper www.inkingonthefly.com with Sleighride Edgelits, Star Embossing Folder from Stampin' Up!Season of Cheer Washi Tape was used to create the rays behind the Gold Glimmer paper star that was also die cut using the Big Shot and the Stars Framelits. The sentiment is from the Versatile Christmas stamp set and is stamped with Jet Black Stazon ink.

Under a Starry Sky insideI don’t always spend much time on the inside of my cards, but this one needed something to write on. Plus, I accidentally scored the cardstock in the wrong place, so I decided to make it a design feature. I scored 4 lines and used them as dividers for the sentiment. This actually made decorating the inside really simple with only 3 pieces of paper: a practice run of my embossed stars was used for the top piece, Very Vanilla for the sentiment (again from the Versatile Christmas stamp set), and a piece of the same pattern of the Timeless Elegance designer series paper.

Under a Starry Sky by Amy Jasper www.inkingonthefly.com - Sleighride Edgelits, Star Embossing Folder from Stampin' UpI also used Black Stitched Satin ribbon, Basic Rhinestones, and the Project Life corner rounder punch to add some detail.

Have a great weekend!!

Hang a Shining Star

My favourite thing about a song, especially Christmas songs, is when someone says something in normal conversation and it sparks a song in your mind that you absolutely MUST sing out loud. As it was said in the movie, ELF, “The best way to spread Christmas cheer is singing loud for all to hear.”

My hope is that my card today will cause a Christmas song to be placed in your mind when you read the words. (Basically, I’m working on developing my talents in mind-control.)

Don’t forget to check out my previous post, Fleecy Caribou and Blog Candy, for a chance to win a stamp set! Winner will be announced on Tuesday!

Here’s today’s sketch from the As You See It Challenge blog:

AYSIChallenge115-1024x1024

The card I have to share with you today is a 3″ x 5.5″ card. The elements that I chose simply demanded to be on a narrow card design. Seriously, the cards should just make themselves if they’re going to be so demanding!!

Hang a Shining Star Card by Amy Jasper www.inkingonthefly.com

It begins with a 3″ x 5.5″ Mossy Meadow card base and the layer of patterned paper from the Merry Moments Designer Series Paper. The next layer is a Spider Web Doily that has been trimmed and turned around to show the white side rather than the black side of the doily. This, of course, was adhered with the Fine-Tip Glue Pen.

Next, the leaf image from the Lighthearted Leaves stamp set was stamped with Old Olive Ink onto Old Olive cardstock. This was then die cut on the Big Shot, using the Leaflets Framelits. I happily sponged away on the edges of my newly cut leaf using Stampin’ Up Sponges and Old Olive ink. Before adhering the leaf, I took a moment to gently curl and shape its edges.

Hang a shining star by Amy Jasper www.inkingonthefly.com

The star on this card is die cut from Silver Foil paper, using the Star Framelits. After using my Embossing Buddy to remove static, dust, and finger prints from the Silver Foil paper, I used the Alphabet Rotary stamp to create the words and stamped them on the star with Versamark Ink. Then they were heat embossed with Silver Embossing Powder and a Heat Tool.

I saw my crooked words and decided to go for it anyway. I think it adds an authentic, kind of, stamped metal look.

The star is adhered with Stampin’ Dimensionals to pop it up off the page. The Silver Sequin Trim and the Real Red 1/8″ Striped Ribbon were attached using a Mini Glue Dot.

Hang a Shining Star card and envelope by Amy Jasper www.inkingonthefly.com

Because I had an unusually-sized card, I needed to make a custom envelope to go with it. The Envelope Punch Board is the perfect tool for just that very thing. Unfortunately, the envelope sizes available on the punch board still didn’t match what I needed. I played around a bit, changing the starting size of the paper and the different positions for scoring and punching and determined this:

To create an envelope for a 3″ x 5.5″ card, start with a piece of 7.5″ x 7.5″ paper (Red Envelope Paper, in this case), using the Envelope Punch Board, punch and score at 2 7/8″. Then carry on with the punch board as you normally would until your envelope is complete.

I also took the time to trim one of the side flaps on my envelope to give it a professional finish. I just drew a pencil line where I wanted to cut, then used my paper trimmer to remove the unwanted bit of paper.

This sketch is simple and cute. You should give it a try and share it with us on the As You See It Challenge blog. We love to see your take on our challenges!!

Did my card make you sing out loud? The words on the star are from one of my favourite Christmas tunes, “Have Yourself a Merry Little Christmas”.

Do you have a favourite Christmas song? Leave a comment and let me know!