2019

Purple Wonder

Purple is a tough colour for me to work with, so when I saw that the As You See It challenge this time was a speed challenge with shades of purple, I wasn’t very excited.

But then I remembered the piece of Designer series paper from the Woven Threads paper that was purple! Not just any purple, but the new In Color from Stampin’ Up! called, Purple Posy. The rest of my idea for my card pulled together easily after that and I was able to create a sweet and whimsical card.

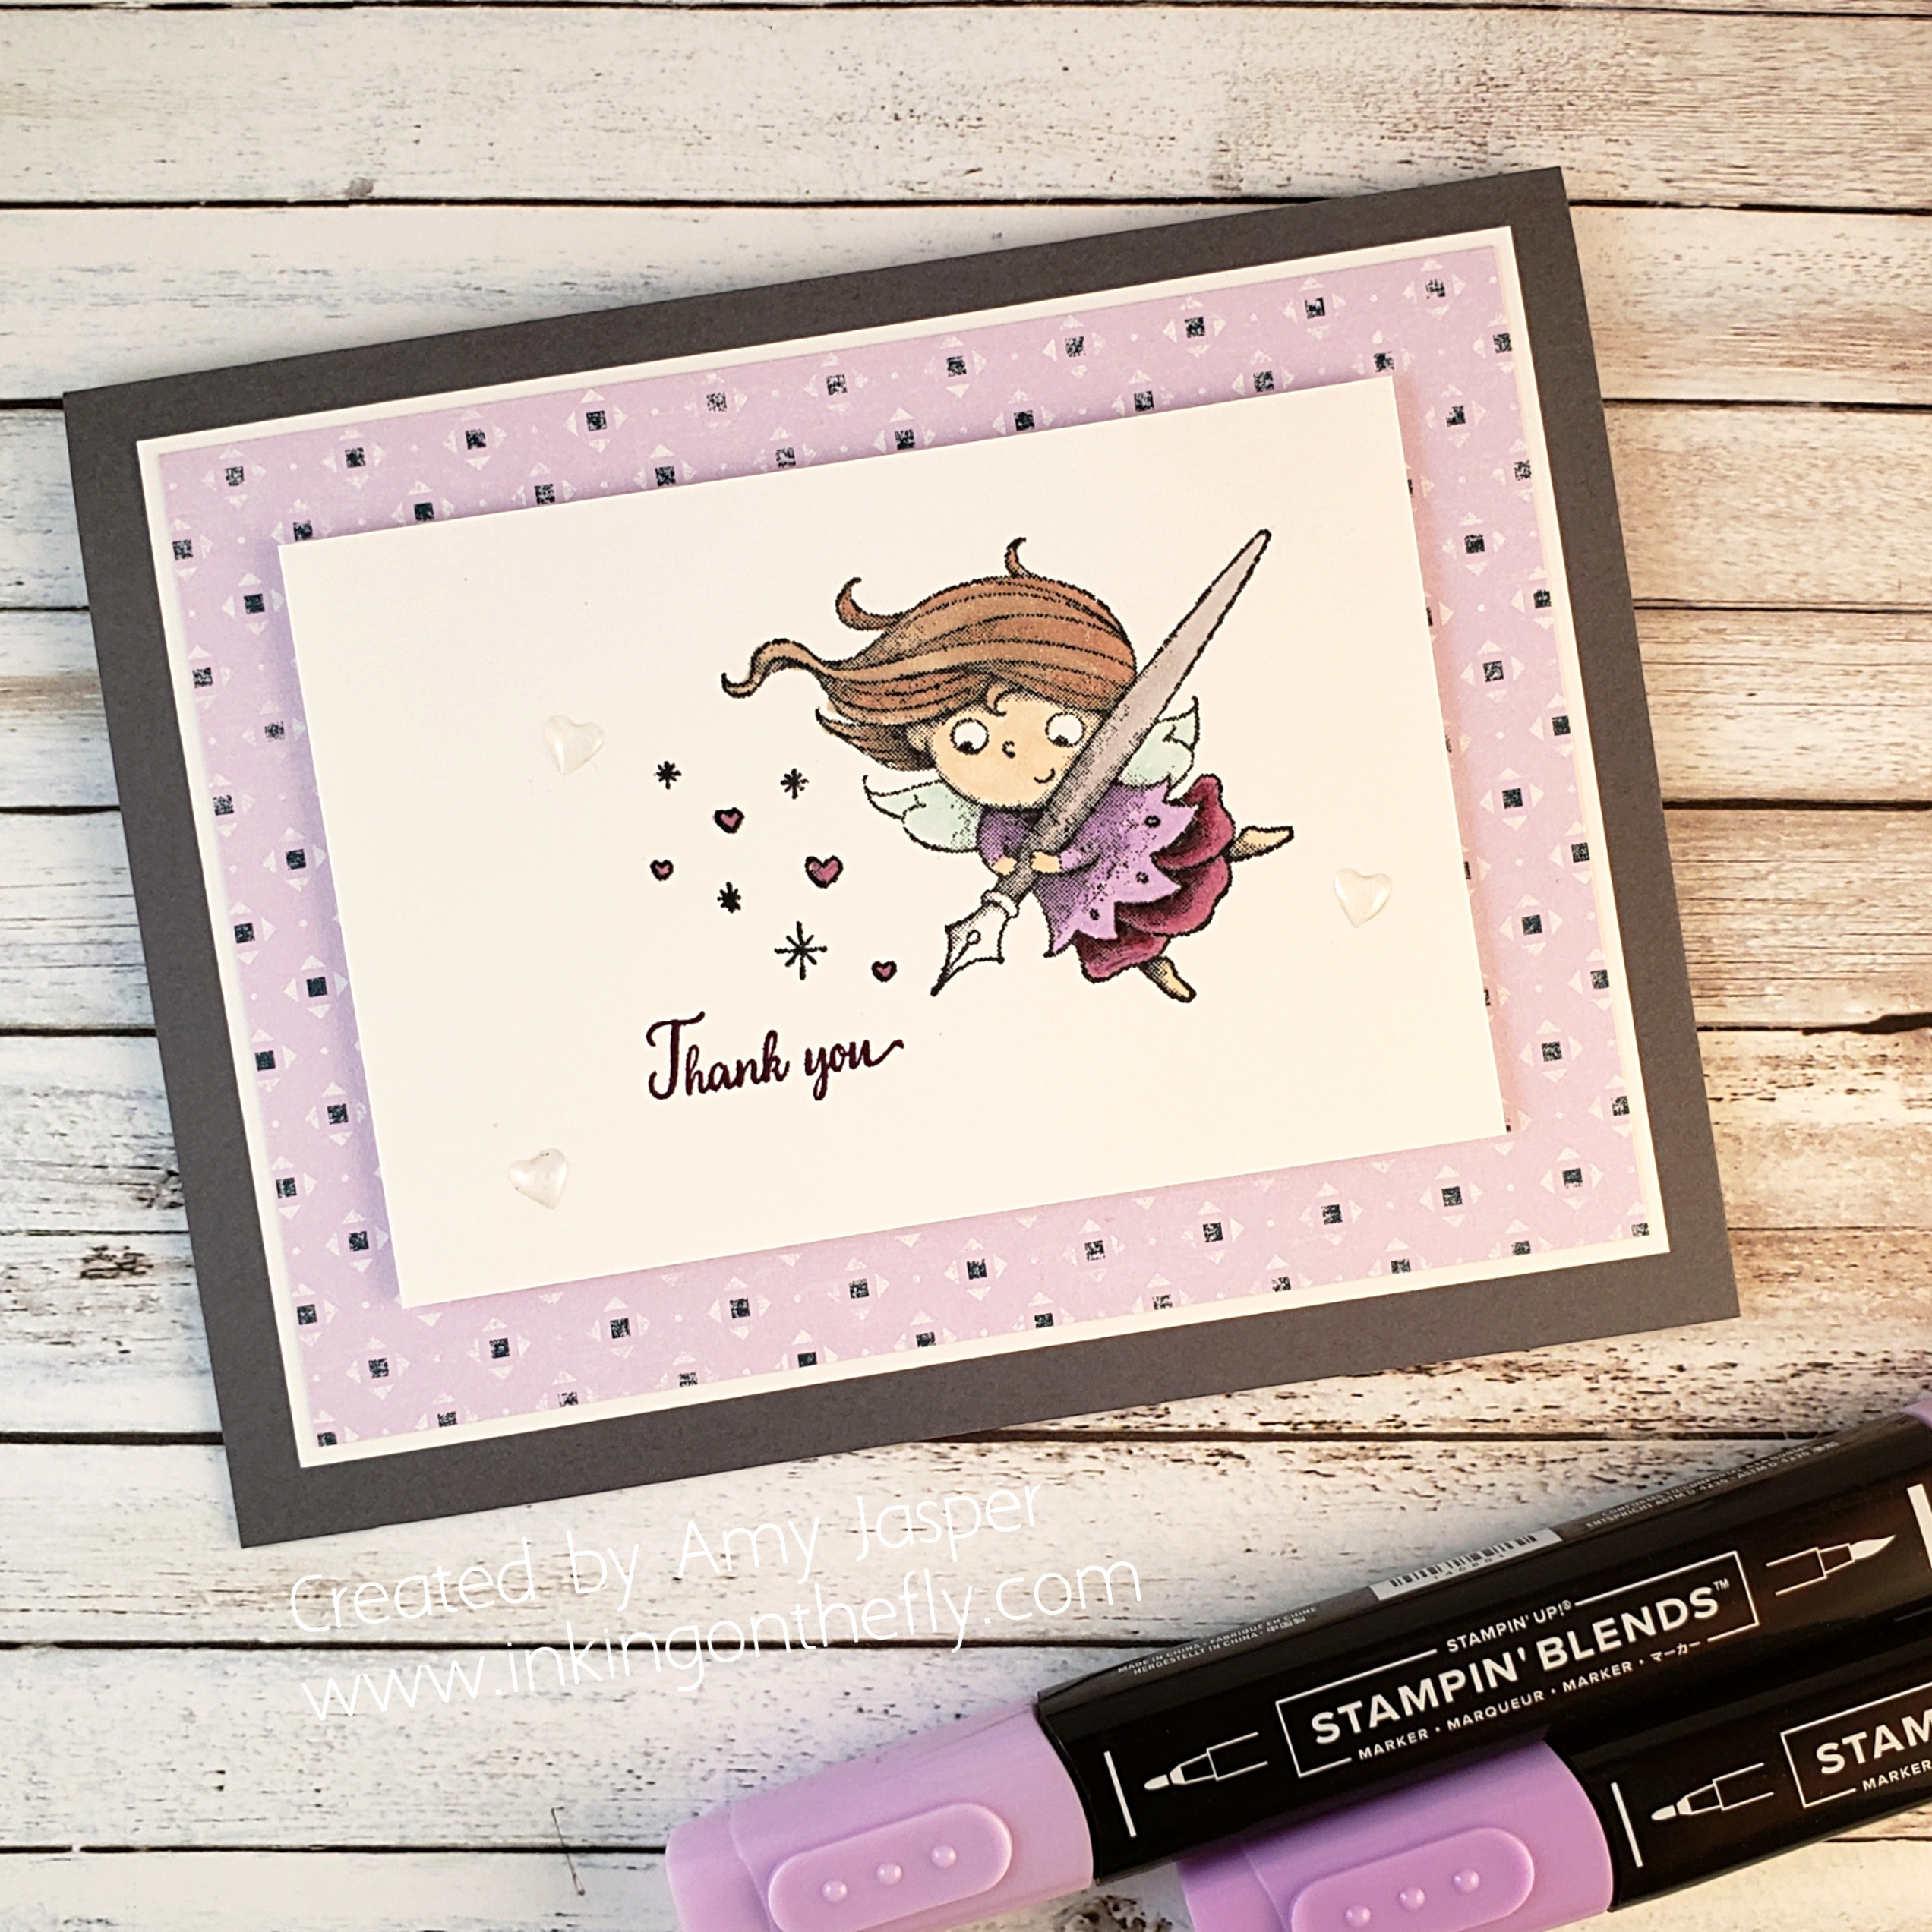
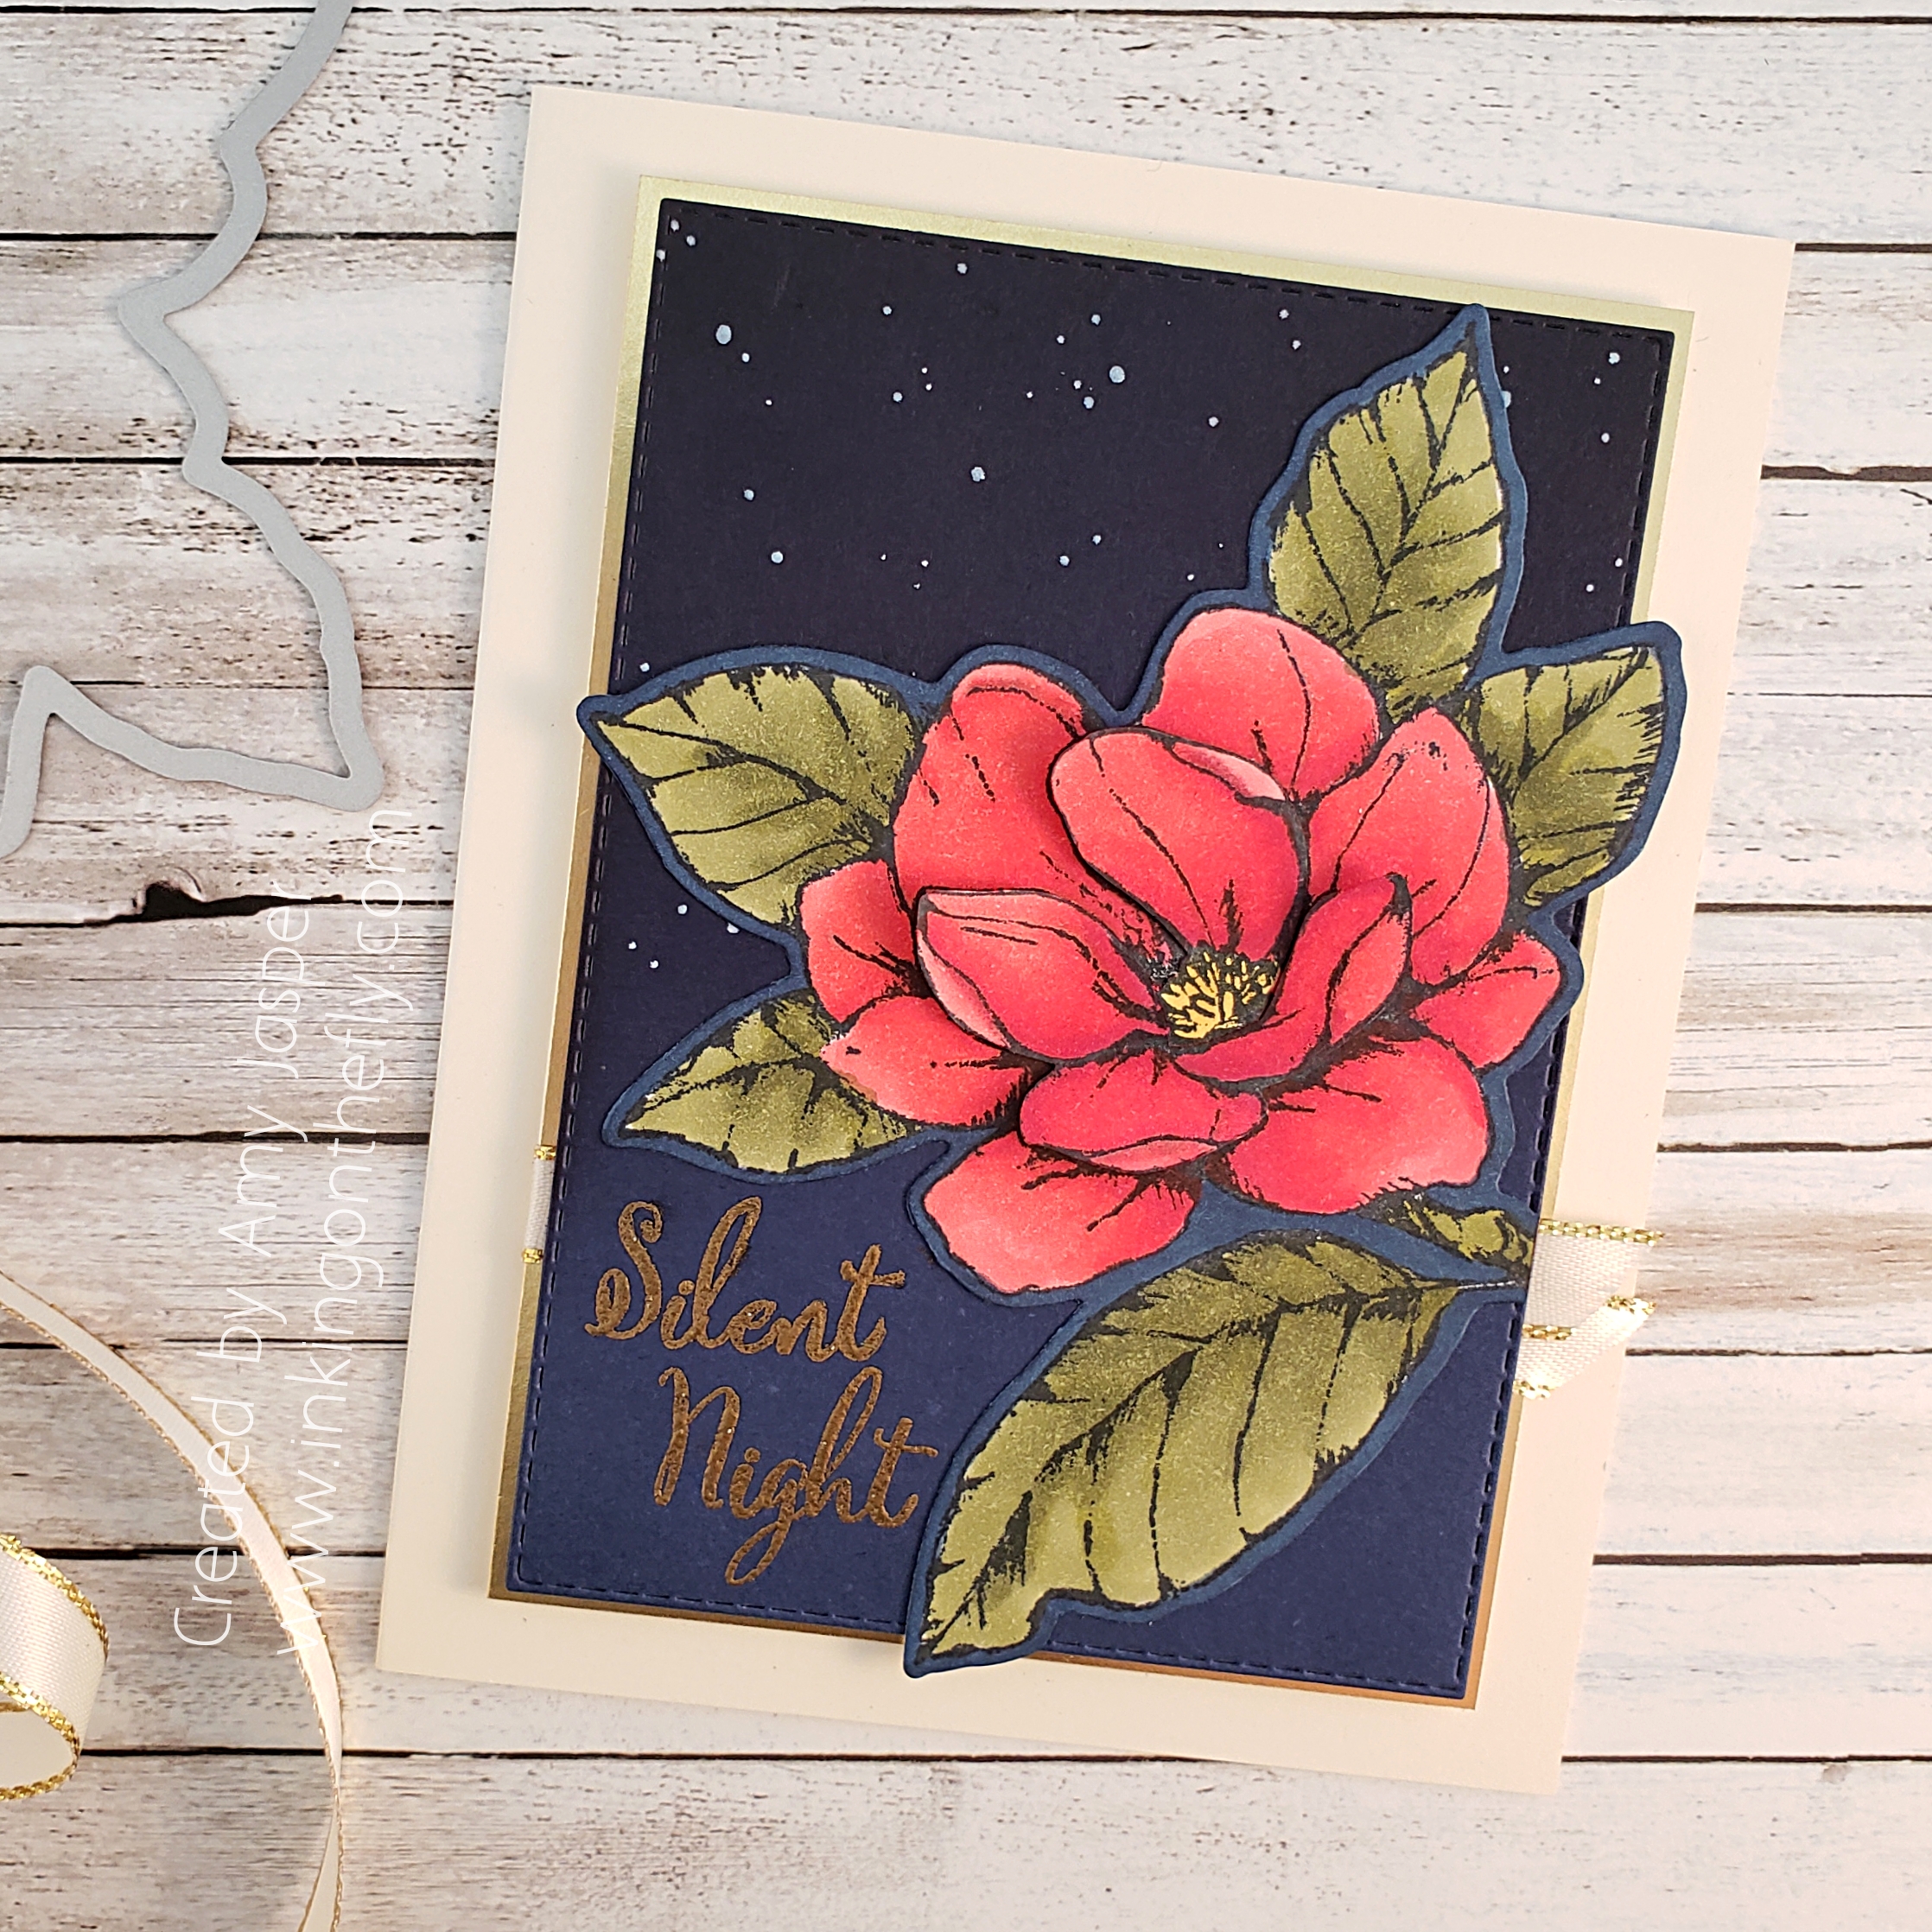
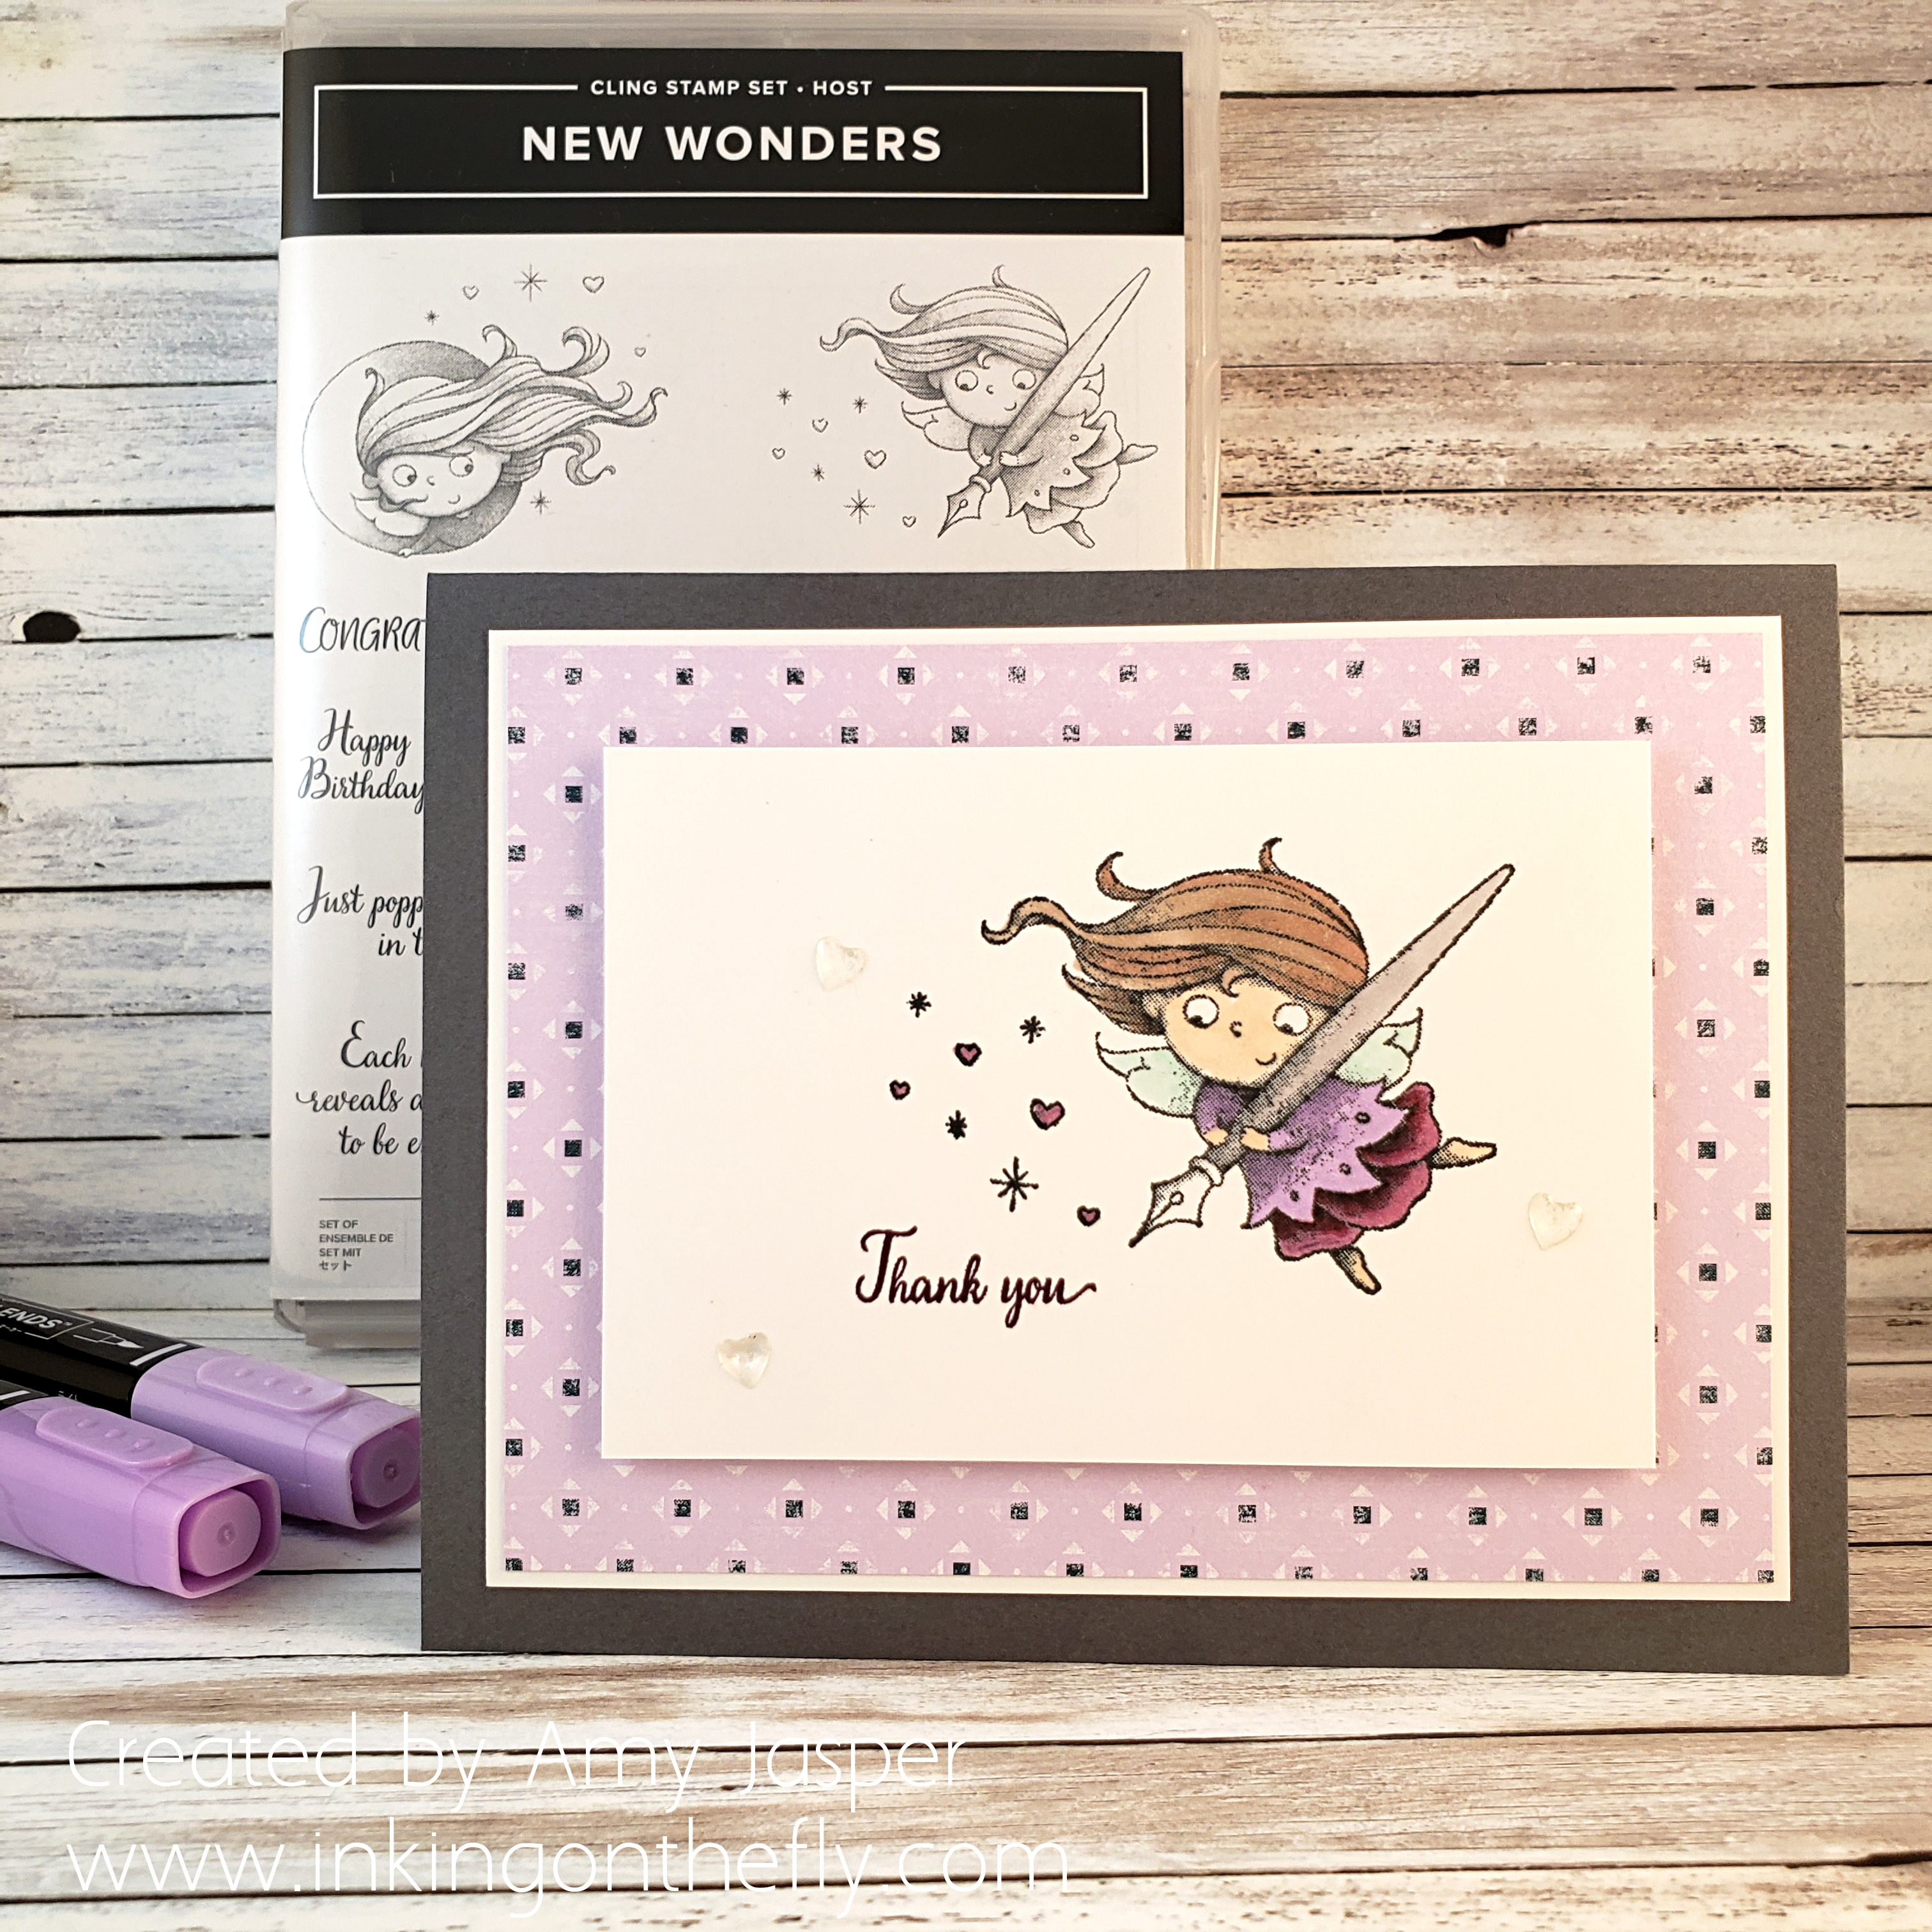
After coming up with my plan, I started the stopwatch with the aim to complete my card in less than ten minutes. I know from past experience that to keep within the time frame, I should avoid ribbon, die cutting, and colouring, because they can steal time from me and catch me up. You can clearly see that I managed to avoid all but one of those things. I just had to colour the sweet image from the New Wonders hostess stamp set from Stampin’ Up!.

I stamped the fairy image on Whisper White cardstock using Momento Tuxedo Black ink, then used an assortment of Blends markers to colour the image: Ivory, BlackBerry Bliss, Highland Heather, Pool Party, Crumb Cake, Bronze, and Smoky Slate. Isn’t she sweet!?

I stamped the thank you sentiment with Blackberry Bliss ink and added a few small Clear Epoxy Hearts around the images.

Then I assembled. The card base is Basic Grey cardstock, then there is a matte of Whisper White behind the Woven Threads Designer Series paper. The stamped piece of Whisper White was adhered with Stampin’ Dimensionals to finish the card.

No ribbon. No die cuts. Just some basic stamping and some Stampin’ Blends Markers. Definitely a sweet and simple card.

I’m pretty happy with myself. It only took me 8 minutes and 10 seconds to finish and I actually like it!

The New Wonders stamp set can only be purchased by those who either purchase $200 of Stampin’ Up! product or who host a workshop where the total product purchased by all the guests reaches a minimum of $200. So if you like this stamp set, contact me to find out how we can make that happen! You can also order at my online store by clicking on the menu on my page and accessing the SHOP button.

Rooted in Nature Sand Dollar

Have you ever looked at an image in a stamp set and thought, “That reminds me of a ______!”

Well, I keep looking at the cross cut wood image in the Rooted in Nature Stamp Set by Stampin’ Up! and am thinking exactly that! It reminds me so much of a sand dollar at the beach. I looked at a few images of sand dollars on Google and decided to try to create one using the stamp as a starting point.

My creative inspiration was from another As You See It Challenge – this one is a beach theme, which, of course, was the perfect opportunity to alter the wood image.

This card used some art skills beyond my usual application for my cards. I also used some supplies from the June Paper Pumpkin kit. If you don’t get Paper Pumpkin, I highly recommend it! If you don’t have a Demonstrator, feel free to use my name to sign up. You get wonderful stamping kits in the mail each month so you can create beautiful hand made cards or home decor with ease. It’s fun and a great escape from the stresses of the world!

Here’s my finished card:

I stamped the wood cut image on Whisper White Cardstock with Sahara Sand ink. Then I had to use some creative art skills to draw the centre image to make it look like the image in a sand dollar. I originally tried to find a stamp or a die that would fit the shape I was looking for, but with no success, I reached for a pencil.

I drew the image that looks like a five petal flower onto the centre of the wood cut stamped image. Then I used the pen end of my Gray Granite Stampin’ Write Marker to darken my pencil drawing. My Blender Pen also got involved to soften my marker lines and create a bit of shading and imperfections that you would find in nature. It took a couple of tries before I got it right, but it was a lot more successful than I thought it would be!

I used my pencil again to draw the long ovals that I wanted to cut with a craft knife. A punch would have been nice, but I didn’t have anything that would work. After carefully cutting these, I used my Gray Granite Stampin’ Write Marker again (this time, I used the brush tip) to darken the edge of the paper inside the holes to give the impression of depth. The colour bled more than I intended it to, but the effect ended up working for me. (Lucky!)

The rest of the card involves paper layering and some heat embossing with Gold Embossing powder on Vellum cardstock. I also sponged some Bermuda Bay ink over the upper portion of one of my Whisper White cardstock layers to create a sort of sky for my beach scene. This with the torn layers of Coastal Cabana, Sparkle Glimmer Paper, and a piece of patterned paper from the Woven Threads Designer Series Paper, along with some Linen Thread tied in a loopy bow, complete my beach-themed card.

Let me know what you think. Did I successfully turn a stamped image of a piece of wood into a sand dollar? Have you ever tried to alter a stamped image to make it look like something else?

Christmas in July

I just can’t get enough of the Good Morning Magnolia stamp set!

The As You See it Challenge this week is what we call an assortment challenge. You have to include all of the listed elements on your card design.

I wasn’t sure how to pull this one off as I like to use current Stampin’ Up! product for the cards I post on my blog and I didn’t have ANY stars!! Not a single current stamp set or die cut with a star. I’m a little bit shocked at this finding. It appears that I need to make a purchase, lol!

Since I didn’t have stars, I remembered a technique using the Chalk Marker to dot the background to look like stars in the night sky. That was the beginning of this card.

I sponged some Night of Navy ink on to Night of Navy cardstock fading it lighter as I moved down the paper. The Chalk Marker dots were then added to make the starry night sky. The sentiment is another problem that I came across as I couldn’t find any Christmas sayings that were the right size for that small space. So I created my own using the Make a Difference Photopolymer Stamp Set. It’s a bit more effort, but it allows you to write whatever you might choose. I stamped each letter with Versamark ink, then heat embossed with Gold Embossing Powder.

I used the Rectangle Stitched Dies to cut the Night of Navy piece to the size I wanted. That was attached to a piece of Gold Foil Paper on which I added a little peek-a-boo amount of the Gold Metallic Edged Ribbon. Both of those layers were added to the Thick Very Vanilla cardstock card base.

The magnolia image is the main attraction on this elegant Christmas card. I stamped the image on Whisper White cardstock with Tuxedo Black Momento ink, then coloured it using my Stampin’ Blends Markers: Poppy Parade (light and dark), a tiny touch of the Cherry Cobbler (I think it was the light one, but I can’t remember now, sorry), Mango Melody (dark) for the centre, Mossy Meadow (light and dark), and the Color Lifter Blends Marker to intensify some highlights on the petals. I then coloured around the outside of the flower with the Sark Night of Navy Blends Marker so that when I die cut the image, it would blend more with my background colour. I attached the die cut magnolia with Multipurpose Liquid Glue.

But that’s not all!

I stamped the magnolia a second time on Whisper White cardstock, colouring just the flower centre and four centre-most petals. I then fussy cut around those four petals. I attached them with Multipurpose Tombo Liquid Glue under the centre of the group of petals, and with Mini Stampin’ Dimensionals under the outer-most area of the petals, giving the flower more of a 3D look.

I love how it turned out!! I am definitely going to share this 3D look with my technique class in the future. I think they’ll really like it!

Now it’s your turn to give this assortment challenge a try and share it with us on the As You See It Challenge Blog! We would love to see how you pulled all of those elements together.

And if you like this Good Morning Magnolia stamp set as much as I do and you are in Canada, why not go over to my ONLINE STORE and add it to an order. You’ll probably love the whole Magnolia Lane Suite! It’s all just gorgeous!