card

Do the Impossible

My niece is a competitive cross-country skier and has qualified to compete in the Biathlon World Youth Championships in Switzerland this month! Her entire family (my brother, his wife, and the two daughters) all compete in biathlon. I think they’re a little crazy, but I am crazy proud of all of them and their determination and discipline to compete.

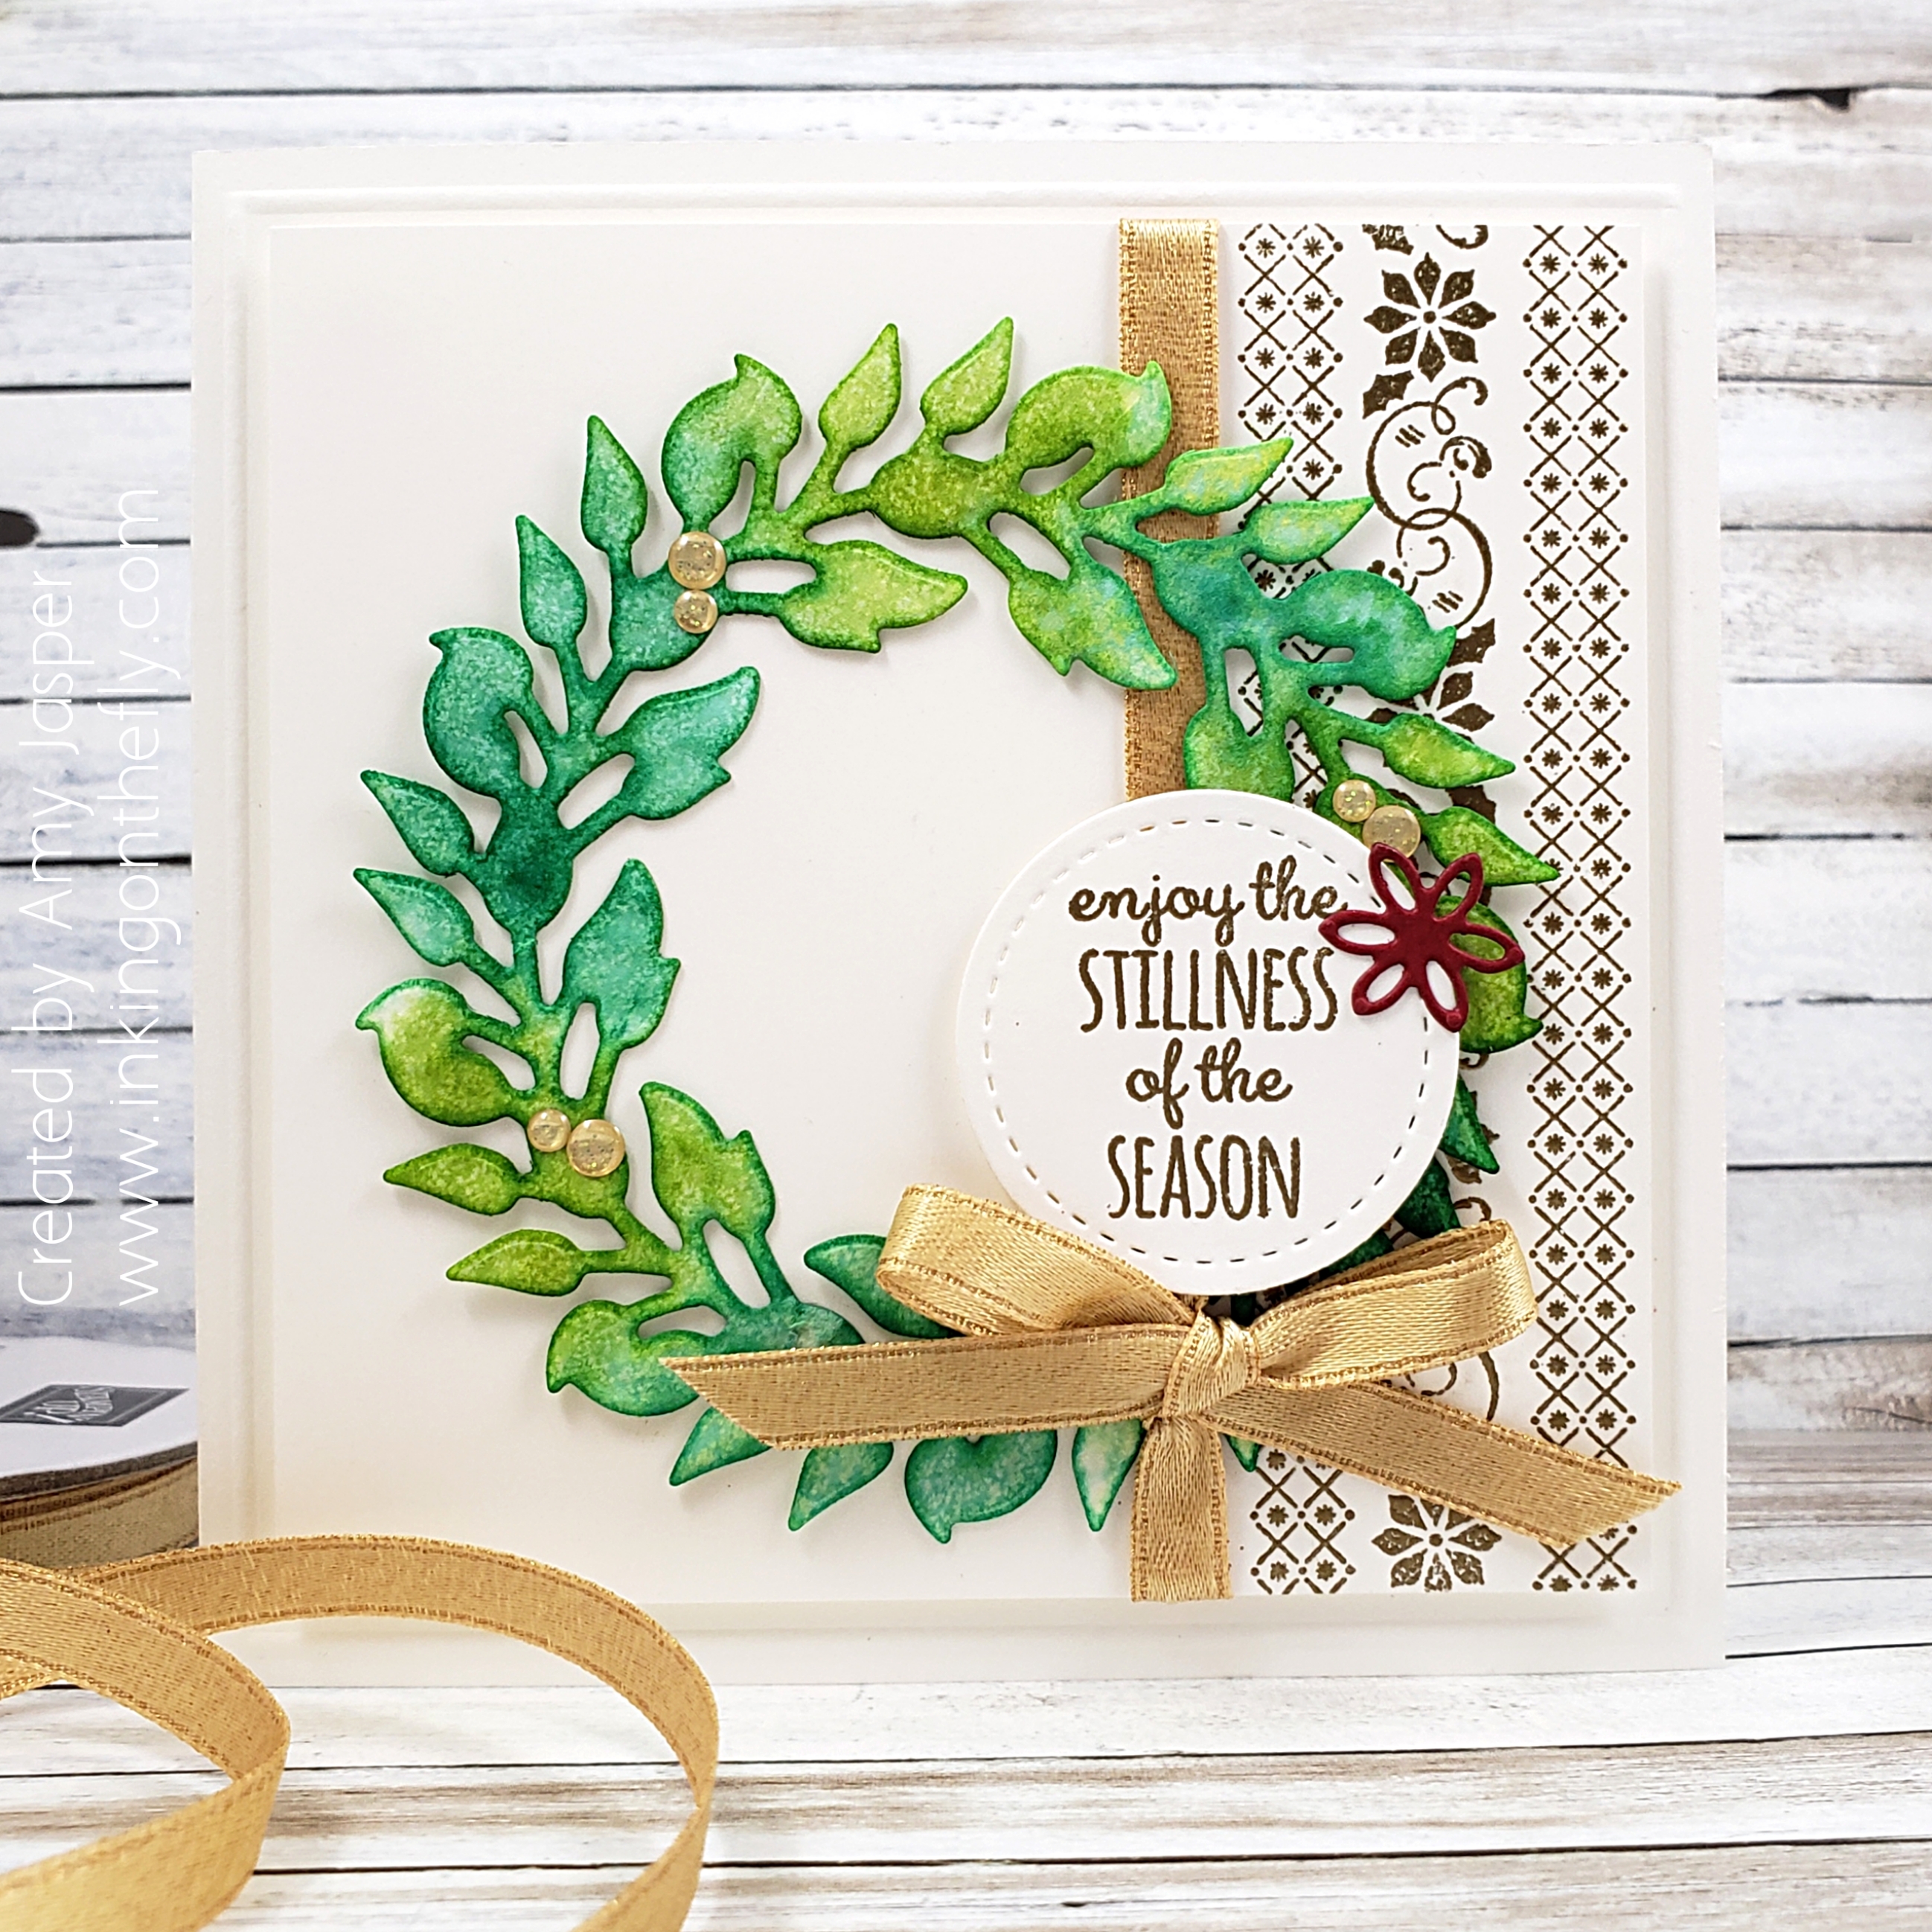
The card I made for today’s blog post is for my niece for her birthday (shhh, it isn’t until February). I am so pleased with how I was able to use an image of a jogger and make it look like a skier with a little extra simple drawing skills.

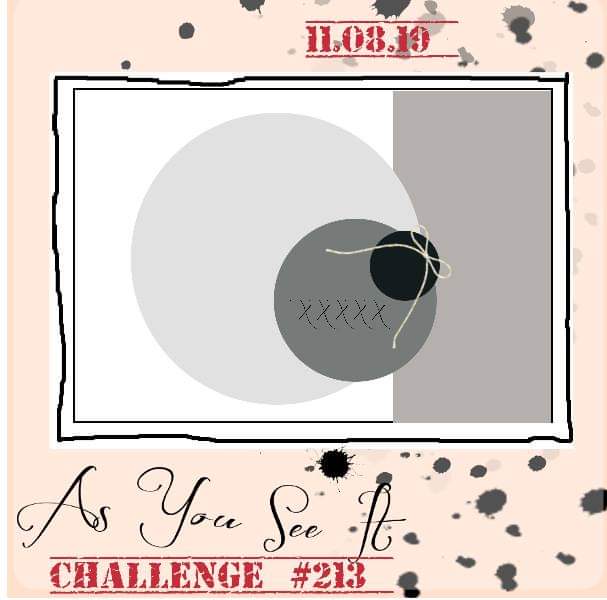
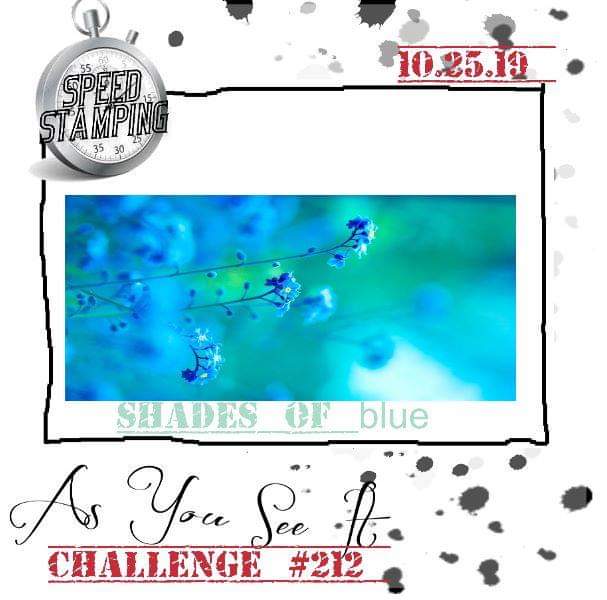
I had this As You See It Challenge to get me started:

For my card, I used the “Do the Impossible” stamp set from Stampin’ Up! One of the images is of two people jogging together. I inked up only the one with the long hair and stamped on Smoky Slate cardstock with Tuxedo Black Momento ink. Then I used a Basic Gray Stampin’ Write Marker to carefully draw in the lines for ski poles and skis. The skis were a bit difficult to get the angle right, but I think it came together. This sketch-style image makes it very forgiving to add to the image like this.

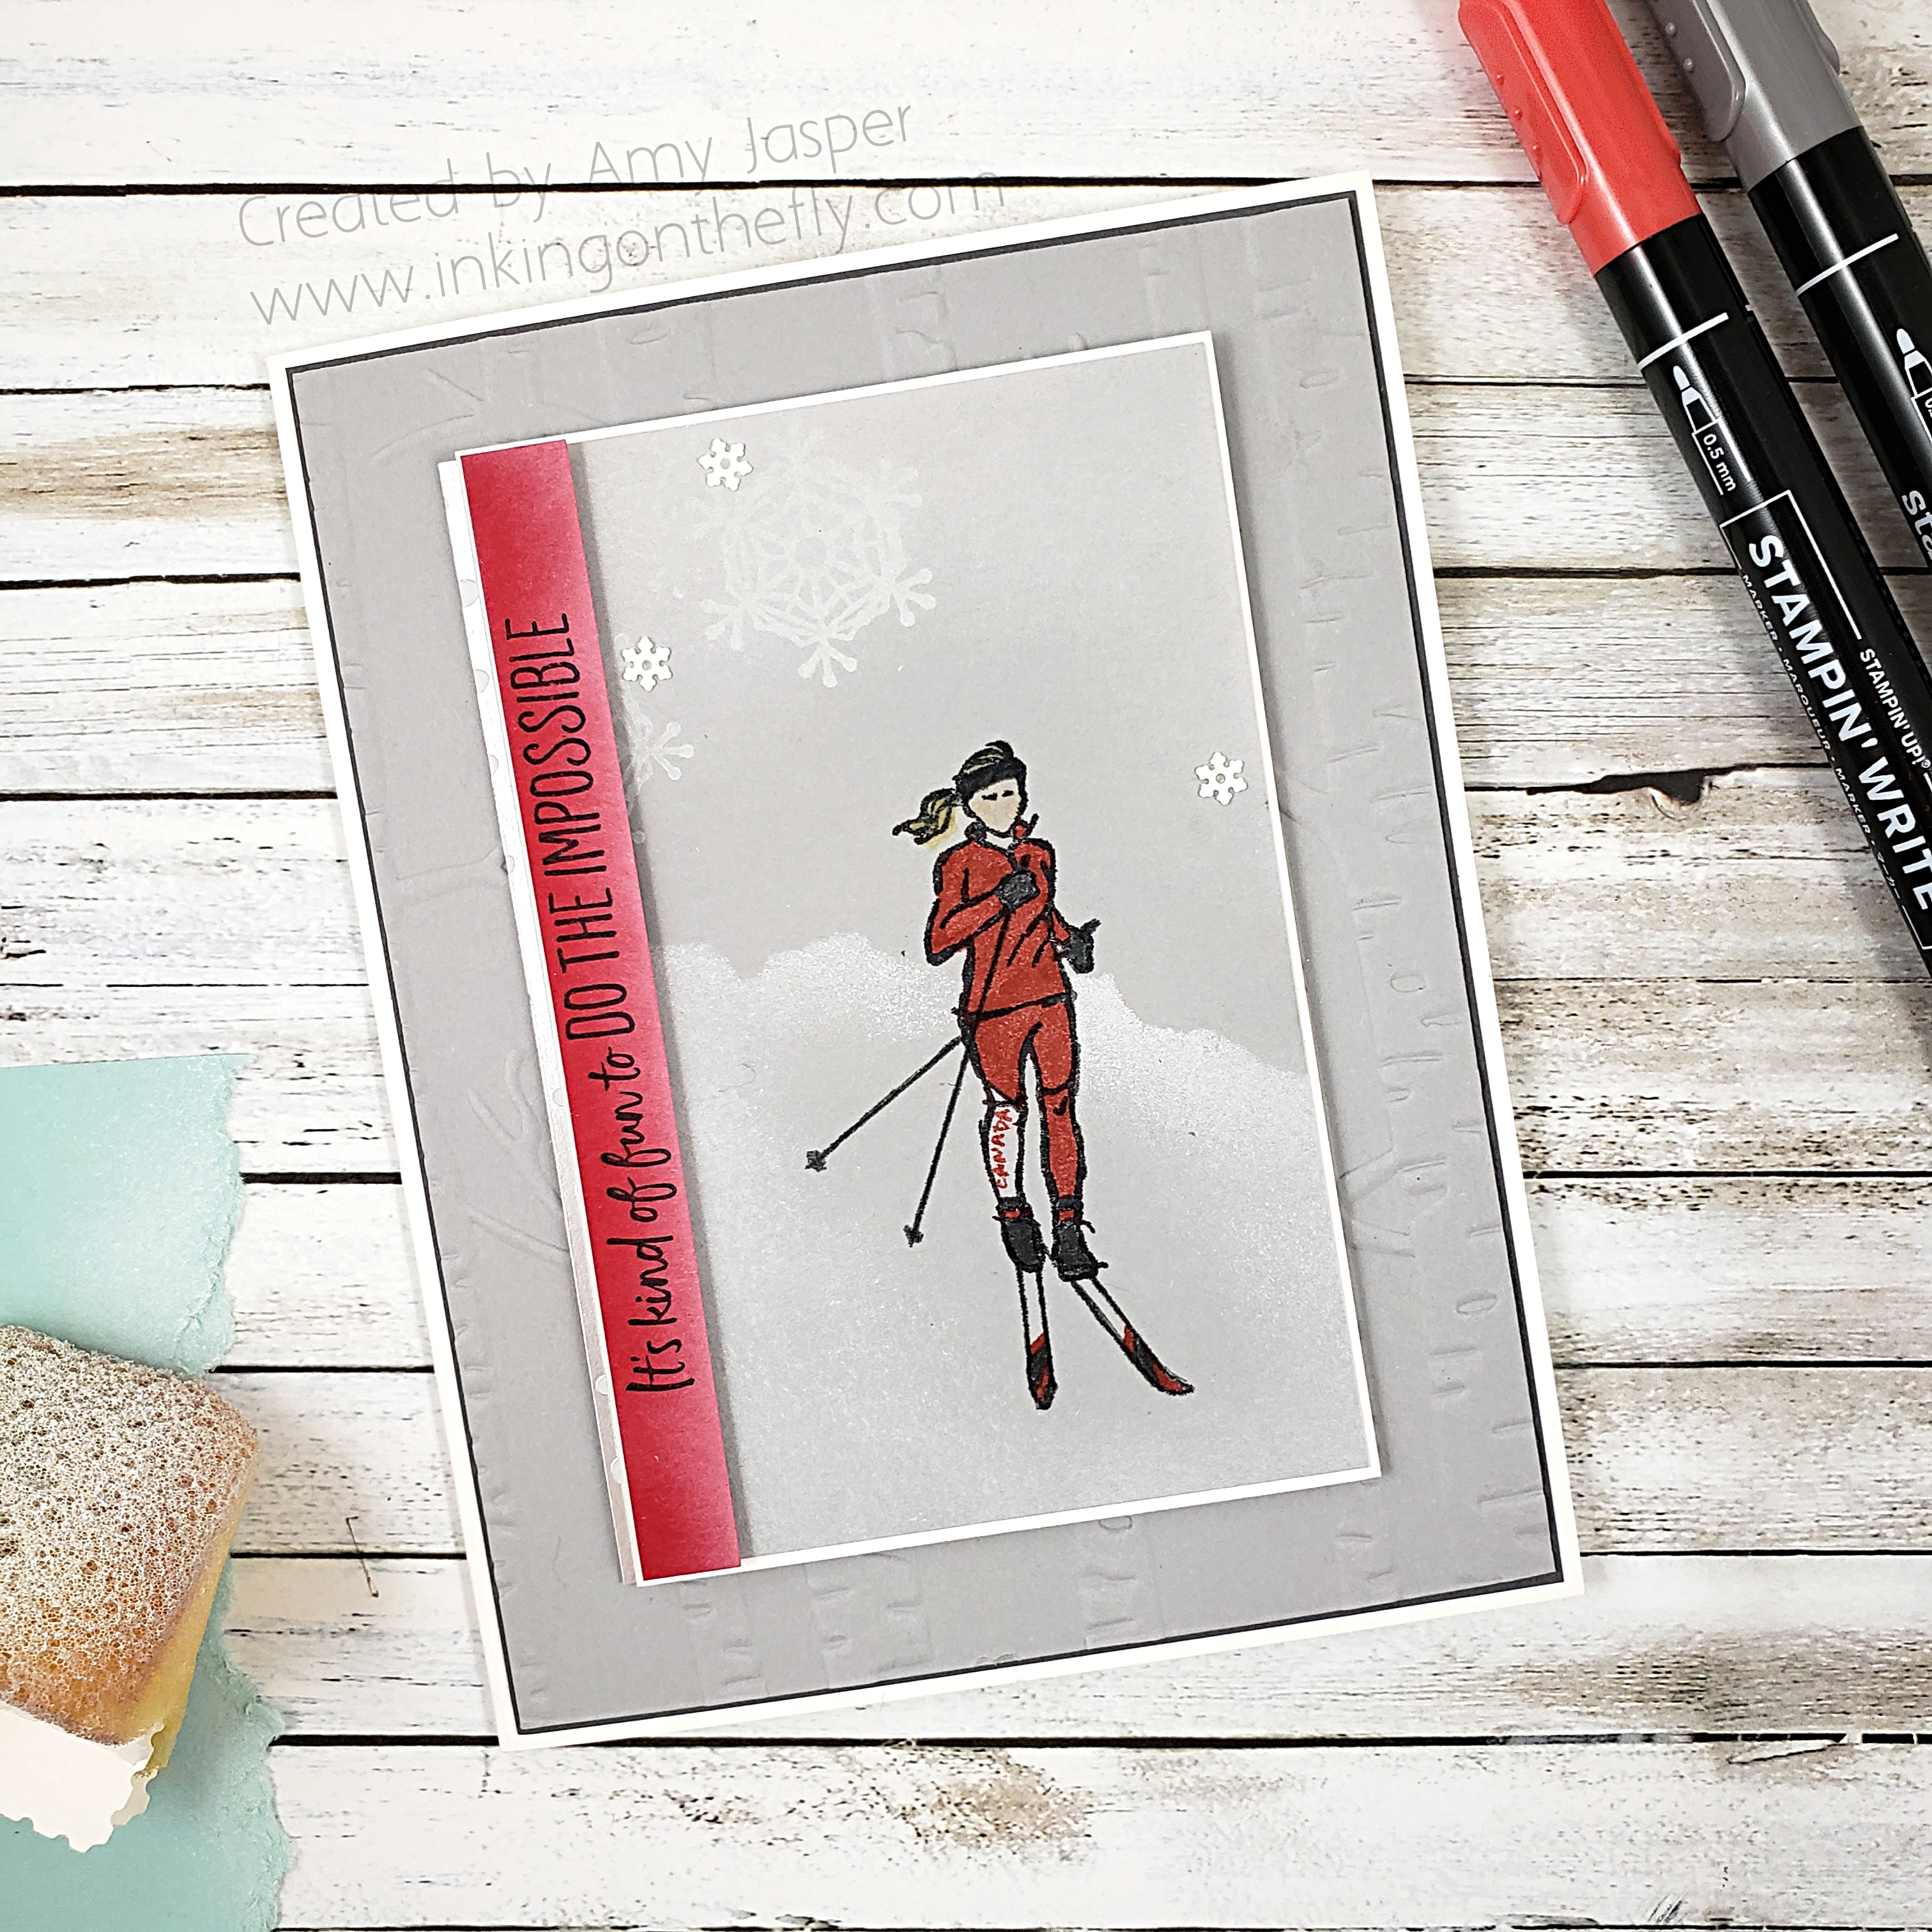
I coloured her ski suit with the Poppy Parade Stampin’ Write marker, trying to make it look like her Canadian racing suit. I even wrote “Canada” on the lower leg, just like the suit has (I thought that was pretty clever, LOL!).

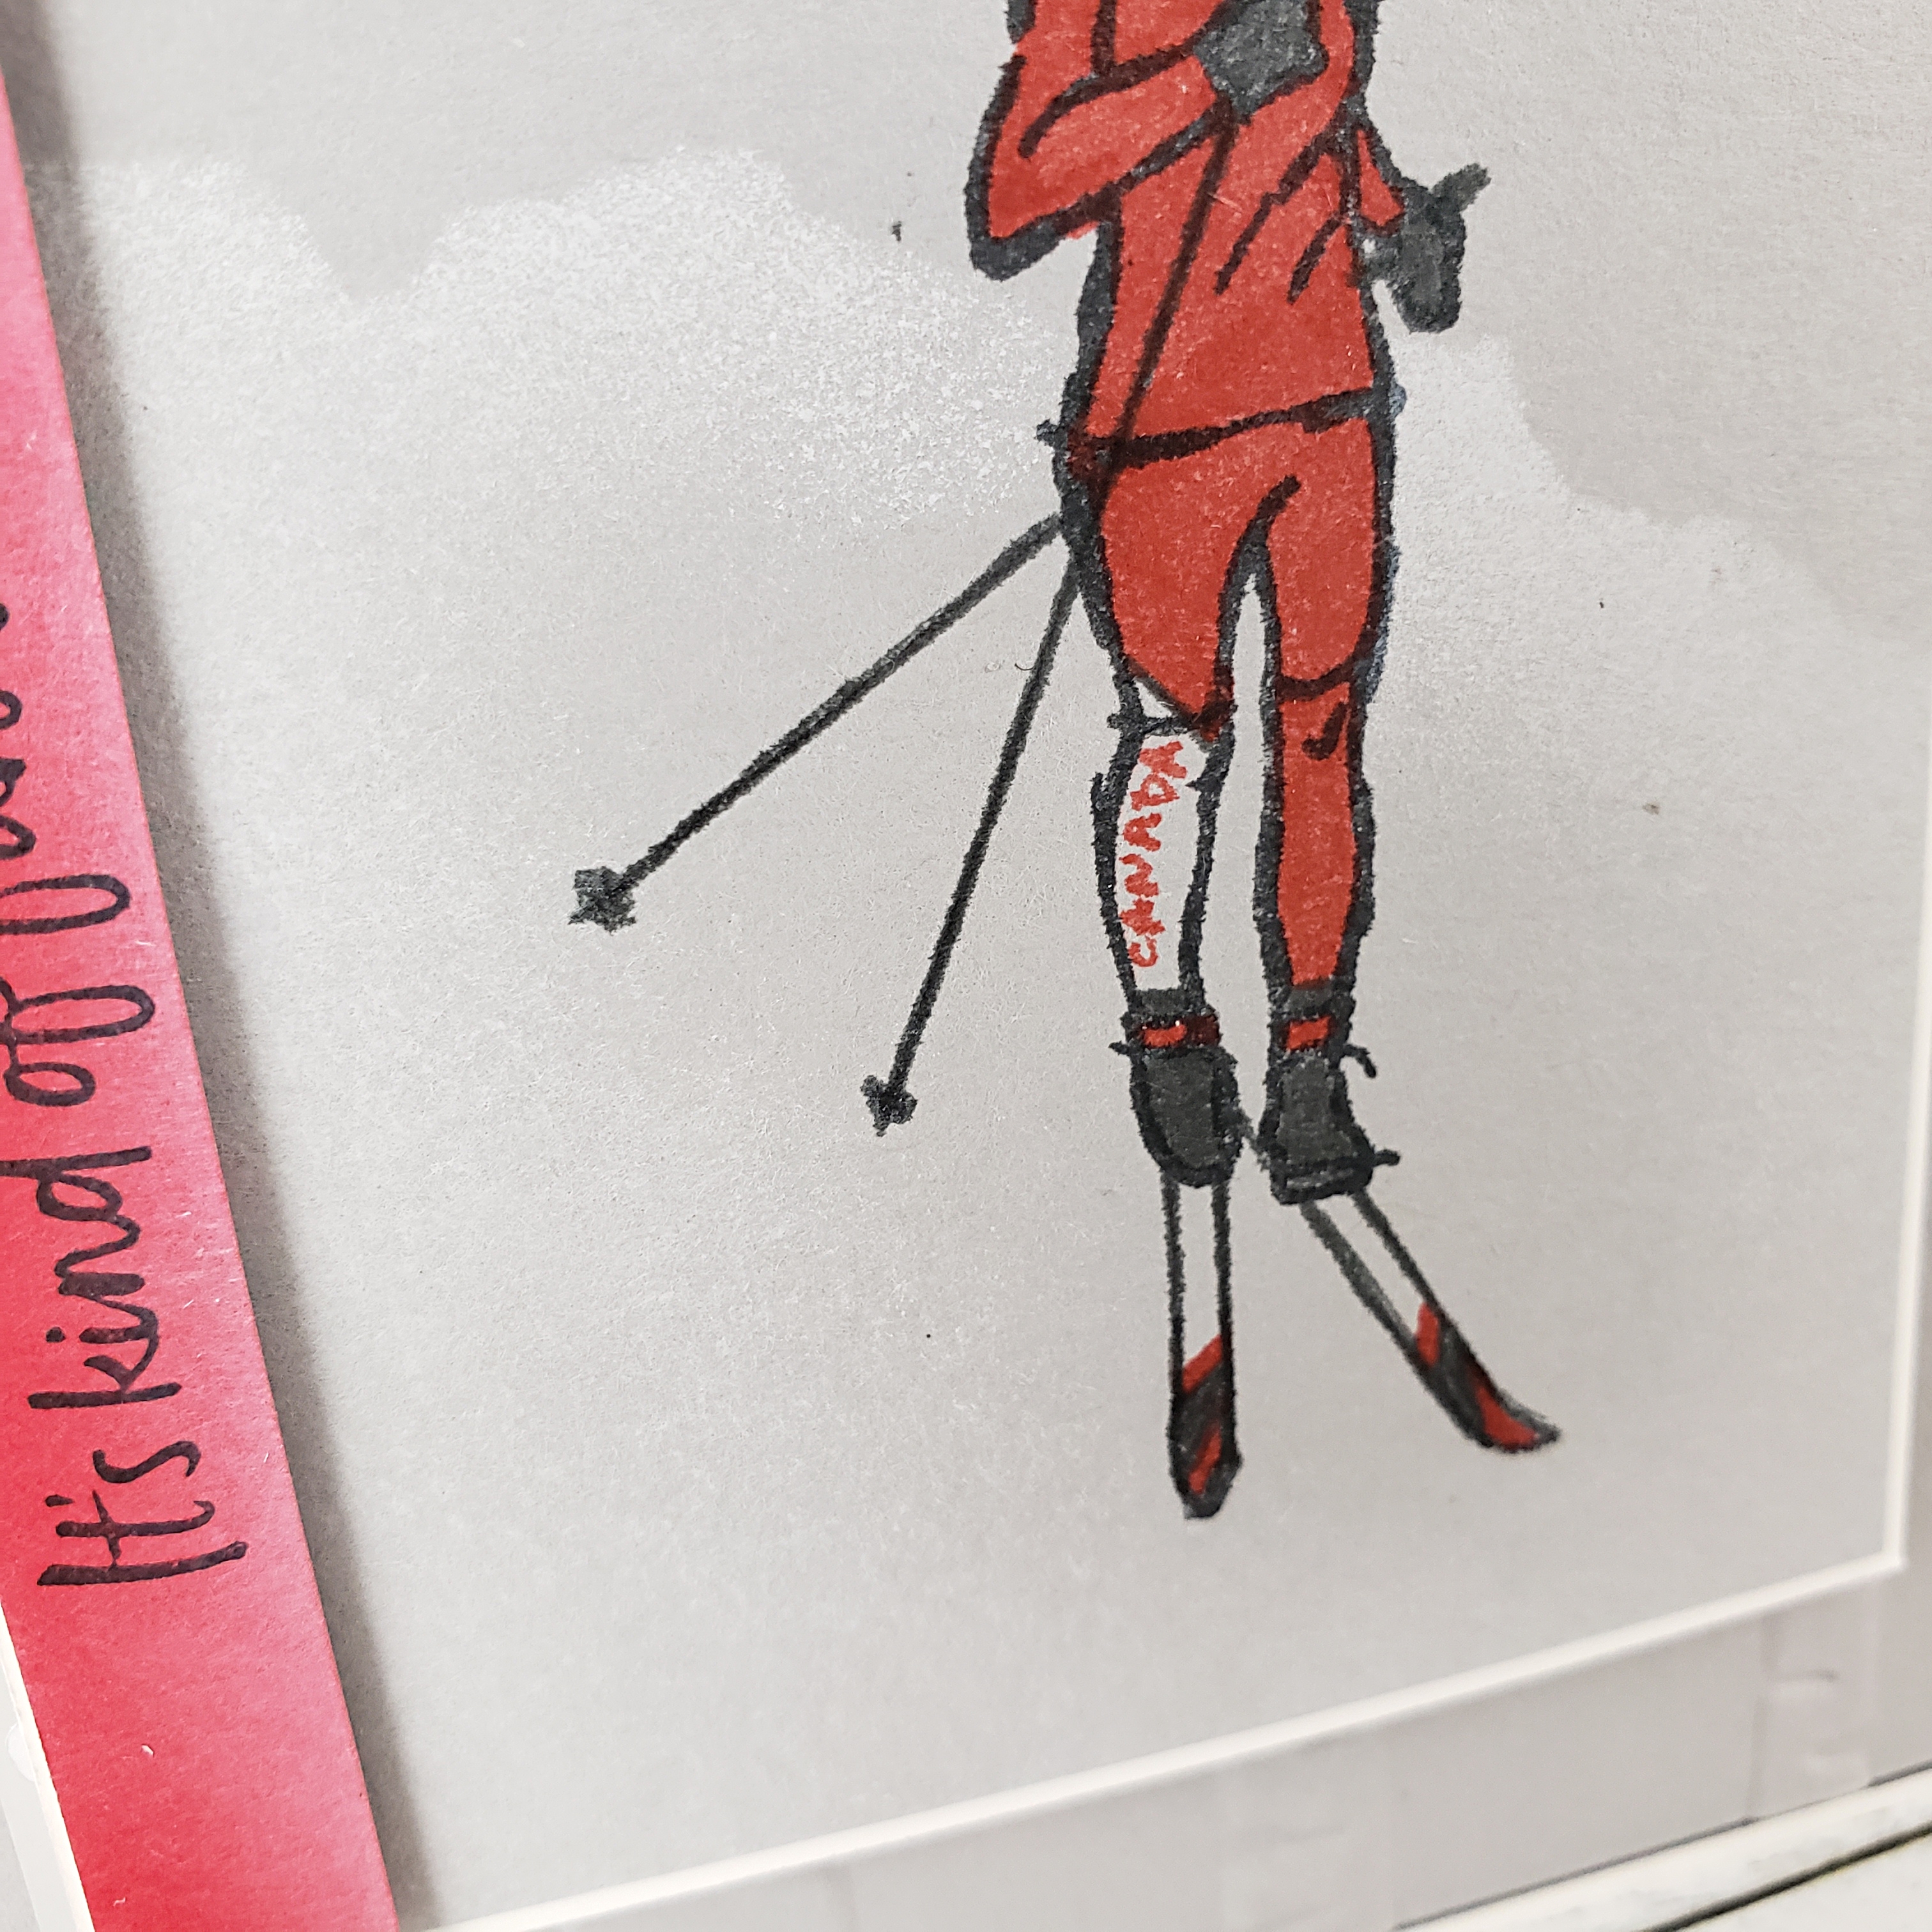
I gave her a headband to keep her ears warm by using that Basic Grey Stampin’ Write Marker again. I used it for her gloves, boots, and some detail on her skis as well. I coloured her hair with a So Saffron Stampin’ Write Marker, but I coloured her face and neck with the Ivory Blends Marker, adding a touch of colour with the Light Petal Pink Blends Marker.

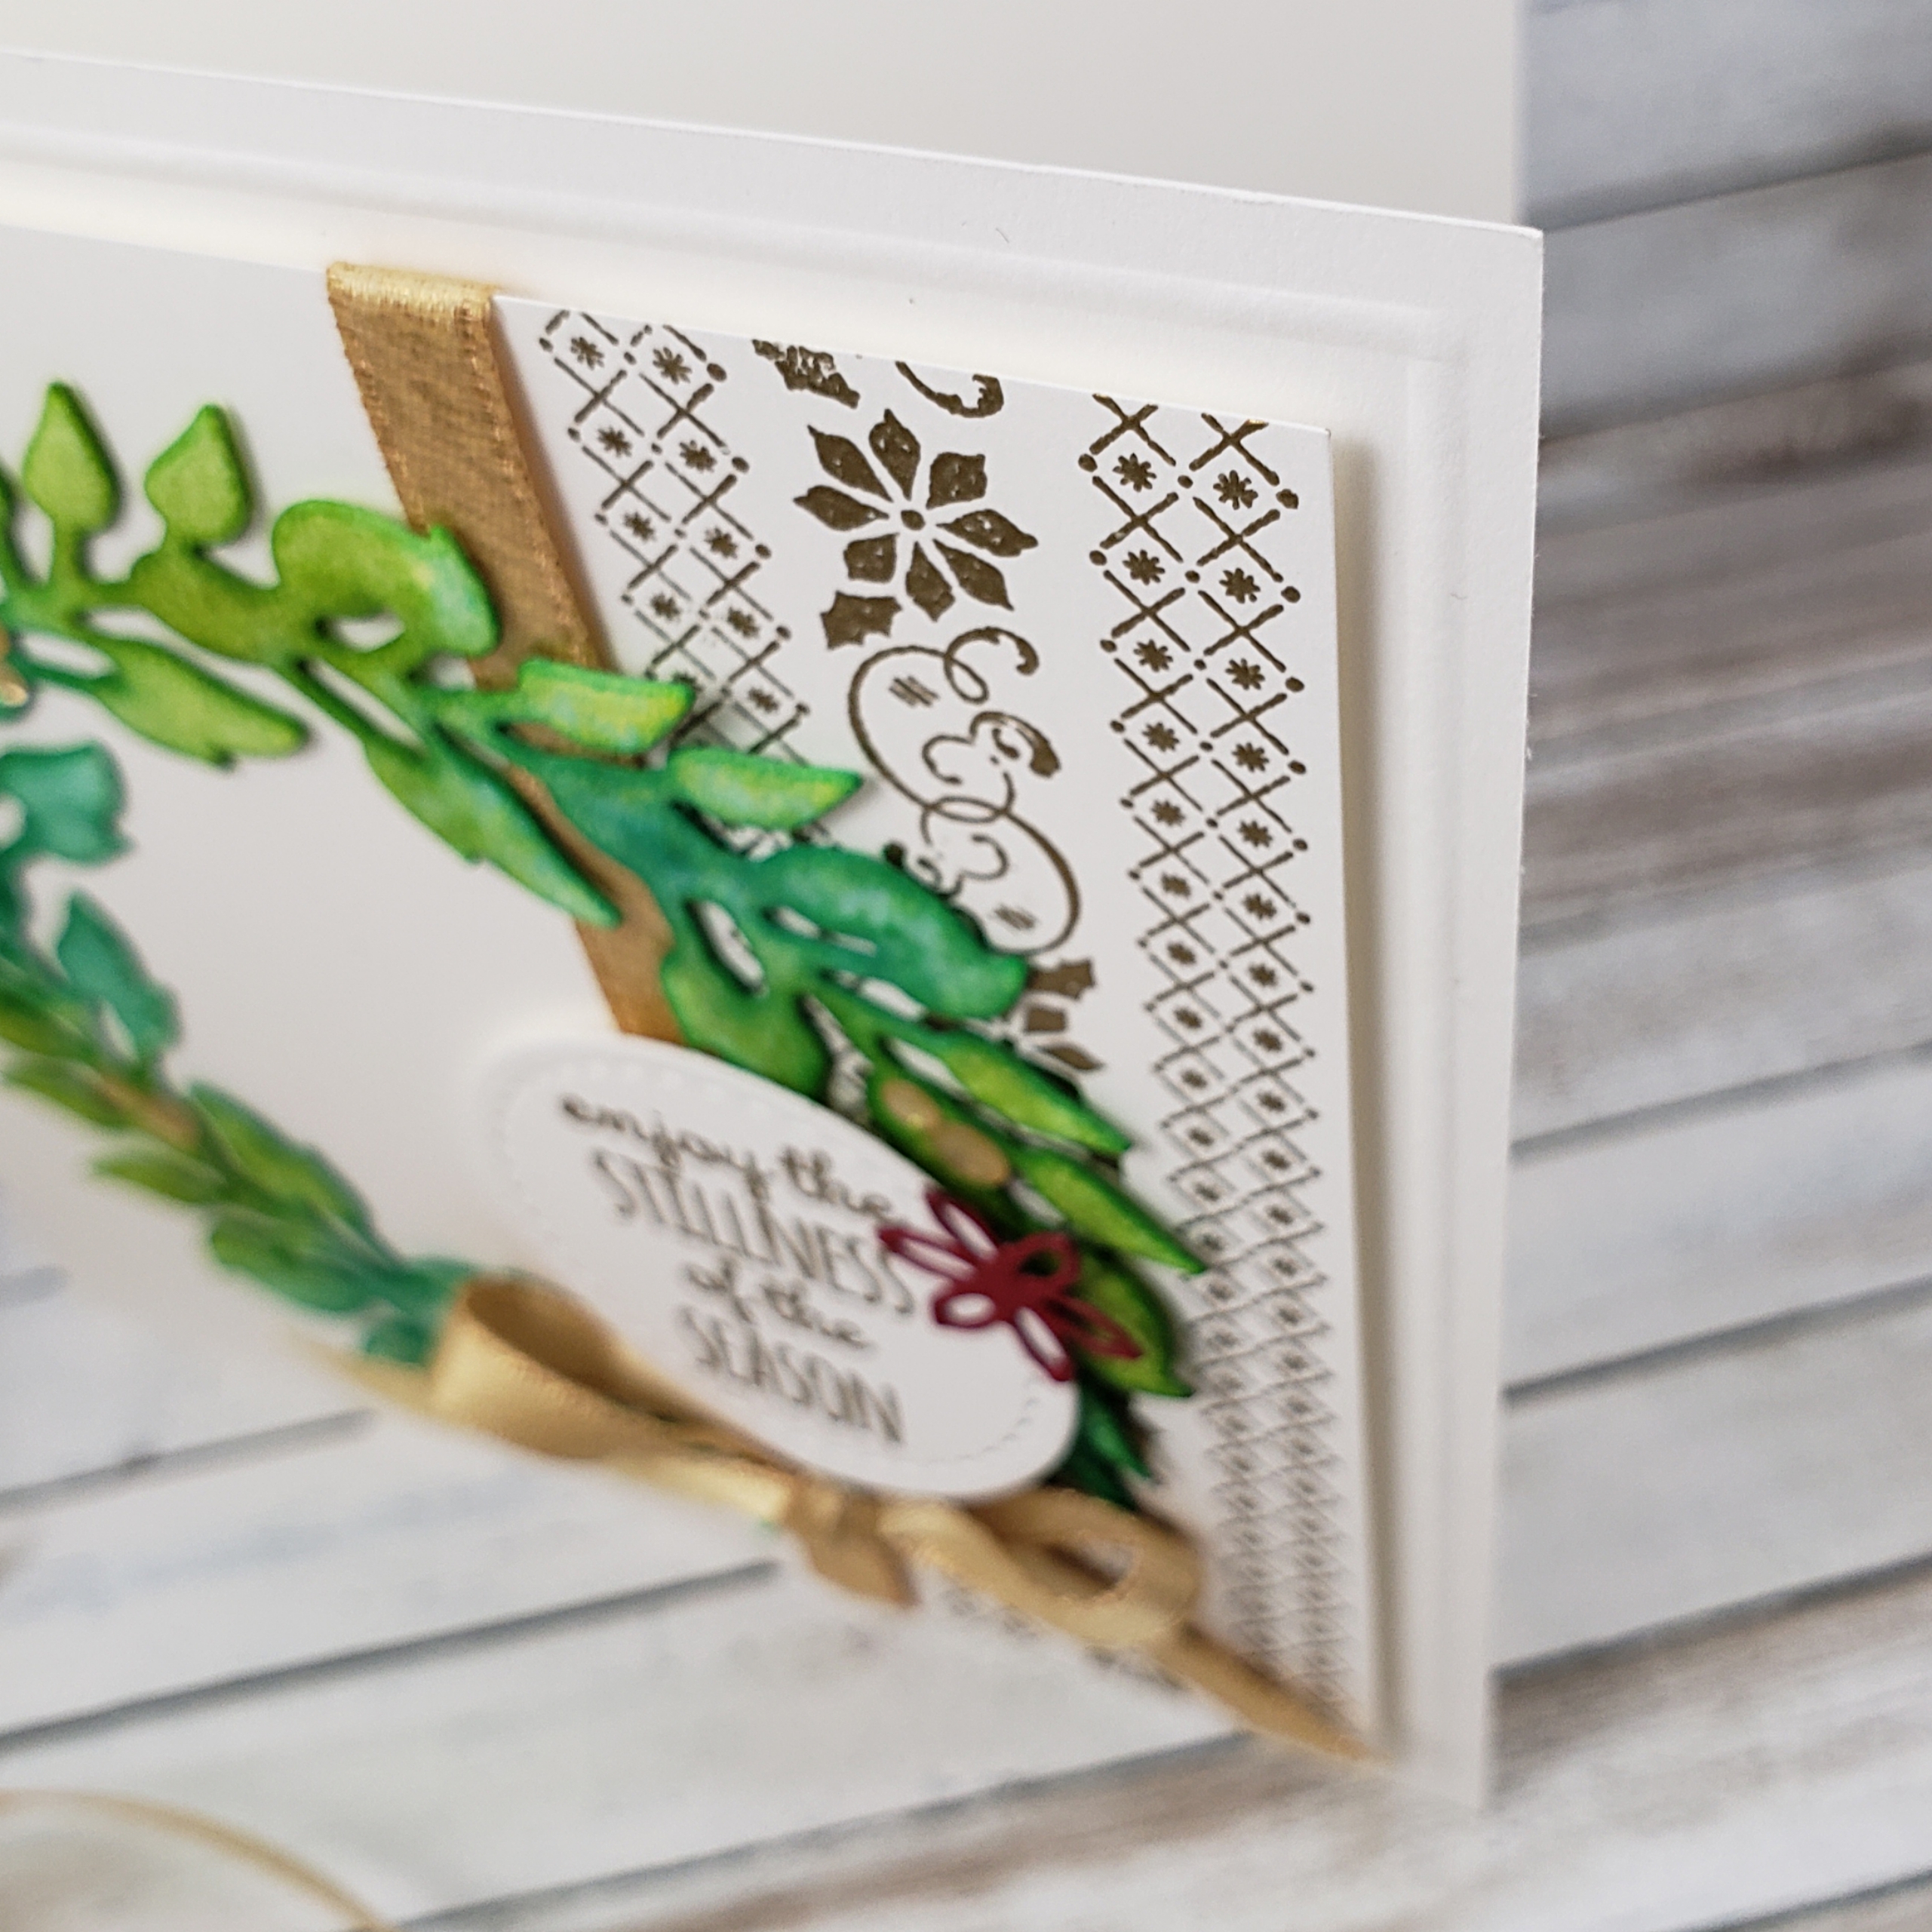
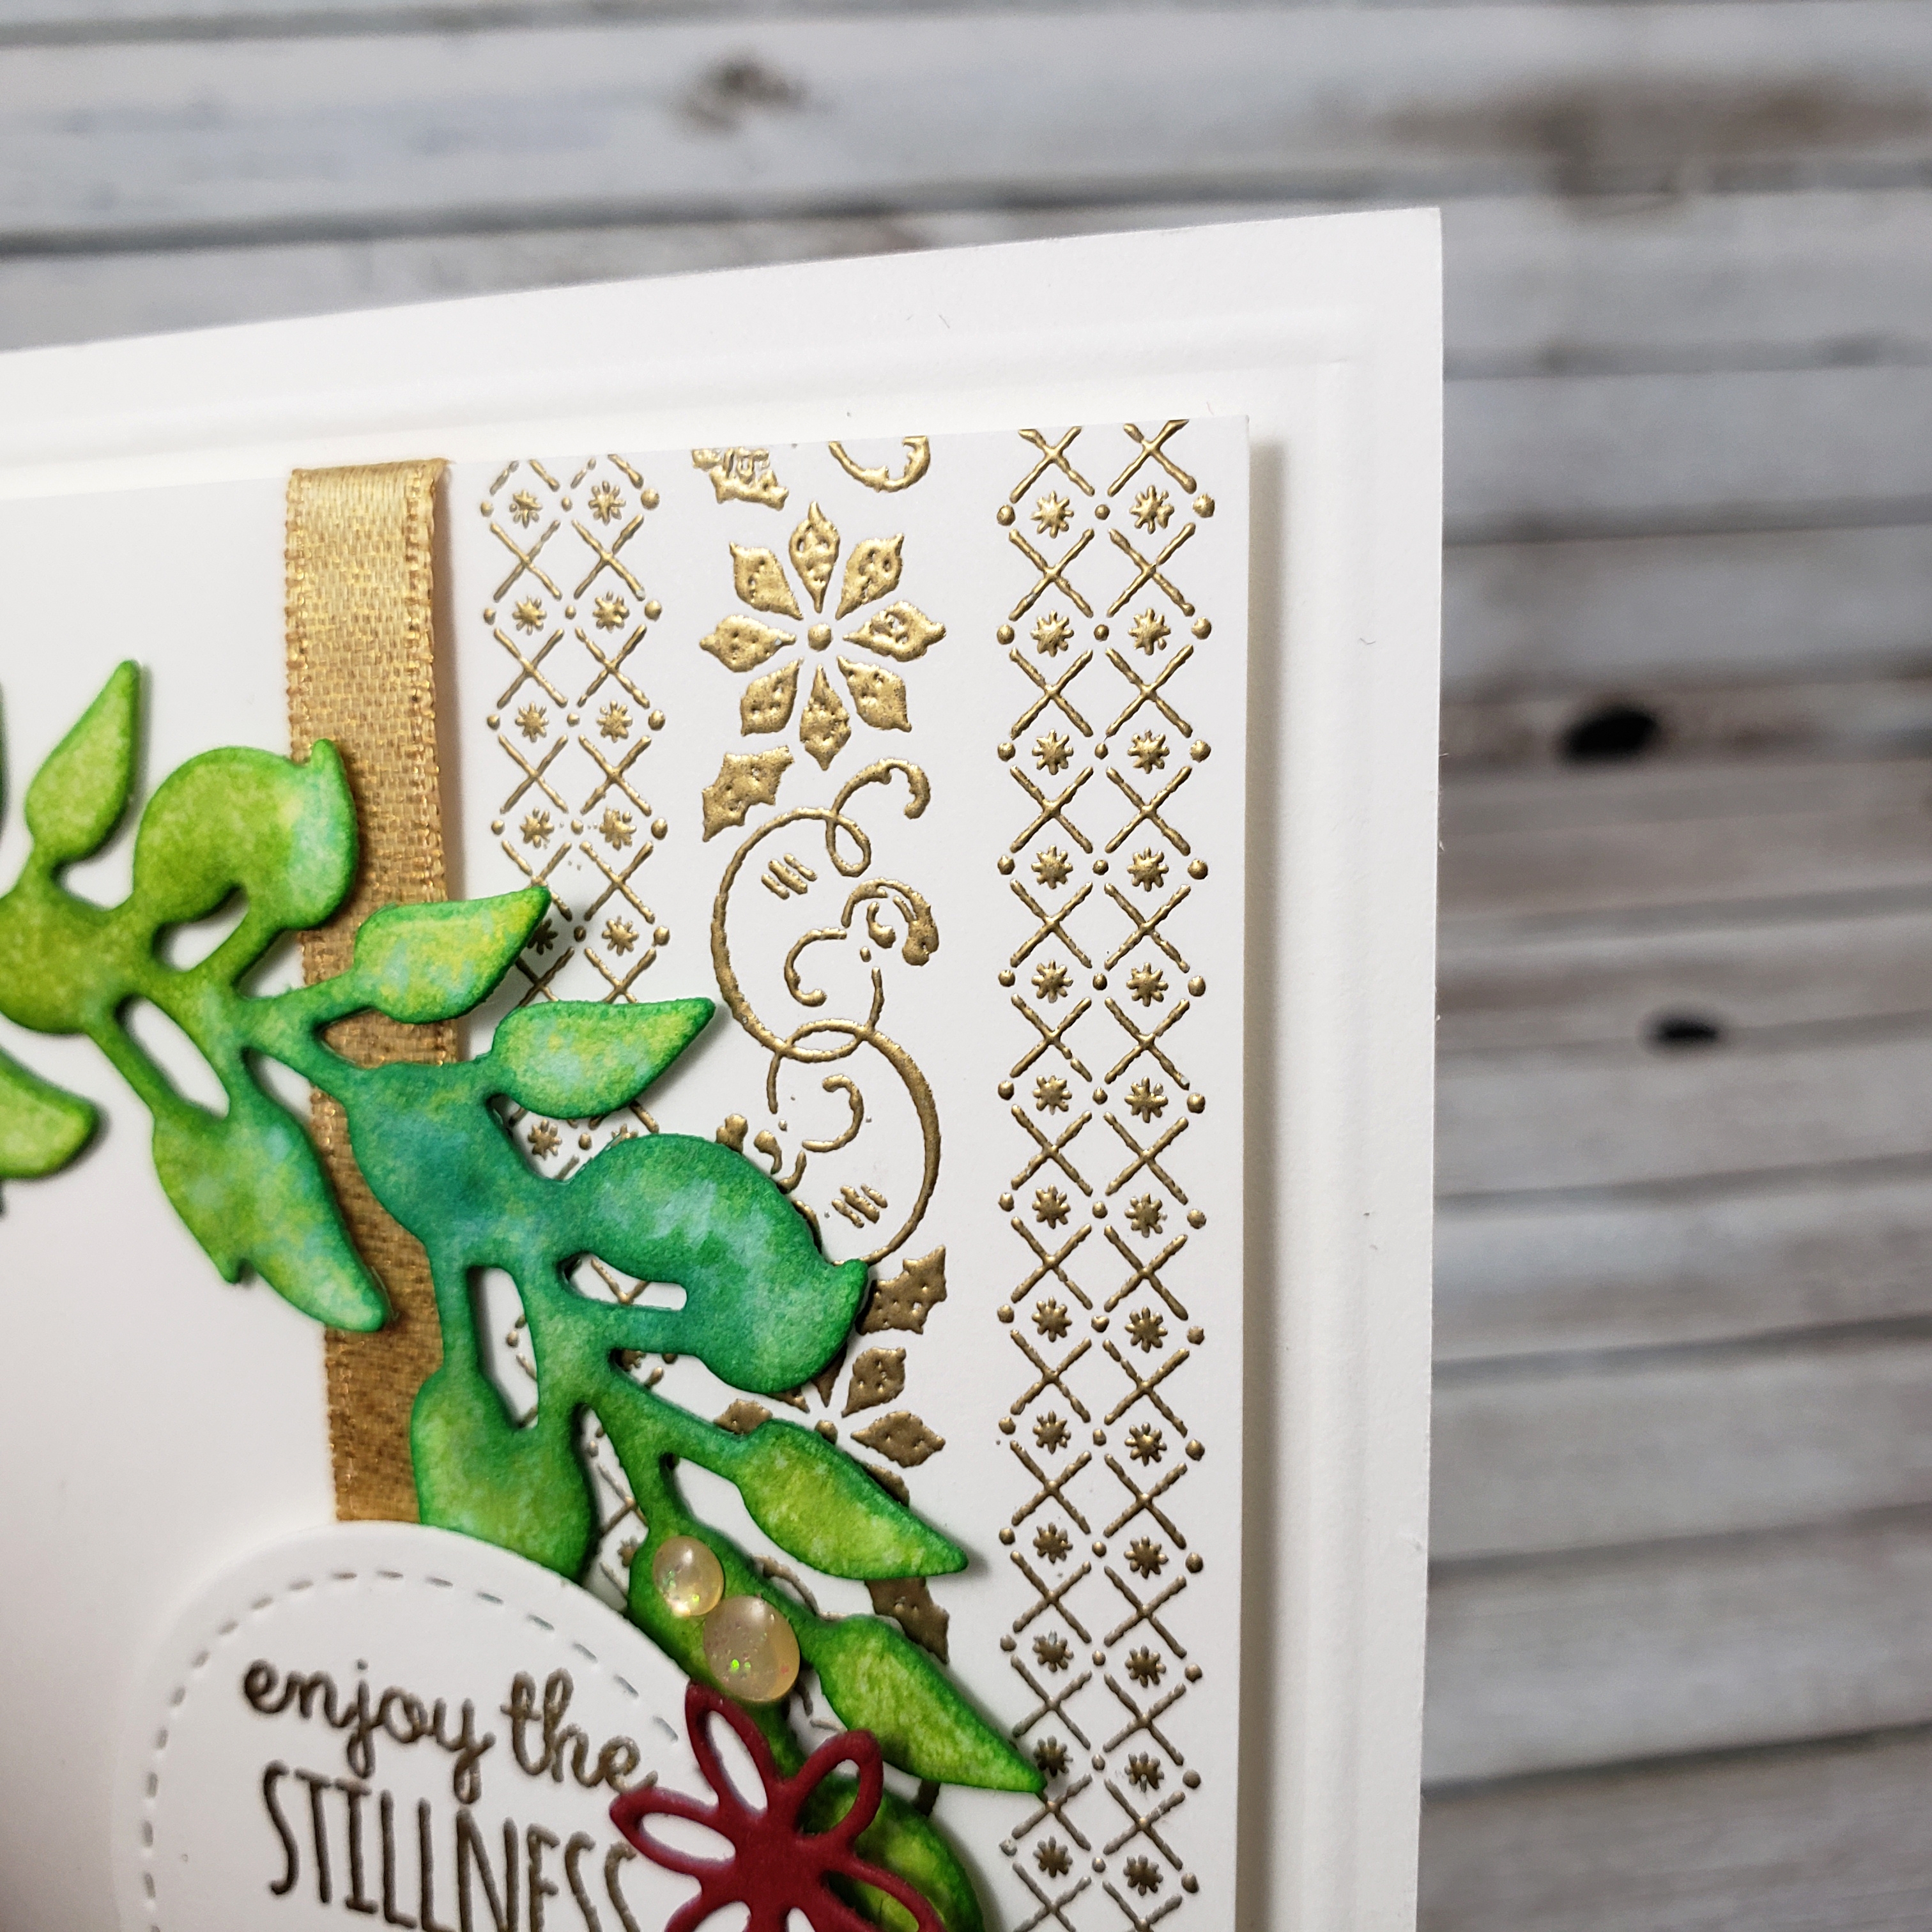
To create the snowy background behind my skier, I stamped the image again on a sticky note and fussy cut it so I could place it over my image to use as a mask. Then I tore a piece of cardstock and lay it over the upper part of my skier and sponged Craft White ink. Then I added a bit more light sponging of the Craft White to the edges of the Smokey Slate cardstock. I stamped the snowflake image from the “Colorful Seasons” stamp set with Craft White ink. The snowflake sequins are from the October 2019 Paper Pumpkin kit!

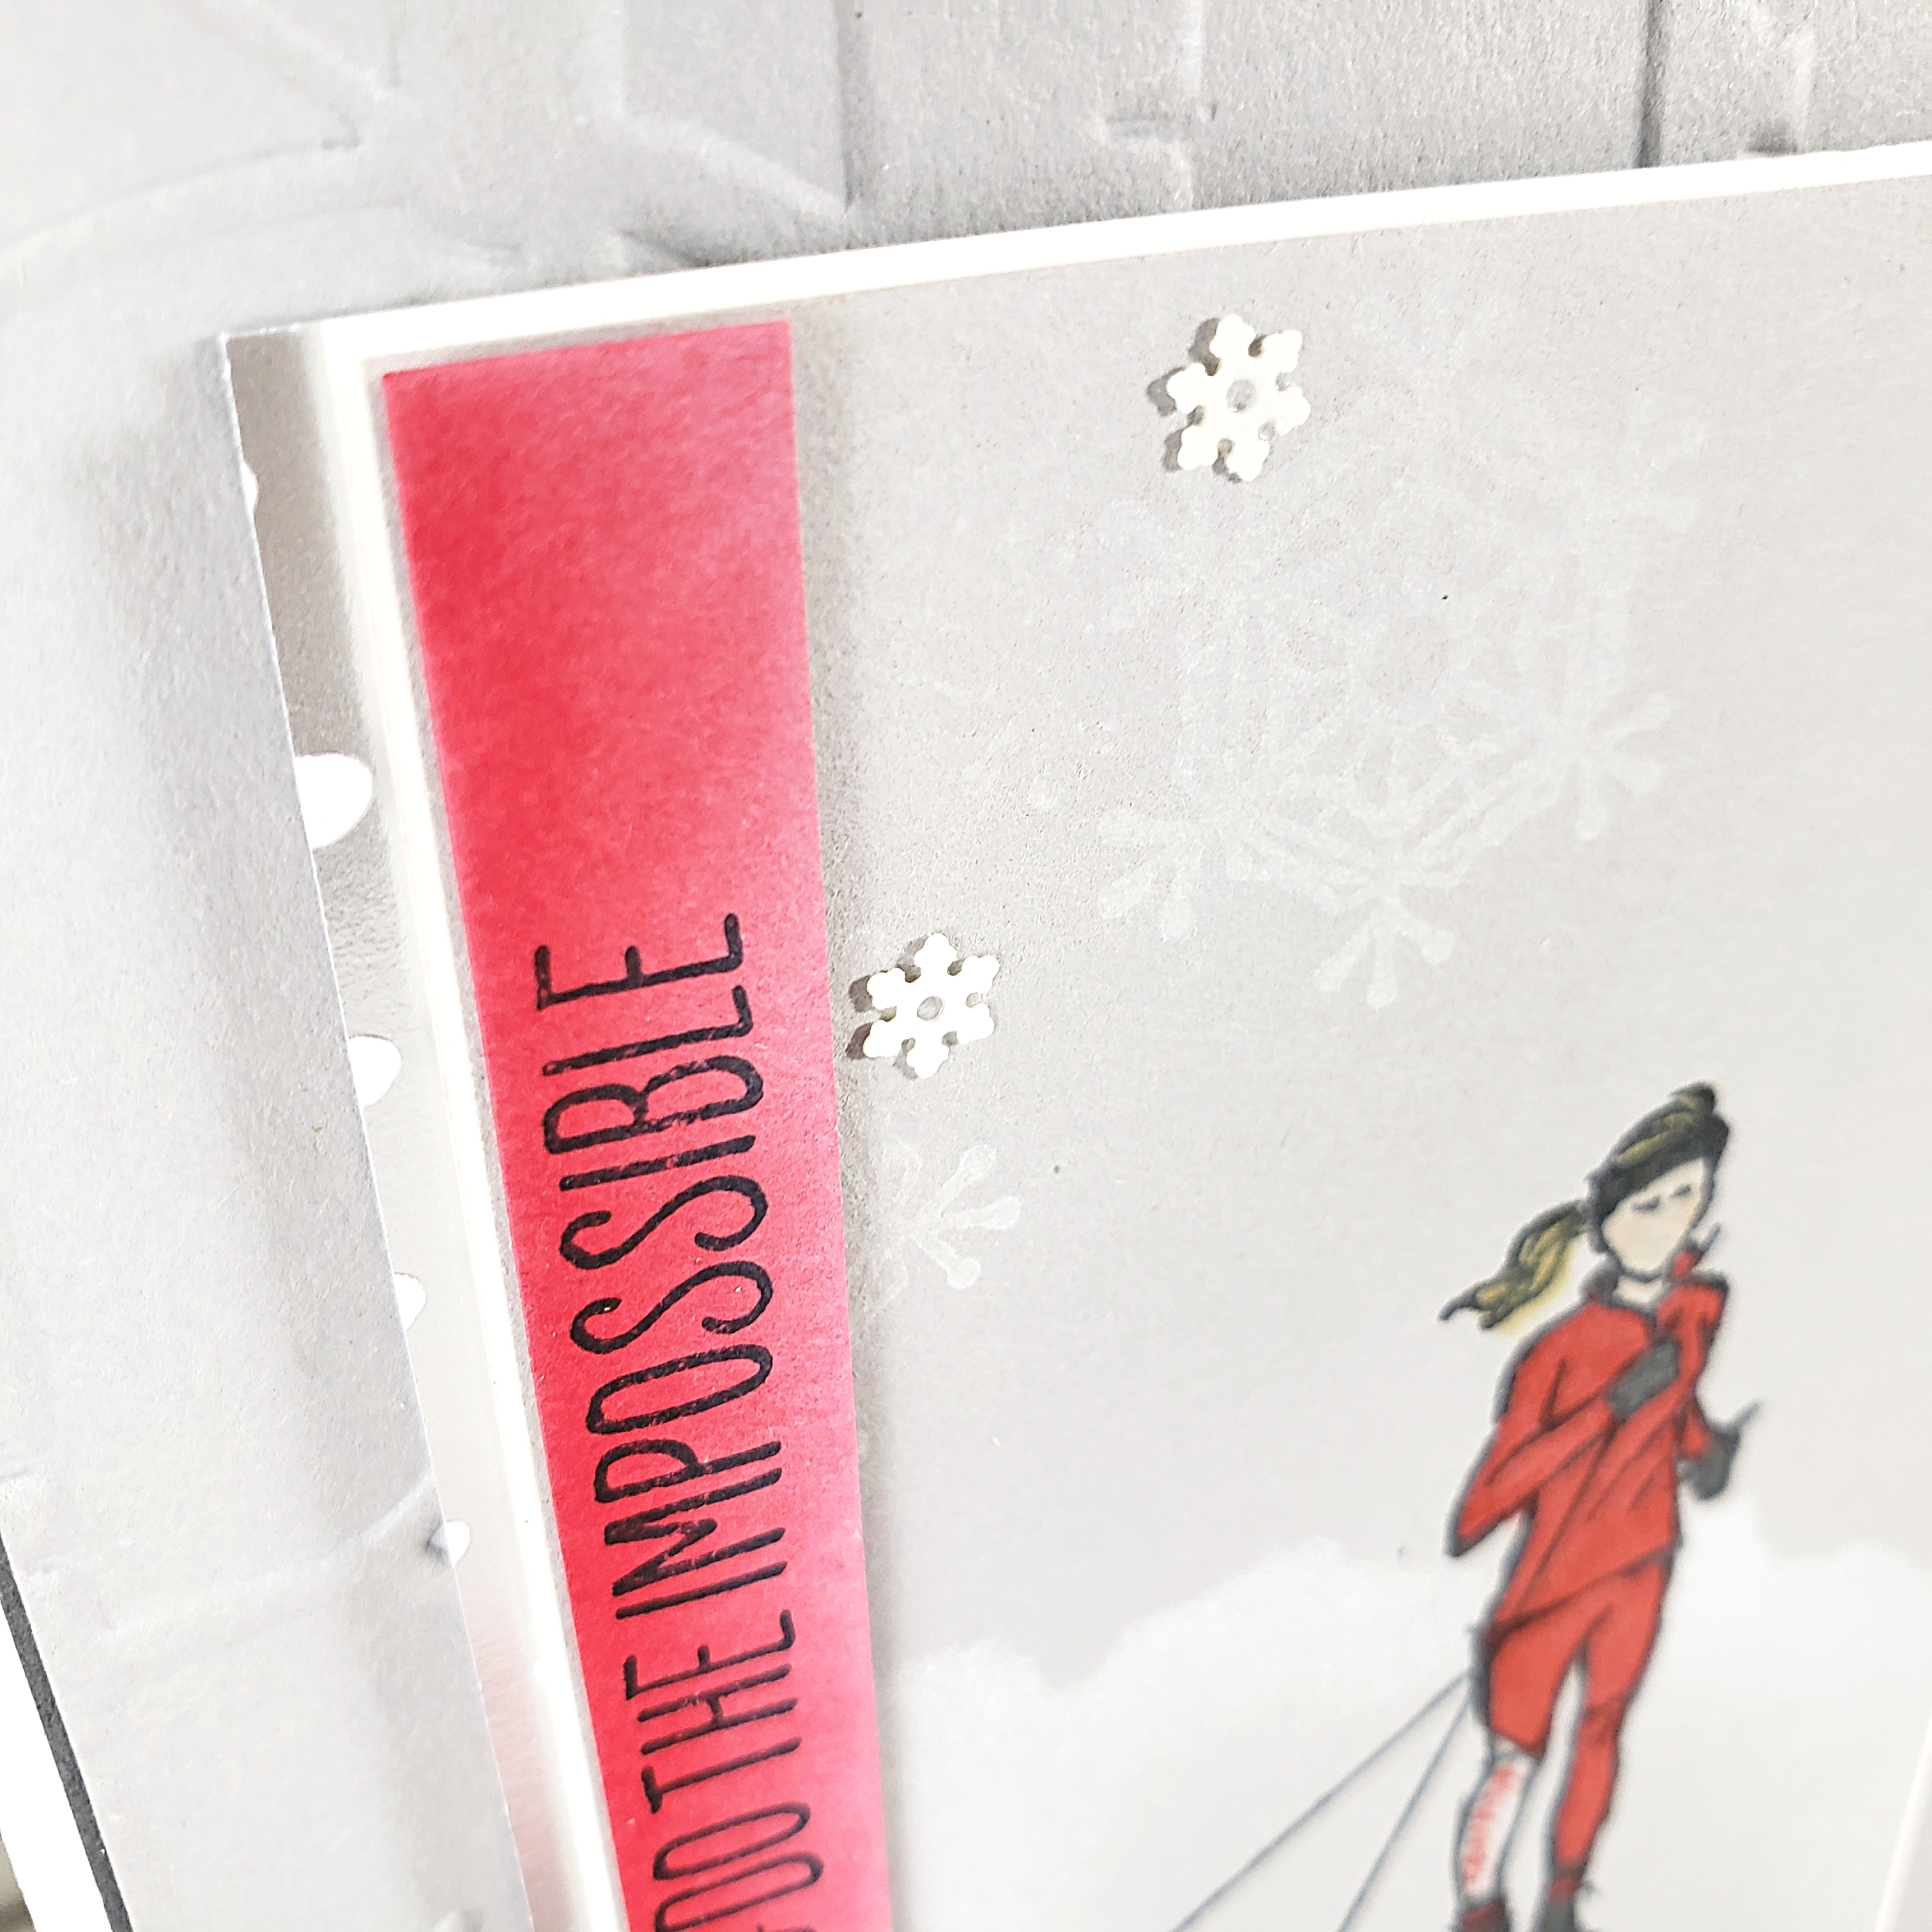
The rest of the card is pretty self explanatory. I sponged a bit of Craft White ink on one side of a strip of Real Red cardstock before stamping the sentiment using Tuxedo Black Momento ink. Just to the left of that you can see my subtle peeking of silver paper – this is patterned paper from the Feels Like Frost Designer Series Paper pack (not available to purchase again until September). Behind all of this, I have a piece of Smoky Slate cardstock that was dry embossed with the Woodland Embossing Folder from Stampin’ Up! and matted with a thin matte of Basic Grey Cardstock on a Thick Whisper White card base.

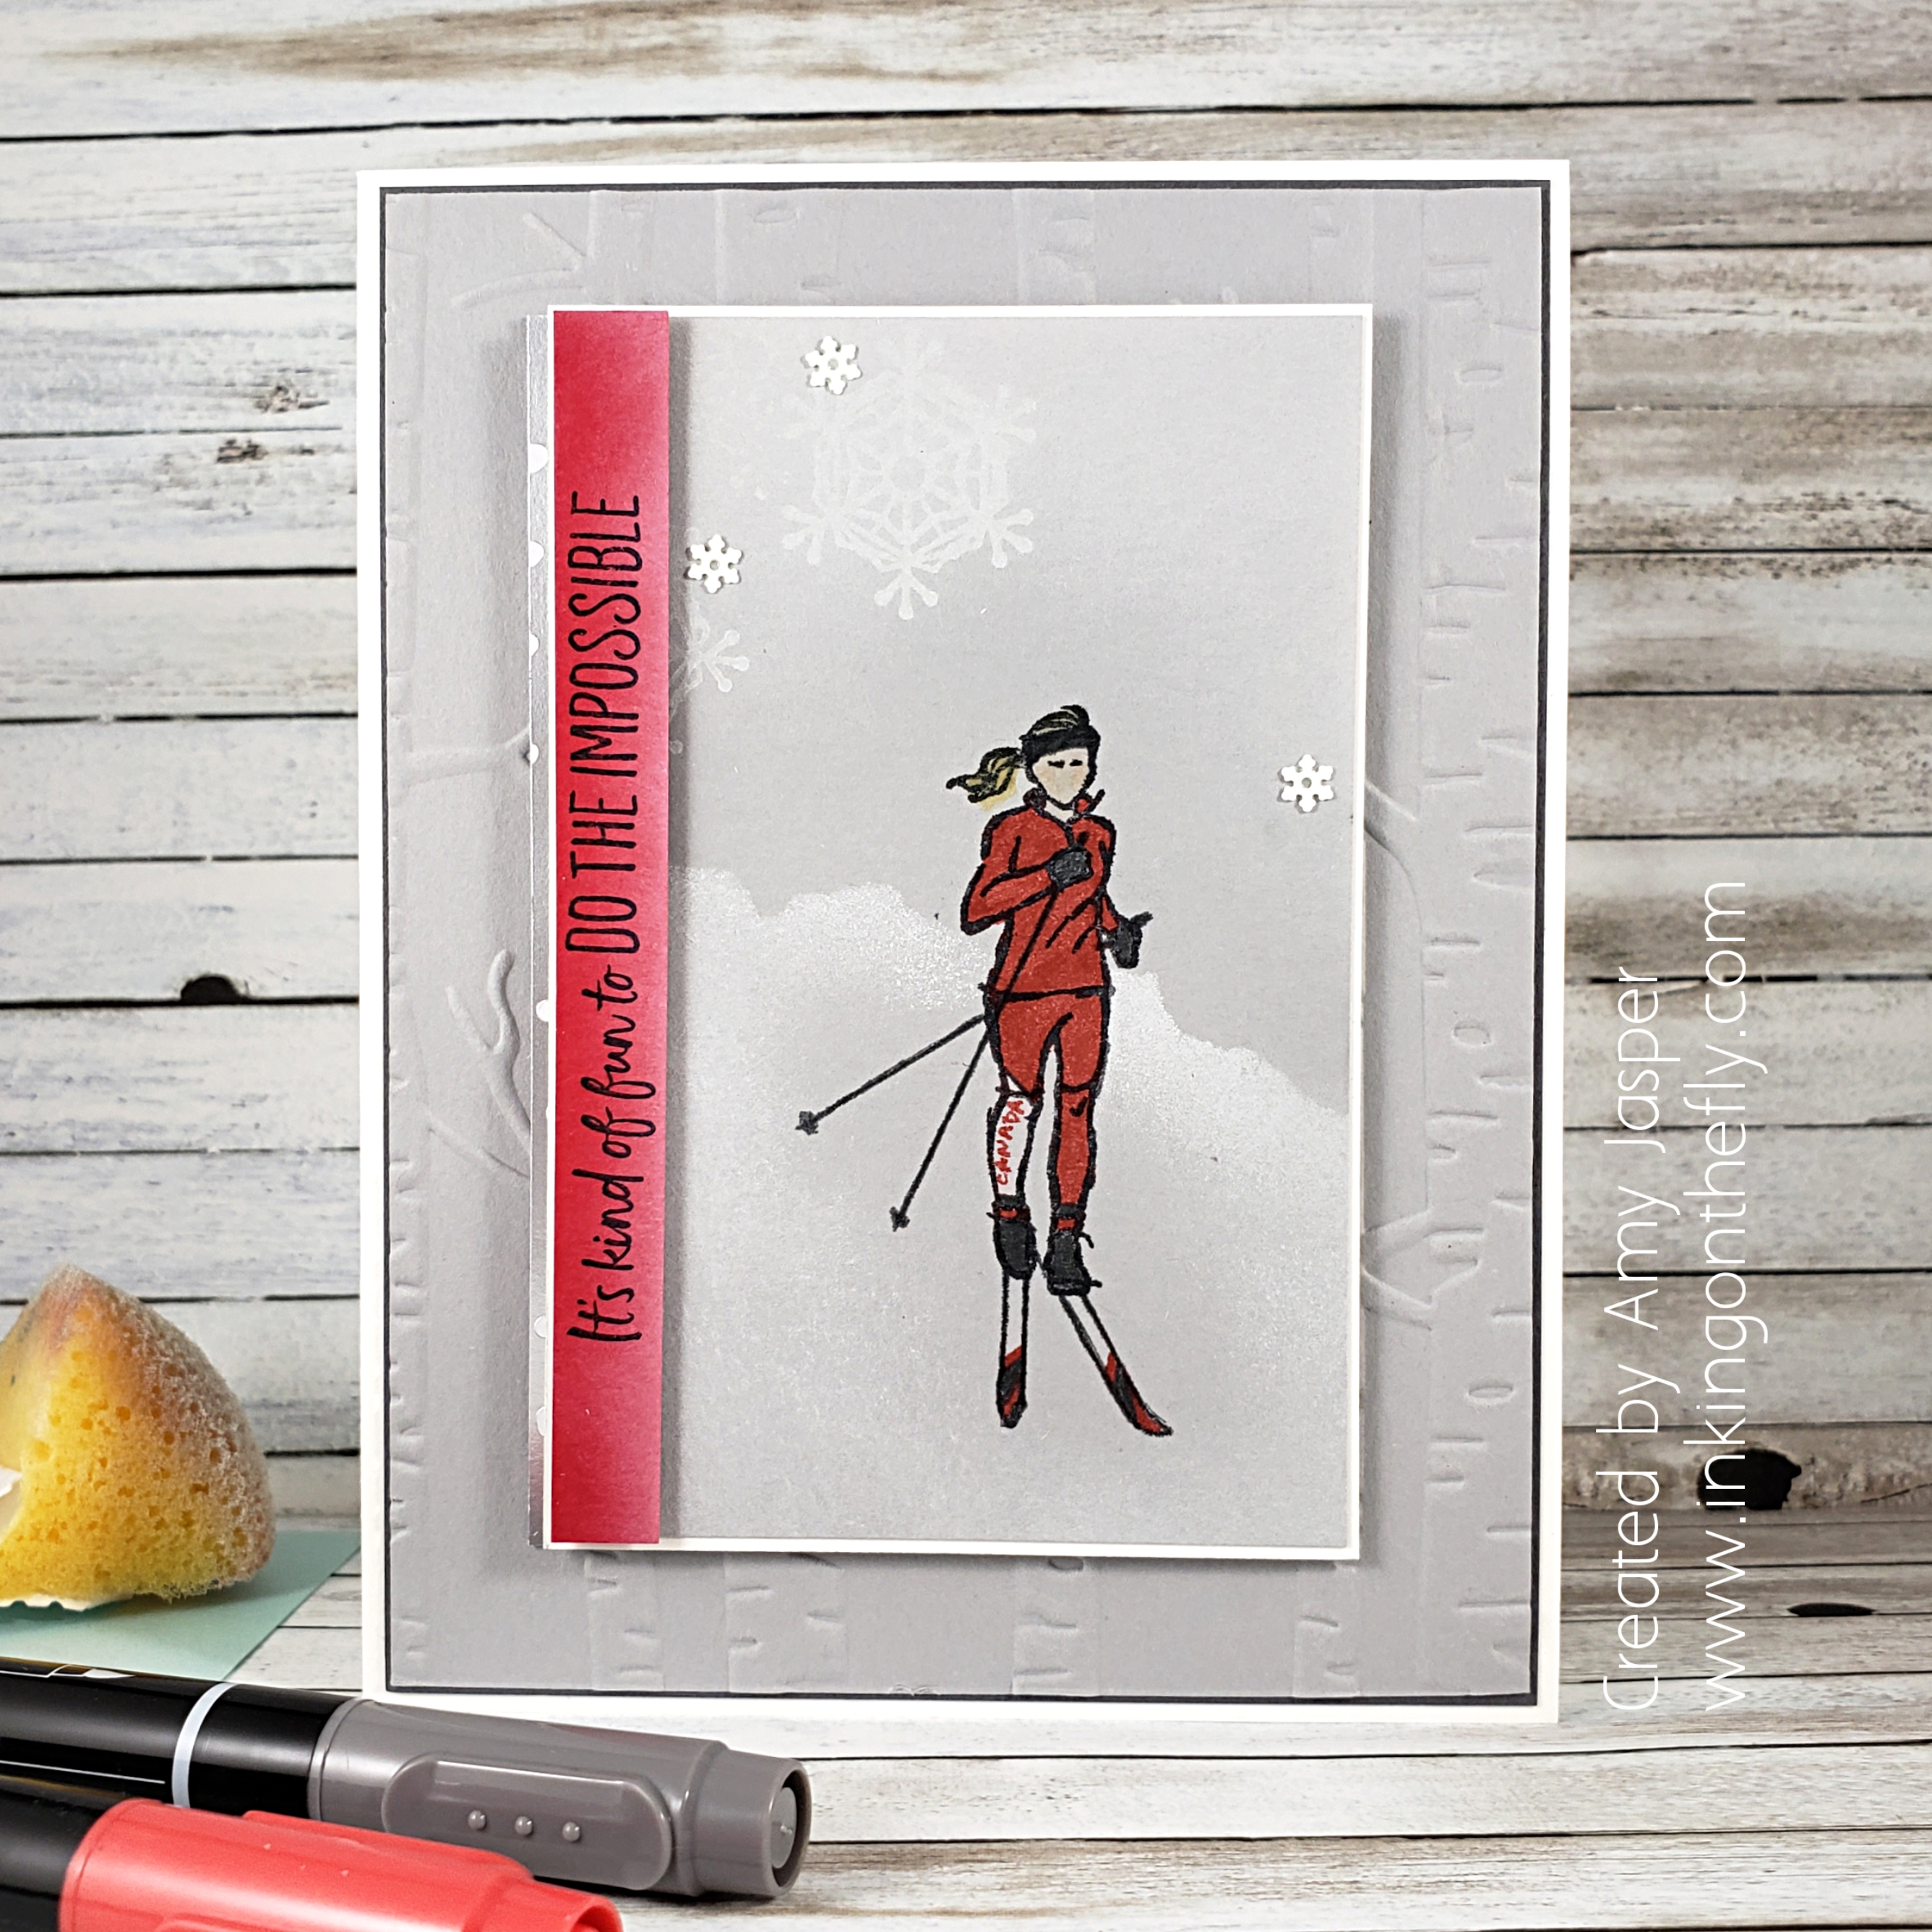
And if you have ever seen my cards before, you KNOW I used Stampin’ Dimensionals to pop up some of these layers. Oh yes!!

This card layout could easily be simplified by taking out the extra drawing and the sponging. I think I might make another one with the two joggers from the original image in the Do the Impossible stamp set from Stampin’ Up! I’ll make sure I add a link to this post when I share it!

Now, stop looking at card ideas on the internet and go stamp something!! Why not try the challenge at the As You See It Challenge with us? Don’t forget to share it! We love to see your creations!!

Gold and Green

I’m thinking of the ice cream in the freezer. I should probably go get it and eat it while I write my blog. You don’t mind, do you?

. . .

Okay. I’m back with my coffee Haagen-Dazs. Yum. Though, honestly, I really shouldn’t be eating it after all of the Halloween candy I’ve been consuming. Maybe, I’m just getting ready to hibernate.

That’s a thing, right?

Once again, I have a card for you and once again it is inspired by the As You See It Challenge for which I am a designer.

Sketch challenges are pretty great because they provide some clear parameters, but still offer so much opportunity for your own creative spin. I decided to take this sketch and create a square card, rather than the more common 4-1/4″ x 5-1/2″ size.

I have seen some beautiful watercolour wreaths created from the All Around Wreath Dies from Stampin’ Up!, so I thought I should give it a try. I cut the wreath from a piece of Watercolor Paper and placed it onto one of the clear plates of my Stamparatus. I then used an Aqua Painter to saturate the Watercolor Paper with plain water. Next, I applied ink using the Aqua Painter and Ink Refills. I used Call Me Clover, Granny Apple Green, and Coastal Cabana. As I applied each colour, I enjoyed watching it spread quickly over the paper because of the water that already prepared the way. Once I was happy with the saturation of colour, I used my Heat Tool to speed up the drying time so I could carry on with the rest of my card.

The card base is Thick Whisper White, which I cut to 8-1/2″ x 4-1/4″ so that I could have a completed 4-1/4″ x 4-1/4″ square card. This is a good size for a square, because it will still fit in Stampin’ Up! envelopes. I used the Simply Scored Tool to create an embossed outline around the card base. I like how that simple step somehow instantly makes a card more elegant.

The next layer is a Whisper White square on which I stamped the line stamps from the Christmas Countdown Cling Stamp Set from Stampin’ Up!. I stamped these in Versamark ink and applied the Gold Embossing Powder, melting it to a beautiful shine with my Heat Tool. I wrapped the Gold 1/4″ Shimmer Ribbon (from the new and only available while supplies last, Christmastime is Here Suite!) around this piece and tied it in a bow. This was attached to the card base with Stampin’ Dimensionals.

The dry watercoloured wreath was attached to the front of the card with glue dots, but I had to cut it to be able to tuck it under the bow of my ribbon. Pretty sneaky, right!

The sentiment is from the Merry Moose stamp set and was stamped with Versamark ink on Whisper White cardstock. Once again, I applied the Embossing Powder and heat it with my Heat Tool, before cutting it in my die cutting machine with one of the circle dies from the Stitched Shapes Dies. This was applied to the card with Stampin’ Dimensionals.

The last few things to add were the gorgeous Gold Glitter Enamel Dots (from the Christmastime is Here Suite), and the Cherry Cobbler flower, which I die cut with my die cutting machine and the Detailed Deer Dies from Stampin’ Up!.

I followed the perimeters of the sketch challenge. I would say that I moved the location of my bow, but the basic sketch is still apparent, don’t you agree?

If you like the products I used on this card, you might want to go to my ONLINE STORE and see what else there is to get excited about! Have you seen the products in the Christmastime is Here Suite? Just beautiful! Definitely have a look.

… and don’t forget to try this sketch and play along with us at the As You See It Challenge Blog!

Okay, my ice cream is done. It was yummy.

Remember to Breathe

Today was a rough day. Lots of unplanned unpleasantness, resulting in a very frustrated, irritated, grumpy, and very spent, me. When I remembered that I hadn’t made my card for this challenge yet, I very reluctantly dragged myself into my messy and crowded craft room (I haven’t unpacked boxes from my last event yet and they’re all over the floor and completely in the way). I started to consider the card I would make and I realized that this card was going to be for me today. I reminded myself to breathe. The worst of the day is done. I got through it.

Just breathe.

Just breathe.

Today is a speed challenge on the As You See It Challenge blog. Not the best activity to take on at the end of the day when you’ve already been stressed and rushing around, but no problem. I didn’t rush. I knew what I wanted to do. I had a plan. I took it slow. (well, not too slow!)

Even with taking it easy, I made this card in 8 minutes and 10 seconds. Attaching any kind of ribbon always adds a significant amount of time for me, but I think it was worth it.

I made a card with a similar layout just the other day, so the basic measurements were fresh in my mind, even though it was different paper, stamps, and embellishments.

The Feels Like Frost Designer Series Paper makes anything look amazing, don’t you think! It feels like cheating! I cut mine to 3-7/8″ x 4″, then cut it on a diagonal so I could split it over the piece of 4″ x 5-1/4″ Whisper White cardstock. I laid the lower portion of the split dsp on the Whisper White cardstock so that I could use it as a guide to position my stamped words from the Colorful Seasons Photopolymer Stamp Set, which I stamped in Night of Navy ink.

Before attaching the Feels Like Frost pieces with Dimensionals, I laid the length of Linen Thread down the left side of the Whisper White cardstock so I could tie it after the dsp was adhered.

The Whisper White is layered on a Night of Navy cardstock base. Clean and fresh. Breathe in. Breathe out.

The finishing touch was to add the three Rhinestone Basic Jewels to the Feels Like Frost Designer Series Paper.

And the very last thing was to actually do what the card says, just breathe. Ahhhh. Feels good.

My day is behind me now and tomorrow will be better.

As always, you can order the products featured in my post, by going to SHOP in the menu at the top of the page, or click on the SHOP circle on the sidebar if you’re on your computer.

Now, go and try this speed challenge and share it with us at the As You See It Challenge blog. We want to see your creations!