card

Rooted in Nature Sand Dollar

Have you ever looked at an image in a stamp set and thought, “That reminds me of a ______!”

Well, I keep looking at the cross cut wood image in the Rooted in Nature Stamp Set by Stampin’ Up! and am thinking exactly that! It reminds me so much of a sand dollar at the beach. I looked at a few images of sand dollars on Google and decided to try to create one using the stamp as a starting point.

My creative inspiration was from another As You See It Challenge – this one is a beach theme, which, of course, was the perfect opportunity to alter the wood image.

This card used some art skills beyond my usual application for my cards. I also used some supplies from the June Paper Pumpkin kit. If you don’t get Paper Pumpkin, I highly recommend it! If you don’t have a Demonstrator, feel free to use my name to sign up. You get wonderful stamping kits in the mail each month so you can create beautiful hand made cards or home decor with ease. It’s fun and a great escape from the stresses of the world!

Here’s my finished card:

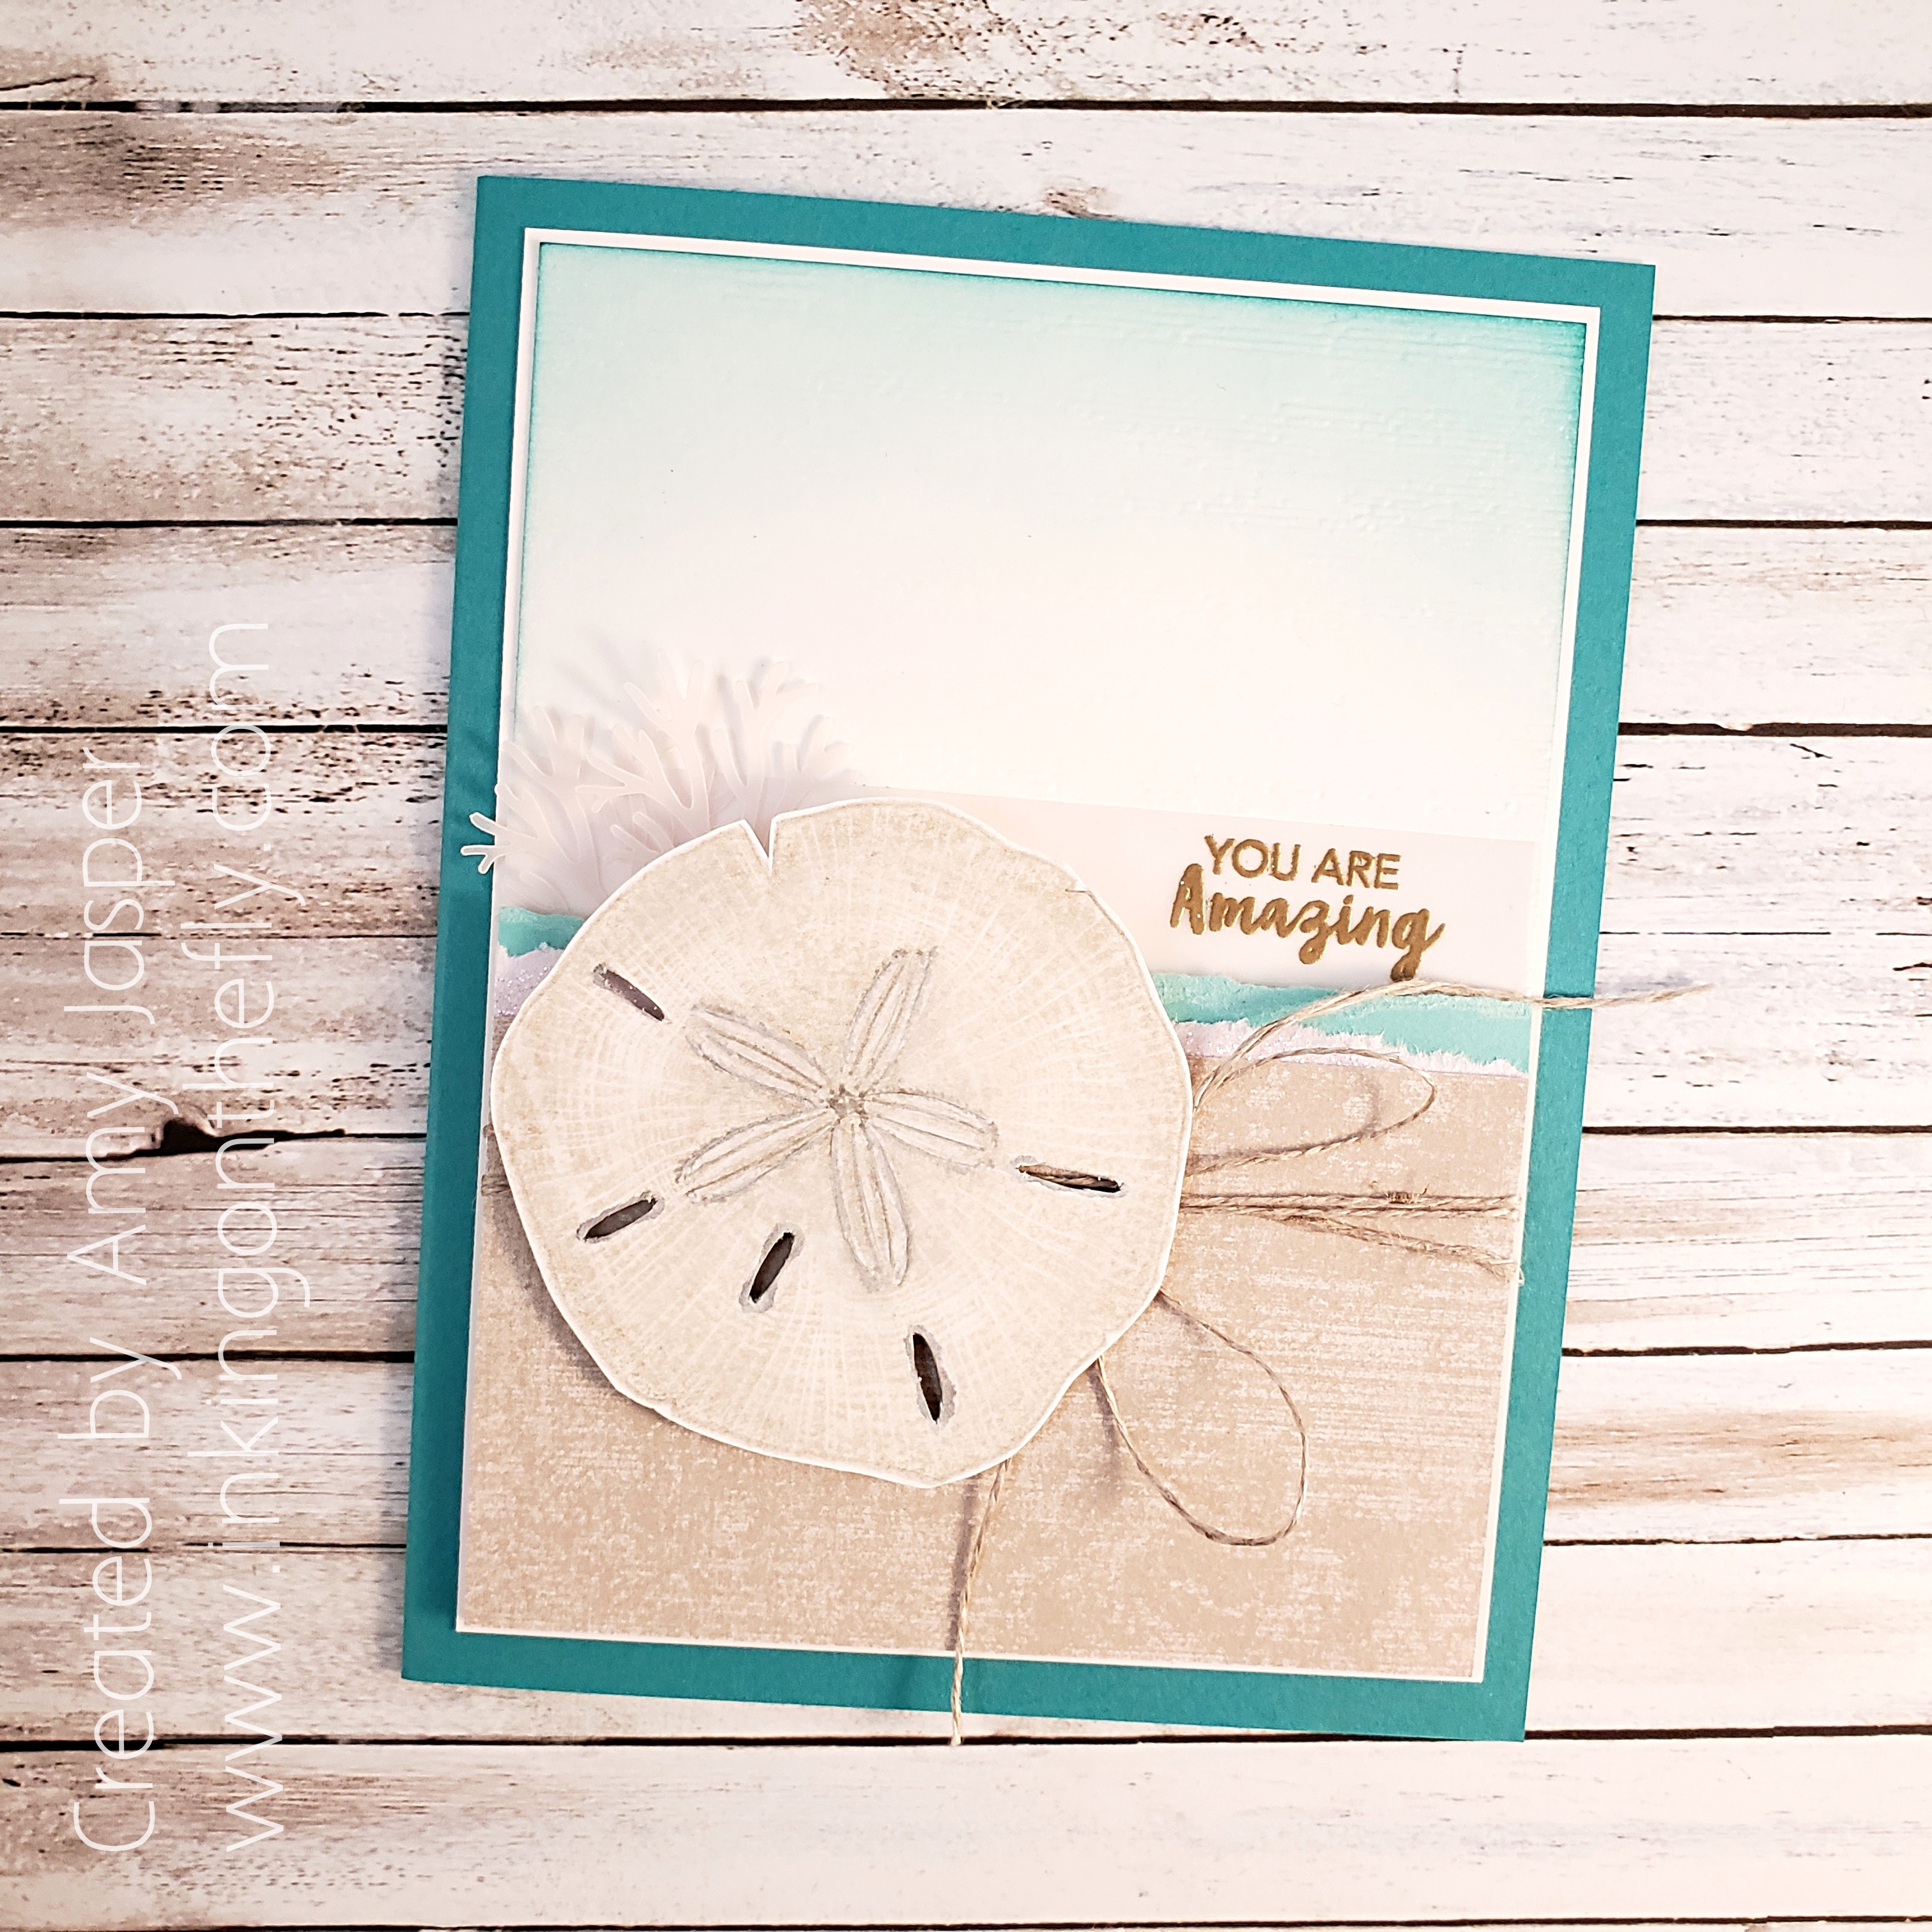
I stamped the wood cut image on Whisper White Cardstock with Sahara Sand ink. Then I had to use some creative art skills to draw the centre image to make it look like the image in a sand dollar. I originally tried to find a stamp or a die that would fit the shape I was looking for, but with no success, I reached for a pencil.

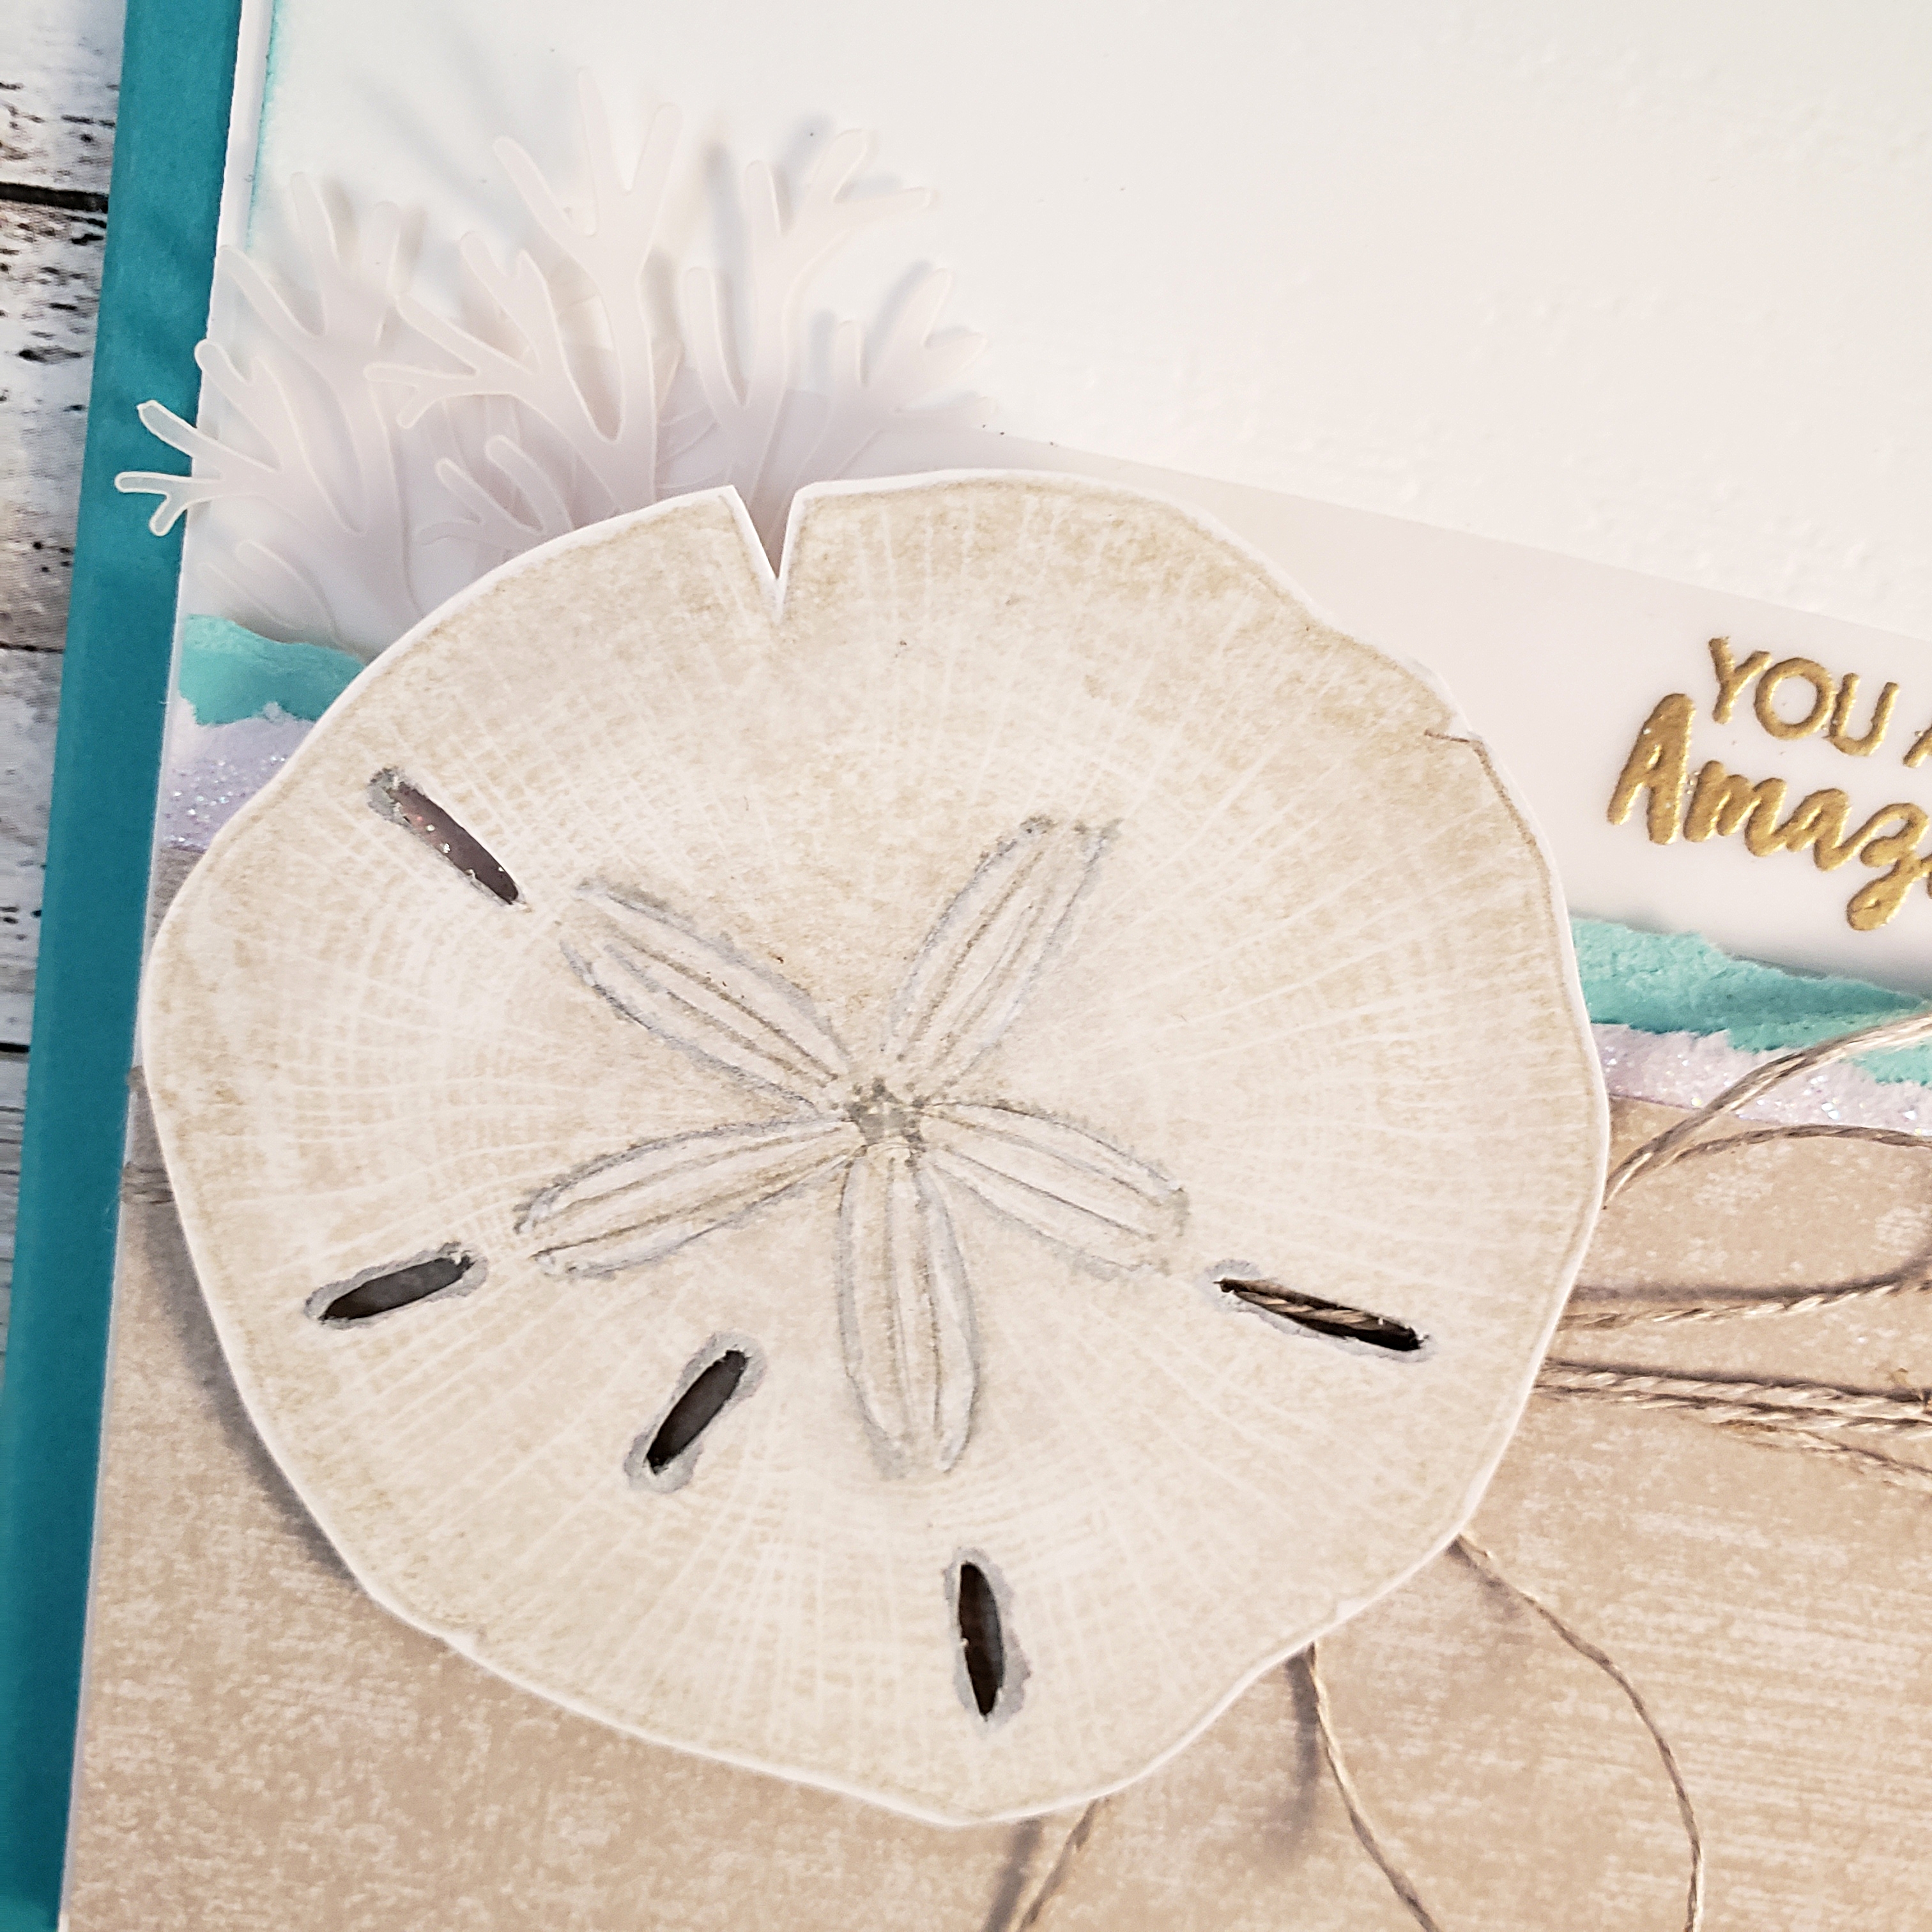
I drew the image that looks like a five petal flower onto the centre of the wood cut stamped image. Then I used the pen end of my Gray Granite Stampin’ Write Marker to darken my pencil drawing. My Blender Pen also got involved to soften my marker lines and create a bit of shading and imperfections that you would find in nature. It took a couple of tries before I got it right, but it was a lot more successful than I thought it would be!

I used my pencil again to draw the long ovals that I wanted to cut with a craft knife. A punch would have been nice, but I didn’t have anything that would work. After carefully cutting these, I used my Gray Granite Stampin’ Write Marker again (this time, I used the brush tip) to darken the edge of the paper inside the holes to give the impression of depth. The colour bled more than I intended it to, but the effect ended up working for me. (Lucky!)

The rest of the card involves paper layering and some heat embossing with Gold Embossing powder on Vellum cardstock. I also sponged some Bermuda Bay ink over the upper portion of one of my Whisper White cardstock layers to create a sort of sky for my beach scene. This with the torn layers of Coastal Cabana, Sparkle Glimmer Paper, and a piece of patterned paper from the Woven Threads Designer Series Paper, along with some Linen Thread tied in a loopy bow, complete my beach-themed card.

Let me know what you think. Did I successfully turn a stamped image of a piece of wood into a sand dollar? Have you ever tried to alter a stamped image to make it look like something else?

Christmas in July

I just can’t get enough of the Good Morning Magnolia stamp set!

The As You See it Challenge this week is what we call an assortment challenge. You have to include all of the listed elements on your card design.

I wasn’t sure how to pull this one off as I like to use current Stampin’ Up! product for the cards I post on my blog and I didn’t have ANY stars!! Not a single current stamp set or die cut with a star. I’m a little bit shocked at this finding. It appears that I need to make a purchase, lol!

Since I didn’t have stars, I remembered a technique using the Chalk Marker to dot the background to look like stars in the night sky. That was the beginning of this card.

I sponged some Night of Navy ink on to Night of Navy cardstock fading it lighter as I moved down the paper. The Chalk Marker dots were then added to make the starry night sky. The sentiment is another problem that I came across as I couldn’t find any Christmas sayings that were the right size for that small space. So I created my own using the Make a Difference Photopolymer Stamp Set. It’s a bit more effort, but it allows you to write whatever you might choose. I stamped each letter with Versamark ink, then heat embossed with Gold Embossing Powder.

I used the Rectangle Stitched Dies to cut the Night of Navy piece to the size I wanted. That was attached to a piece of Gold Foil Paper on which I added a little peek-a-boo amount of the Gold Metallic Edged Ribbon. Both of those layers were added to the Thick Very Vanilla cardstock card base.

The magnolia image is the main attraction on this elegant Christmas card. I stamped the image on Whisper White cardstock with Tuxedo Black Momento ink, then coloured it using my Stampin’ Blends Markers: Poppy Parade (light and dark), a tiny touch of the Cherry Cobbler (I think it was the light one, but I can’t remember now, sorry), Mango Melody (dark) for the centre, Mossy Meadow (light and dark), and the Color Lifter Blends Marker to intensify some highlights on the petals. I then coloured around the outside of the flower with the Sark Night of Navy Blends Marker so that when I die cut the image, it would blend more with my background colour. I attached the die cut magnolia with Multipurpose Liquid Glue.

But that’s not all!

I stamped the magnolia a second time on Whisper White cardstock, colouring just the flower centre and four centre-most petals. I then fussy cut around those four petals. I attached them with Multipurpose Tombo Liquid Glue under the centre of the group of petals, and with Mini Stampin’ Dimensionals under the outer-most area of the petals, giving the flower more of a 3D look.

I love how it turned out!! I am definitely going to share this 3D look with my technique class in the future. I think they’ll really like it!

Now it’s your turn to give this assortment challenge a try and share it with us on the As You See It Challenge Blog! We would love to see how you pulled all of those elements together.

And if you like this Good Morning Magnolia stamp set as much as I do and you are in Canada, why not go over to my ONLINE STORE and add it to an order. You’ll probably love the whole Magnolia Lane Suite! It’s all just gorgeous!

Keeping It Together


I have been riding my bike this month for the Great Cycle Challenge, raising money to fight childhood cancer. The money will help fund research to find better cancer treatments, provide care for sick kids, and work toward finding a cure for kids’ cancer! I have pledged to ride 750km throughout the month and am aiming to raise $1500 for the cause.

I have pedaled over 590km since June 1st and have practically met my fundraising goal, pulling in $1499 so far!  My deeper wish is to actually go way over that and hit $2500 in donations, but I think that might be a bit of a stretch. You see, with that amount raised, riders in the Great Cycle Challenge earn a very special jersey of honour – the Hero Jersey! How I would LOVE to ride around with my “Batman” symbol and utility belt! LOL!  With the struggle to find time for my long rides and with the pain and fatigue I’ve been experiencing in my legs, I kind of feel like it would all be even more worthwhile with that very special jersey as physical evidence of my effort. However, that is a very big leap (a superhero sized leap!) to go from $1499 to $2500 with only 10 more days left to go!

At the end of the month, every dollar raised is a huge win in the battle against childhood cancer with or without the Hero Jersey. I believe, that with enough funding, we can truly make a difference in the lives of children and their families who are fighting cancer. I am very pleased with the support of my friends and family who have donated and encouraged me along the way. My stamping community has been a significant part of my support and I am so grateful that you’ve got my back!!

Here’s the As You See It Challenge that has inspired the card design for this blog post:

My card today is a bit of a tribute to my supporters. I have been very busy with my bike riding and fundraising, but I have also been managing some untimely life stresses as well. The family van transmission has finally kicked the bucket and we are in a bit of a pickle trying to find a new family vehicle before we leave on a road trip in less than a week. It’s time-consuming to drive to neighboring towns to try out vehicles, talk to sales people, research options and manage the family’s needs with only one working vehicle. Then there’s the normal busyness of June with end of school activities and celebrations for our three kids and the usual day to day things that we still need to keep up with.

It has been overwhelming and I feel like I am falling apart, but with the support of my family, friends, and customers (who are also friends), somehow I’m able to keep it together. They (you) have been keeping me together! I am so grateful for my community!

So, like I said, this card is for my supporters this month.

My favourite colour to wear is orange. Orange is my happy colour. I also wear a lot of grey (it’s my comfort colour), so I figured why not just get them both in there! I used the gorgeous Good Morning Magnolia stamp set and my Stampin’ Blends (Pumpkin Pie and Smoky Slate) for the main image and I added some sponging around the flower with Smoky Slate classic ink.

Then I used the Puzzle Pieces Dies with my Big Shot die cutting machine to cut the coloured image into the puzzle shapes. This I adhered to a Smoky Slate cardstock matte with Multipurpose Liquid Glue for some of the pieces and Mini Dimensionals for all the pieces with flower petals on them.

I inked the sentiment from the Love You to Pieces Stamp Set so that the middle was Smoky Slate (inked with my Smoky Slate Stampin’ Write Marker) and the top and bottom were Pumpkin Pie (inked carefully with my Pumpkin Pie ink pad). This was die cut using the Stitched Nested Labels Dies, which I trimmed to fit.

I added the Whisper White Solid Baker’s Twine, attached the label with Mini Dimensionals and adhered the whole card front to the Basic Gray cardstock card base with more Stampin’ Dimensionals. The final touch was to add the Seaside Spray coloured sequin from the Woven Threads Sequin Assortment pack. The Fine-Tip Glue pen and the Take Your Pick Tool are the perfect combination to get those little guys to stay where I want them..

Thank you all for your amazing support!

If you’d like to cheer me on by donating to this great cause, you can click on THIS LINK and help fight childhood cancer with me!

Together, we can make a difference!

Together, we can find a cure!