Christmas

Winter Bird

063header

Check out my design this week for the As You See It Challenge blog using An Open Heart stamp set from Stampin’ Up! I love the blended ombre effect in the winter background.

I was leery of the sketch this week. The small center square bugged me. But the funniest thing happens when I am lacking inspiration with a particular layout or colour scheme: I end up really liking the final product!

#63

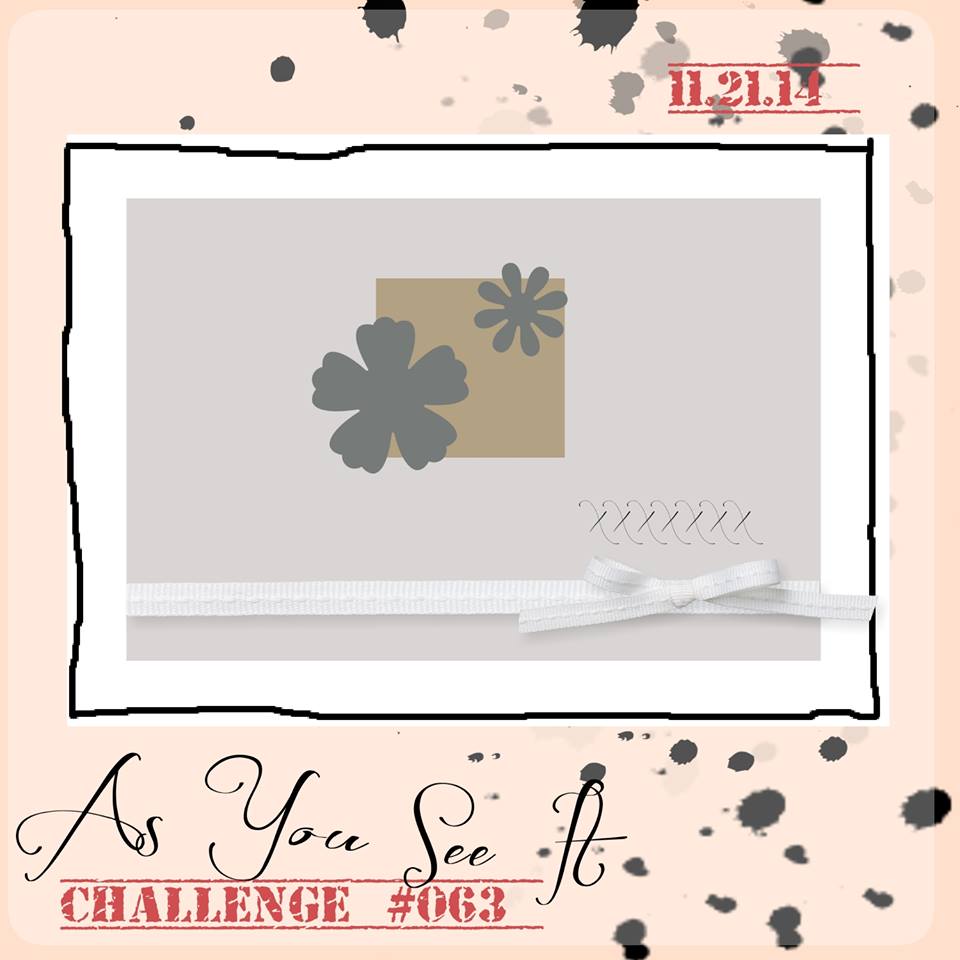
I can’t wait to see what everyone comes up with for this one. I found it so challenging! I decided to use the little bird from the An Open Heart stamp set in place of that square. The snowflake sequins (which were too stark white, so I coloured them with my Light Coastal Cabana Blendability marker), are in place of the flowers on the As you See It layout above. The rest is eye candy for me! Techniques and fun! The stuff I thrive on!

063Amy

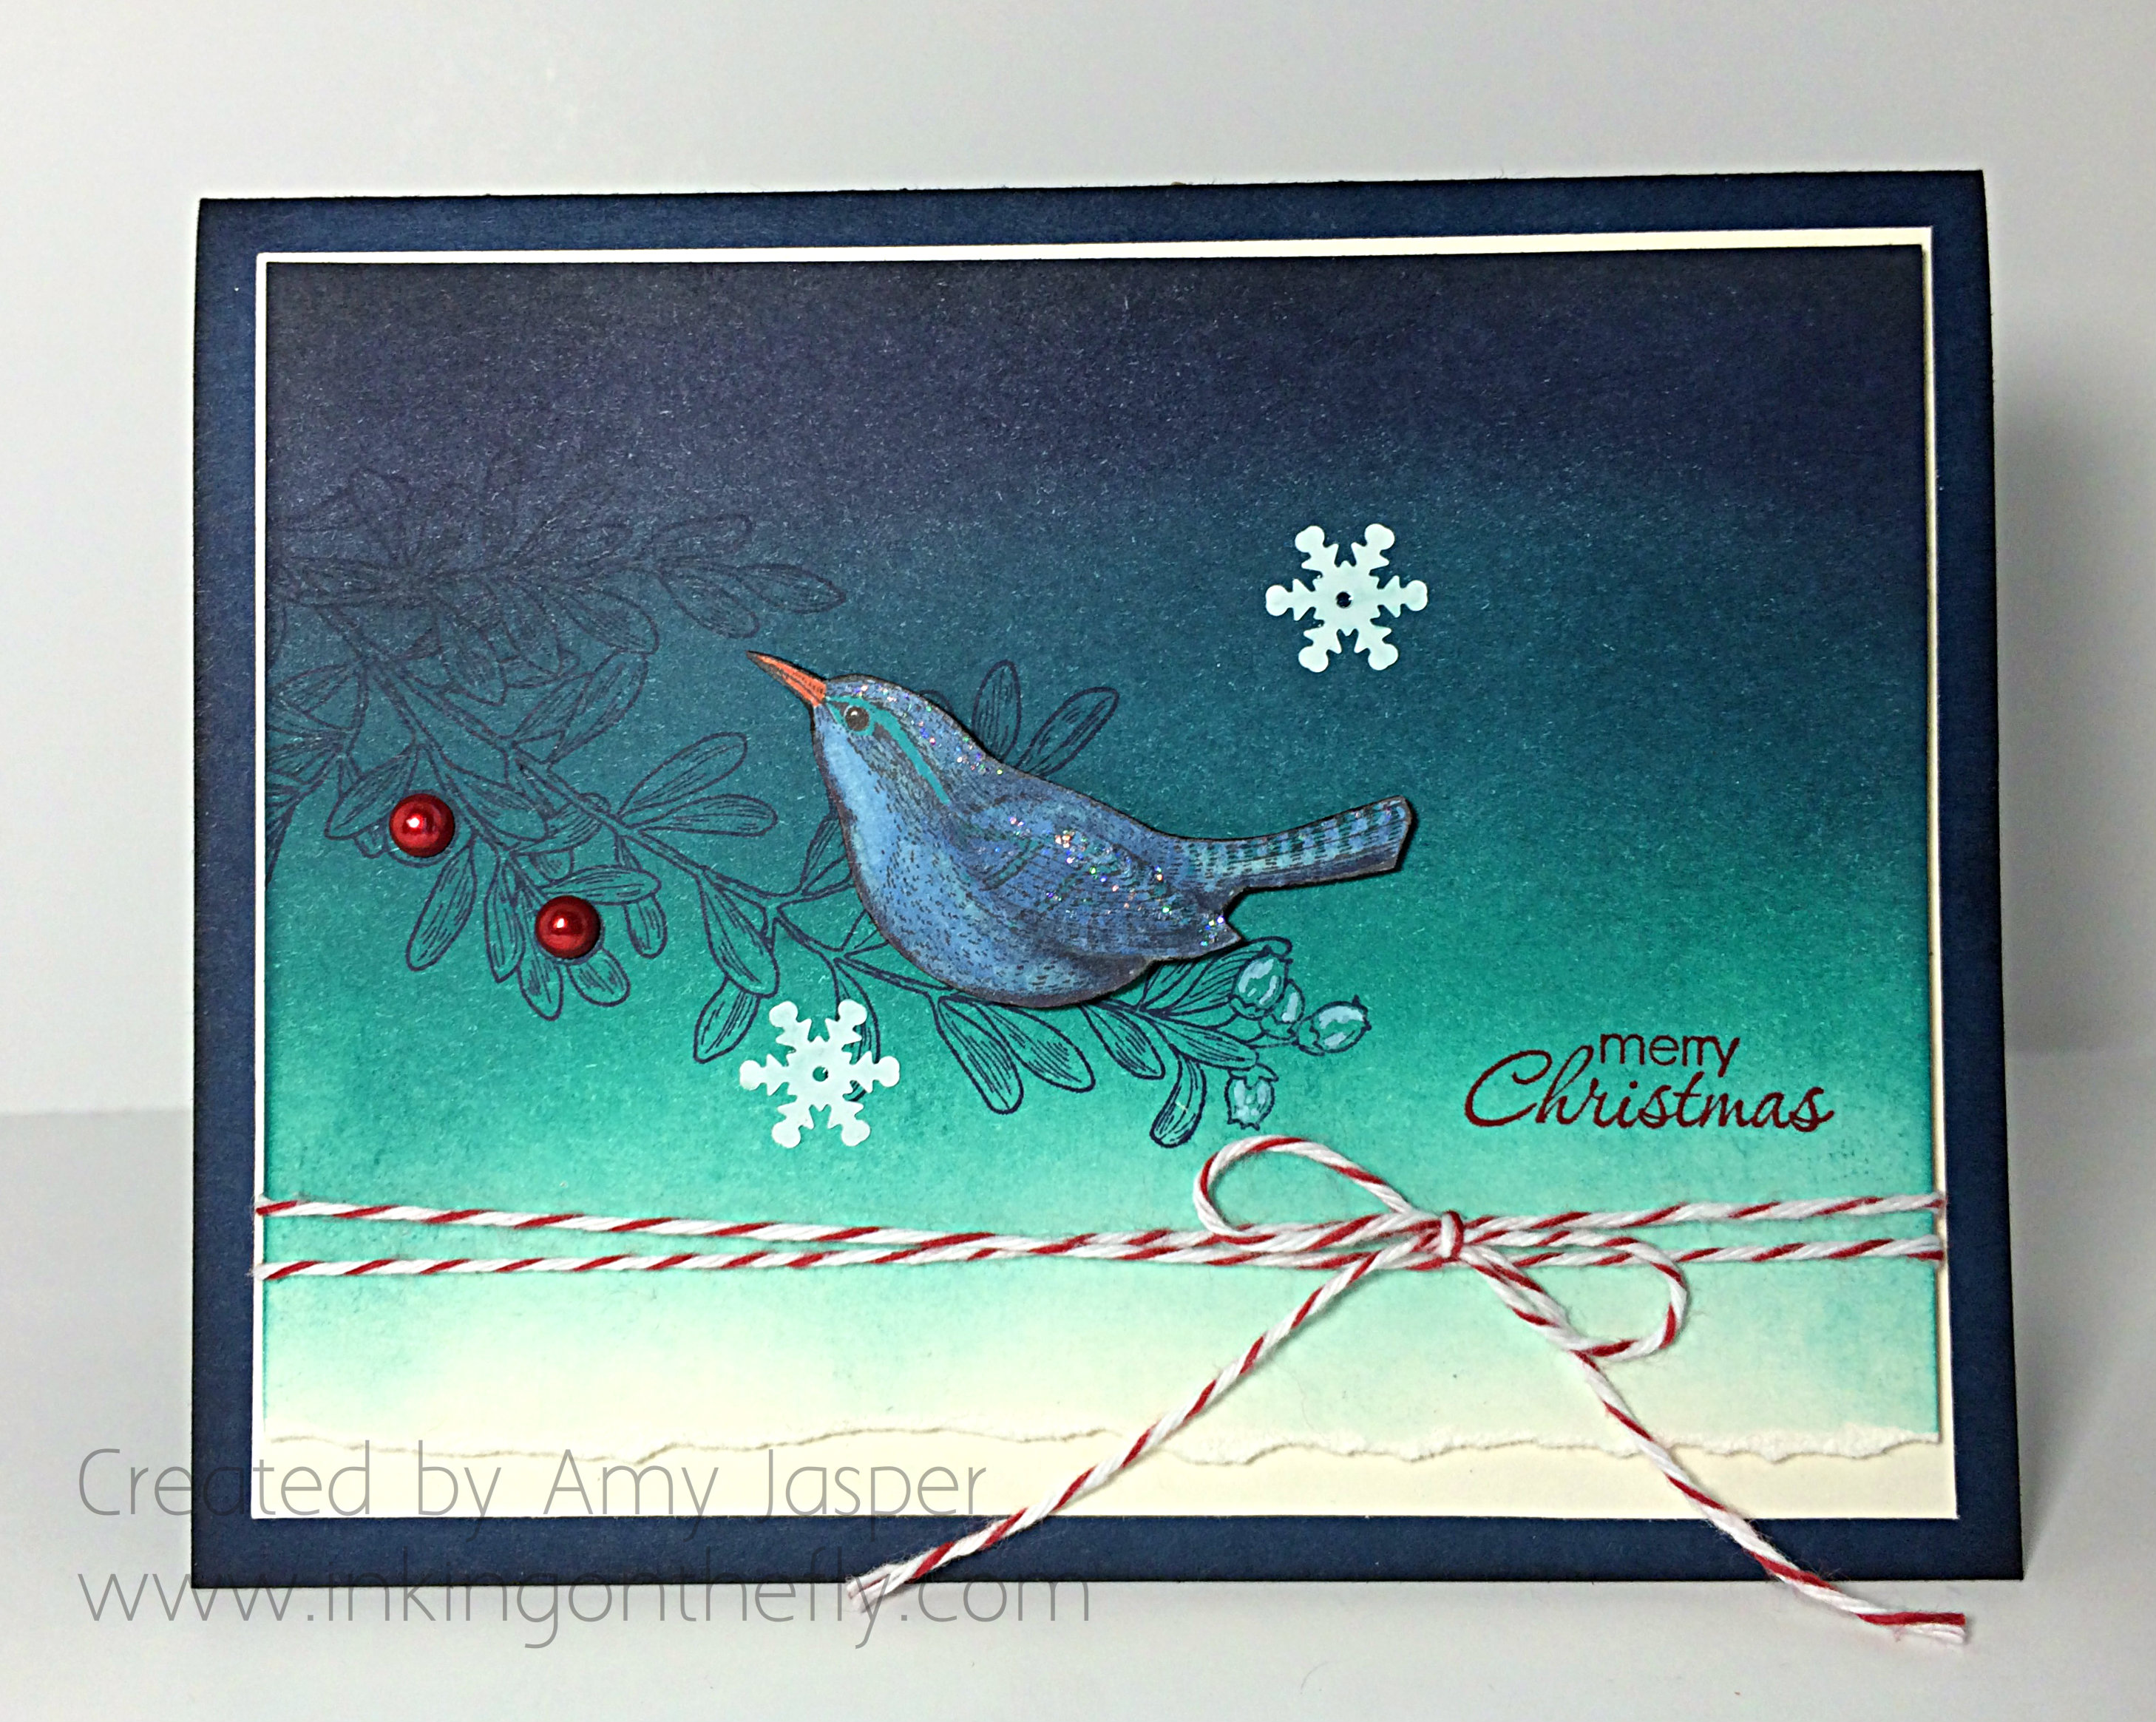
I started with a piece of Very Vanilla cardstock and began using sponge and ink to shade the evening sky background. I was inspired by an image I found on Pinterest for this colour scheme and I love it! With a sponge, from top to bottom, I applied Night of Navy, Island Indigo, and Bermuda Bay ink. Once I was satisfied with the saturation of colour, I added a touch of Momento Black to the very top edge to complete the look. The most bottom edge of the Very Vanilla cardstock was left un-inked and I tore the edge for a bit of texture detail.

Then I stamped the branch image from An Open Heart in Night of Navy ink. The pearls were coloured with the Medium Cherry Cobbler Blendability marker and added for the berries on the branch. I then decided to use my Chalk Marker to accent the buds on the end of the branch. The snowflakes were also coloured (as mentioned above) and adhered to the card with a small dab of Crystal Effects. The Merry Christmas sentiment is from the Petite Pairs stamp set and was stamped with Real Red ink.

063close

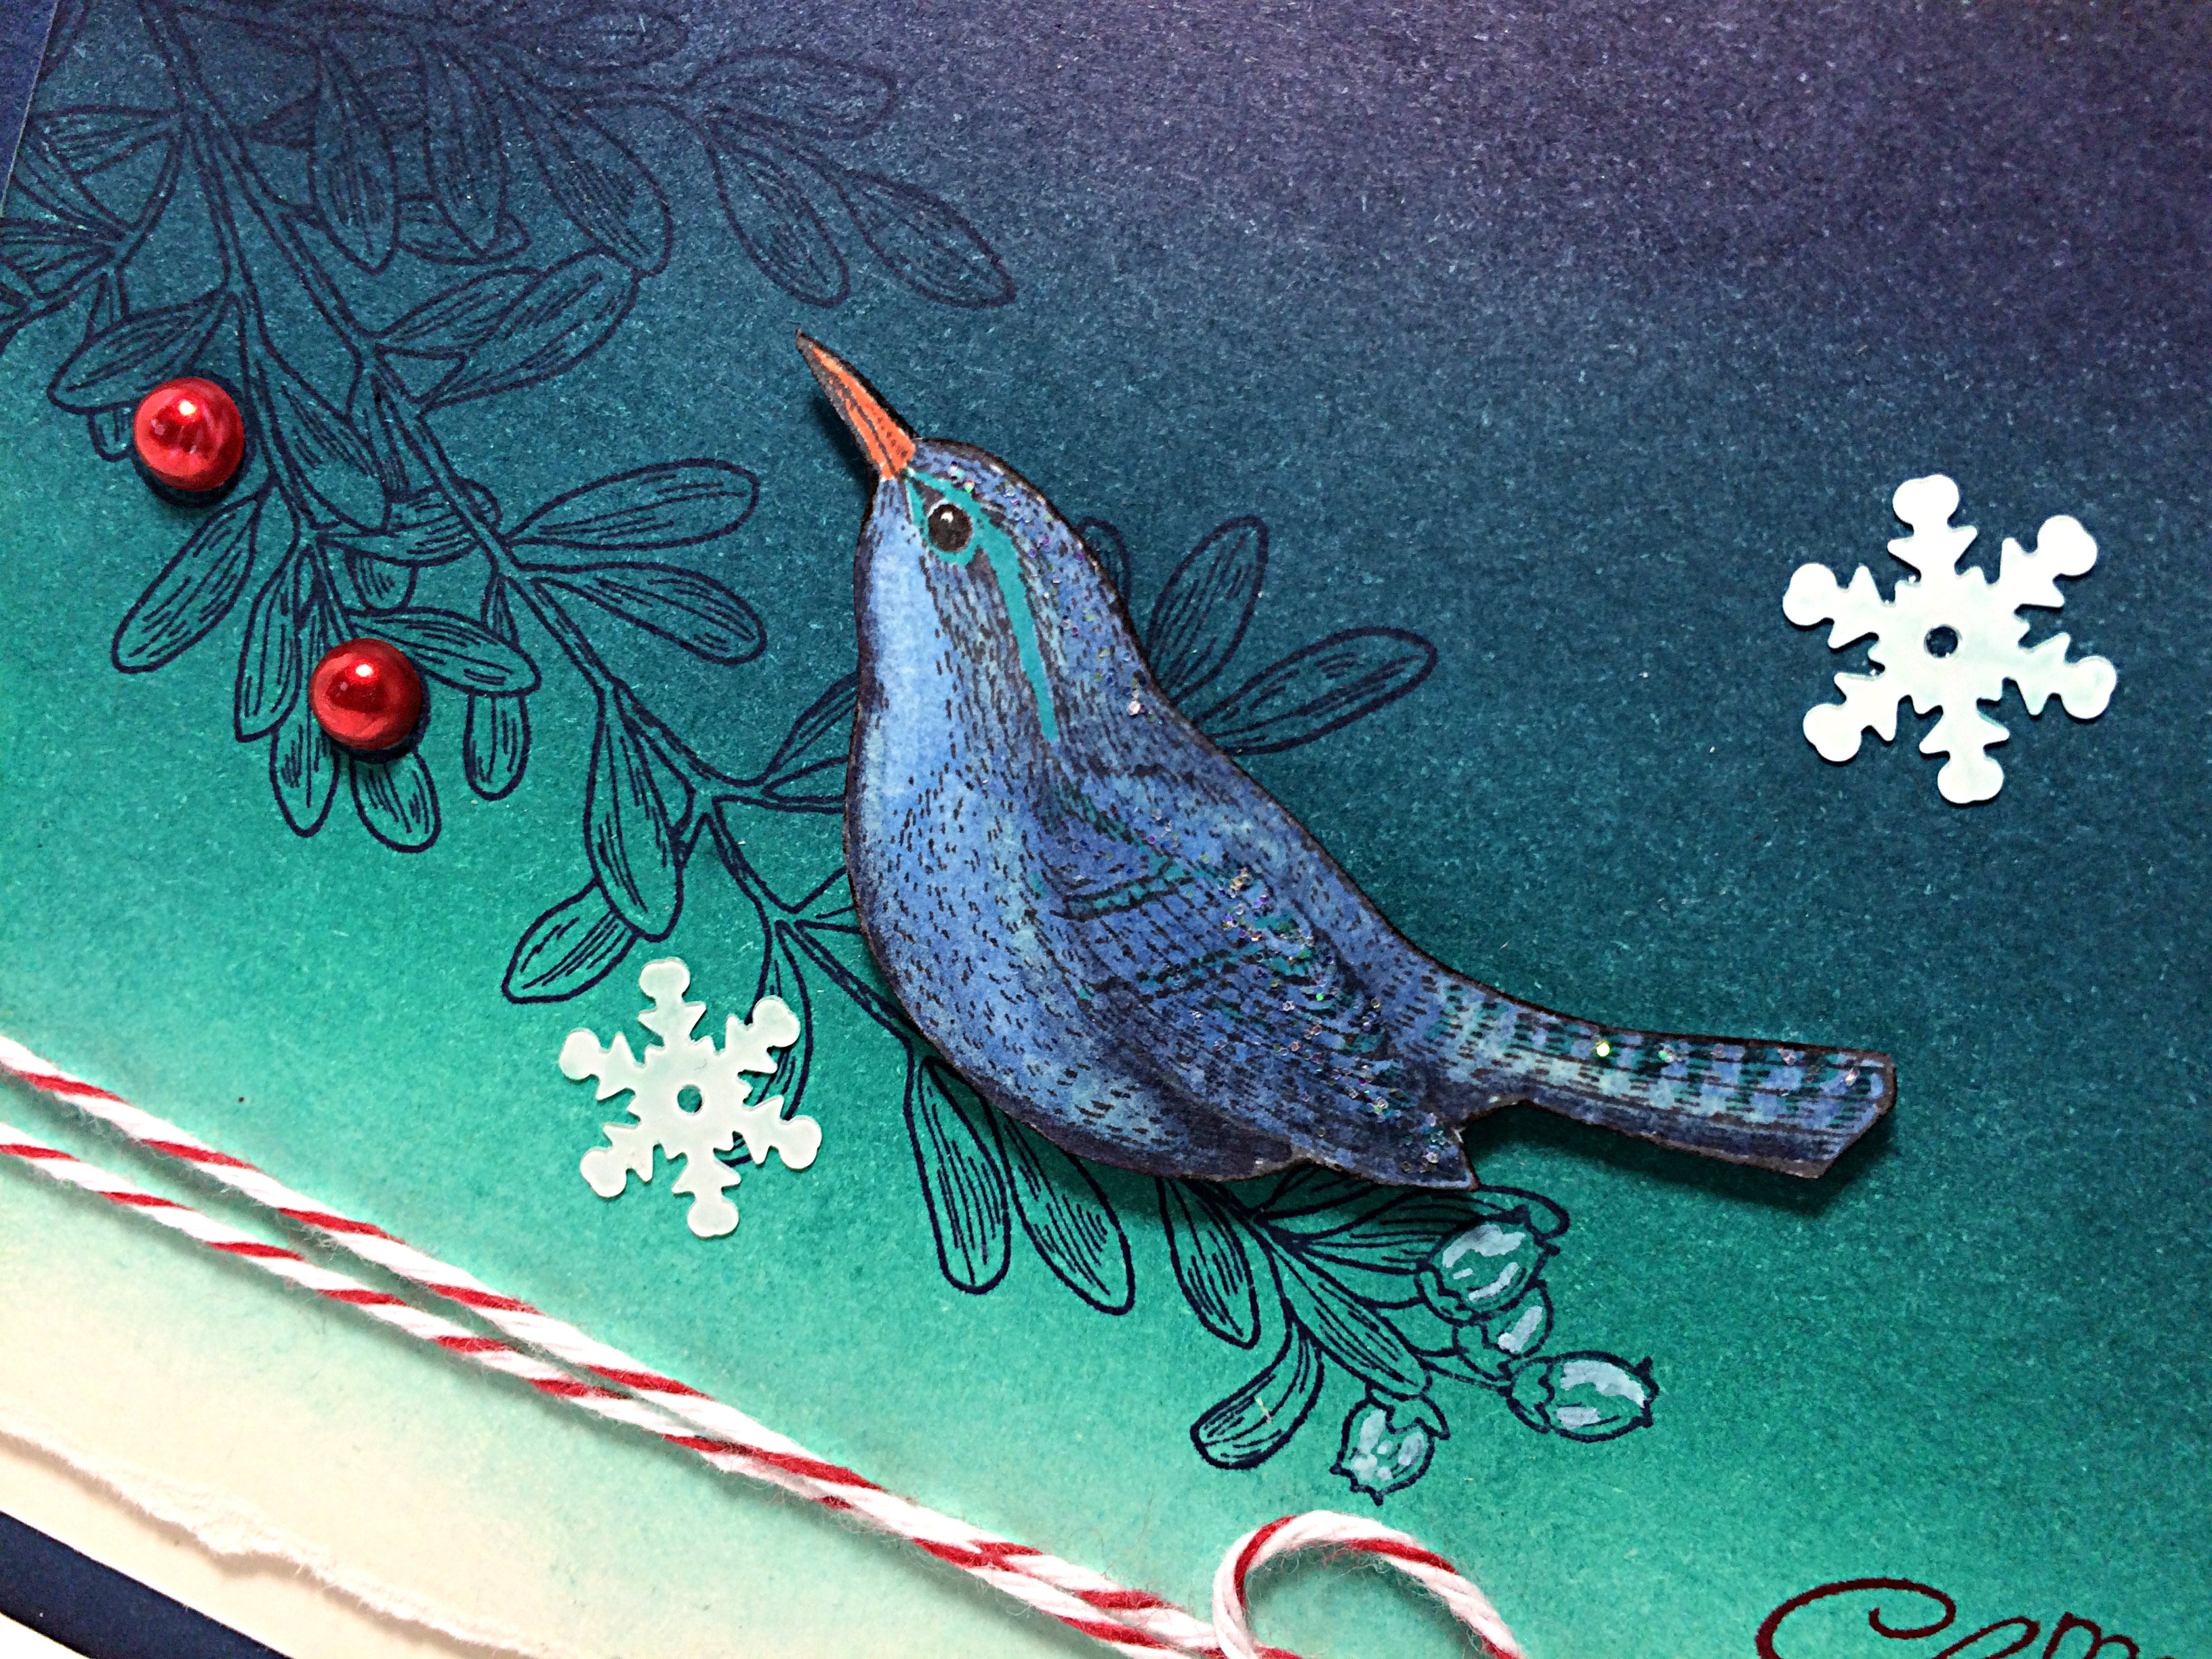
The blue bird was stamped with Momento Black ink and coloured with Night of Navy and Coastal Cabana Blendability markers and a touch of Dazzling Details glitter was applied to the bird as though a wee bit of snow was glinting in the moonlight. His beak was coloured using a Tangerine Tango Stampin’ Write Marker. I cut out the bird with my Paper Snips and cut his little legs right off so he could be sitting all comfy-like on the branch. I also used my Project Life journaling pen to darken his beady little eye so it would have a little more life in it (a trick I learned in the watercolouring class I took last spring). That sweet little winter bird was then adhered to the cardstock with Stampin’ Dimensionals.

After wrapping the Cherry Cobbler Baker’s Twine around that layer of cardstock, I used Stampin’ Dimensionals to layer it over the thin mat of Very Vanilla Cardstock. This all was adhered to the Night of Navy card base which looked a little flat next to all that deep blue ink, so I added a bit of Night of Navy ink to the edges of the card base with a sponge.

What will you do with this sketch? I hope you’ll share it with us over at the As You See It Challenge blog!!

Amy.

Designer-Badge

Snowflakes Fall Slowly

061header

I have a card for today’s colour challenge that uses the Snowflake Card Die from Stampin’ Up! with some atypical snowflake colours and I think it turned out beautifully!

Check out this palette:

#61

When you think of beautiful snowflakes, do you imagine them in red and brown? Not usually. You probably think of white, silver, or blue if you have snowflakes on an art project. However, these challenge colours: Baked Brown Sugar, Cherry Cobbler, and Silver give a warm earthy feel to something normally cold and crisp. Snowflakes fall slowly and quietly, they dampen the noise in the street, all while you are warm and cozy by the fire in your living room. These are cozy colours of sitting by the fireplace on a cold, snowy day.

I have been aware that I need to slow down a bit lately and have been completely unsuccessful. In fact, I think I’ve had more going on in the last month than I’ve had in a long time! The autumn months are always busy in the stampers world with all of the Christmas preparations. It’s busier with the kids in the fall as well. I find that whenever I’m able to delete something from my time table, another thing comes along to fill its place. I was asked the other day what I do for downtime, to recharge, and I realized it’s been so long that I don’t even KNOW what I do for downtime. Part of that is the busy life of a mom of 3 ever-going kids – I’m always one or two (or 23) steps behind everything! It’s gotten a bit out of hand lately. The house is a disaster with piles of stuff all over the place, boxes of stamping supplies still waiting to be put away after events long gone, school papers from the kids, clothes in boxes that need to go to charity – I’ve lost things in the clutter and have found myself forgetting things while attempting to juggle the activities and events for me and my family.

But … I watched a bird today. It wasn’t doing anything special – just silently flying above the noise of the cars zipping around on street below, in its own world, just being a bird. I think it was playing on a breeze up there. I wanted to be like that. Just ‘in the moment’, not caring about anything or anyone. Enjoying ‘being’.

So, I take notes from the bird and ponder a snowflake falling slowly and quietly, and I am going to try to be more like that for a while. To slow down. To enjoy some ‘being’. And a part of that will be to take a break from my stamping events so I can catch up on the needs of my household and my family. I might even light the fire in our living room and have a cup of tea. Why not? Crazier things have happened before, lol!

I designed my card while I was away at the Creative Escape Retreat at Rockridge Canyon in Princeton, BC. The photo below shows the card closed. I used the Snowflake Card thinlit in the Big Shot to cut the card base but using a full 5.5″ x 8.5″ piece of cardstock so that the thinlit would not cut it on the one end (I’m sure you’ve seen these sorts of dies used this way before – if not, google ‘extended flip card’ and you should find a tutorial’)

061Amy

The die set for the Snowflake Card thinlits includes the die for the Silver Glimmer snowflake in the center of this card as well as the Joy and the mini snowflake that are inside the card. It has a bunch of die shapes that are all very useful.

Oh, my goodness, I used a ton of things on this card:

Baked Brown Sugar cardstock, Cherry Cobbler cardstock and Under the Tree Specialty Designer Series Paper. Nordic Designer buttons. Cherry Cobbler 1″ Sheer Linen Ribbon. Linen Thread. Silver Glimmer Paper. Scallop Edge Border Punch. Hardwood Background Stamp with Baked Brown Sugar Ink. Northern Flurry Embossing Folder. Sponging with Baked Brown Sugar ink. 1 3/4″ scallop punch. 1 3/8″ circle Punch. 1 1/4″ circle punch. Snowflake Card thinlit dies. Big Shot (by far, my most FAVOURITE TOOL!!). Sticky Strip, Tombo Liquid Multipurpose Glue, and Stampin’ Dimensionals (another favourite supply item.

The photo below shows the card with the snowflake flipped to it’s other side as the card is opened.

061open1The next photo shows the card fully opened to reveal the available writing space and the entire inside of the card.

You might be wondering how I cut the large Cherry Cobbler snowflake when there isn’t a die that fits in that space. I used the full thinlit die for the card base and laid it on a piece of Cherry Cobbler cardstock that was just big enough to fit that section of the thinlit. I ran that through the Big Shot, which leaves you with a partially cut large snowflake. I then removed the partially cut piece of Cherry Cobbler cardstock and repositioned it by 90 degrees so that when I ran it through the Big Shot again, it would cut the areas that weren’t cut the first time.  Because the top and bottom of the shape are exactly the same as the sides of the shape, this works! Easy peasy!! (Maybe not as easy to understand with written words, sorry I don’t have a quick photo tutorial for you).

061open2I hope you give this colour combo a try and link it up to the As You See It Challenge blog! I love to see what you come up with!

Amy

Designer-Badge


Better than Nacho Libre

060header

Here we are again with another card for the As You See It Challenge Blog. Oh how I struggled with this sketch, but I loved using the little saying from the Project Life by Stampin’ Up Holiday Cheer stamp set.

#60Though the sketch is Halloween inspired, I am geared into Christmas already. So a Christmas card is what I did. I’m not very happy with it, but it’s better than how it looked before I decided to turn it on it’s side!!

Do you remember the movie Nacho Libre with Jack Black. I found it very funny! That sort of humour suits me just fine.

nacho-libreBefore I turned my card design on its side, I found that with all of those stars in combination with the Real Red and the Bermuda Bay colours, it became very American, but in a Nacho Libre sort of way (though, I’m pretty sure he was not American, lol!). The strip of Champagne Glimmer Paper looked like a belt with the oval sentiment in the centre; and the flashy red patterned paper from the Nordic Noel Designer Series paper looked like fancy wrestler pants! So I absolutely HAD to turn it sideways to avoid the confusion!

Tilt your head to the left and see if you can imagine what I saw!!

060Amy

Even though it’s better than my Nacho Libre version, this is not my favourite card.  Maybe it just needs some loopy thread like in my card a couple weeks ago. Yes, I might go back and add that!

This card used the Lucky Stars embossing folder on Whisper White cardstock. I used Bermuda Bay to mat the Under the Tree Specialty Designer paper (with those cute tiny stars on it) along with the strip of Nordic Noel Designer Series Paper and the strip of Champagne Glimmer paper.

The Holiday Cheer sentiment is from the Project Life “Holiday Cheer” stamp set. I used my Stampin’ Write markers to ink the “holiday” in Real Red and the “cheer” in Bermuda Bay ink and (after huffing on it with my breath to re-moisten the ink) stamped it on Whisper White cardstock, which I then punched out with the Large Oval punch. The cute stocking is also from the Project Life Holiday Cheer stamp set, stamped with Bermuda Bay ink and hand-cut. I added a bit of Dazzling Detail glitter to the stocking as well.

Of course I used Stampin’ Up Dimensionals as well. They are under the Bermuda Bay layer and under the oval and the stocking.

Now I want to watch Nacho Libre again!

I hope you’ll play along this week and show me how to make this sketch amazing!! Upload your designs to the As You See it Challenge blog and give me some inspiration!

Amy

nachoquote1