embossing

Happily Pretty Simple

079header

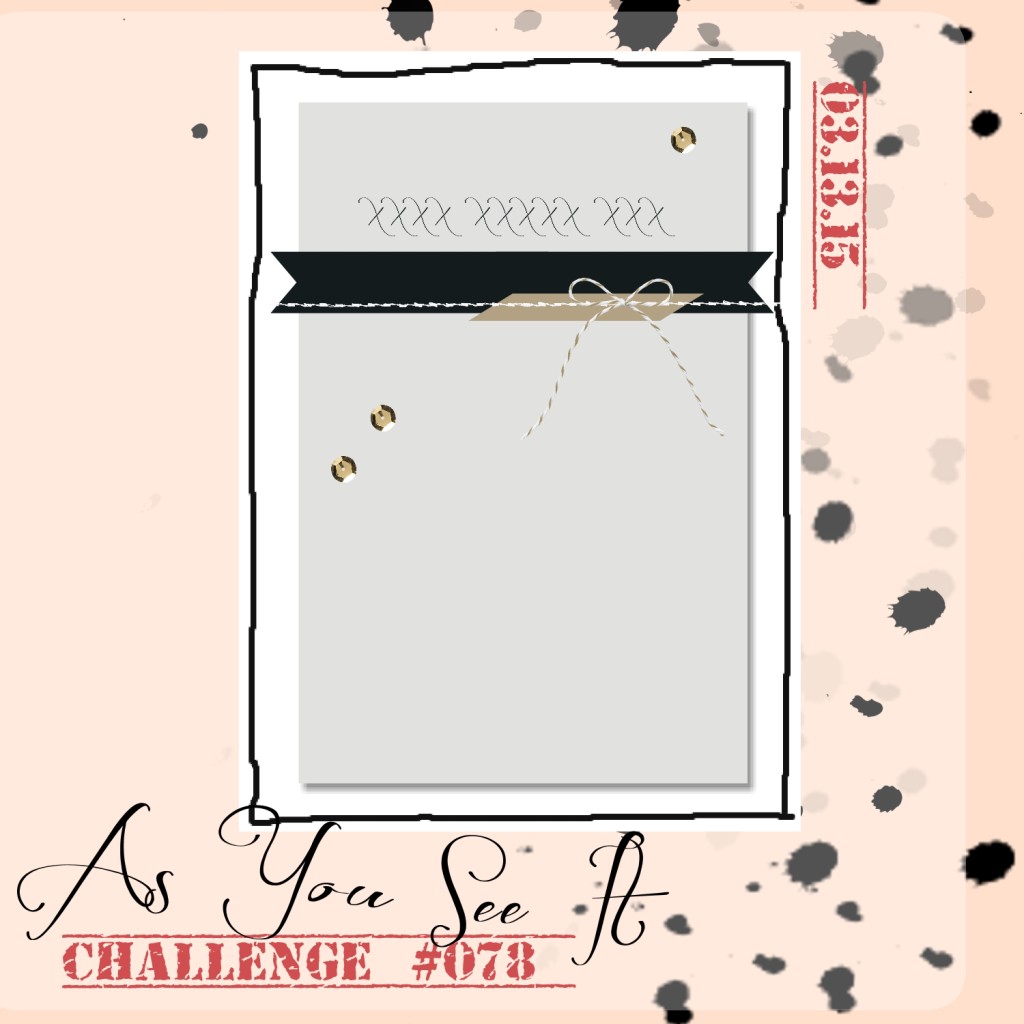
The As You See It Challenge Sketch #079 is bold and simple at the same time. This week I worked with heat embossing, Blender Pens, a note card project, and Envelope Liner Framelits.

Here’s the sketch challenge I started with for this project:

AYSIChallenge079-1024x1024

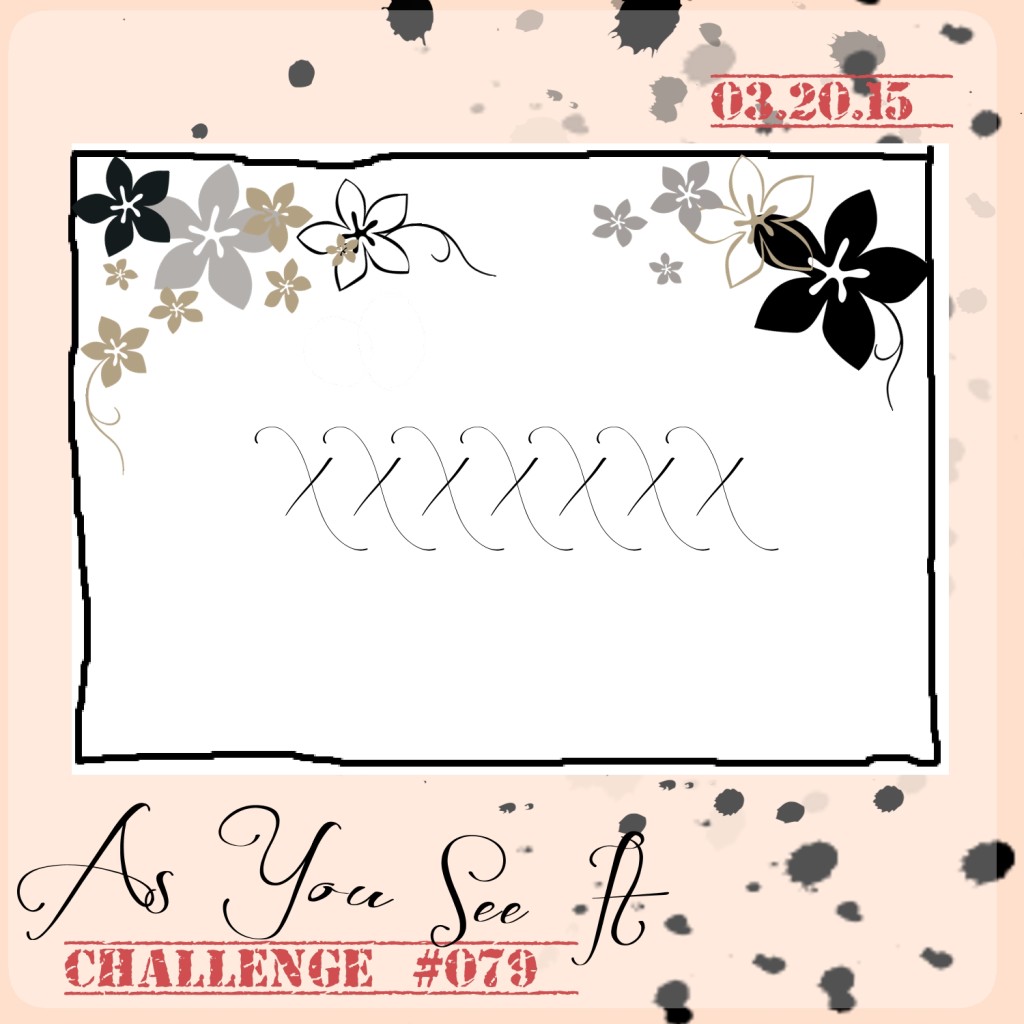
At first glance, I had NO idea what to do with this sketch. So, I started by looking at the largest sentiments that I had available, then carried on from there. I hadn’t even mounted my Big News stamp set yet and it was perfect for this layout!

079Amy

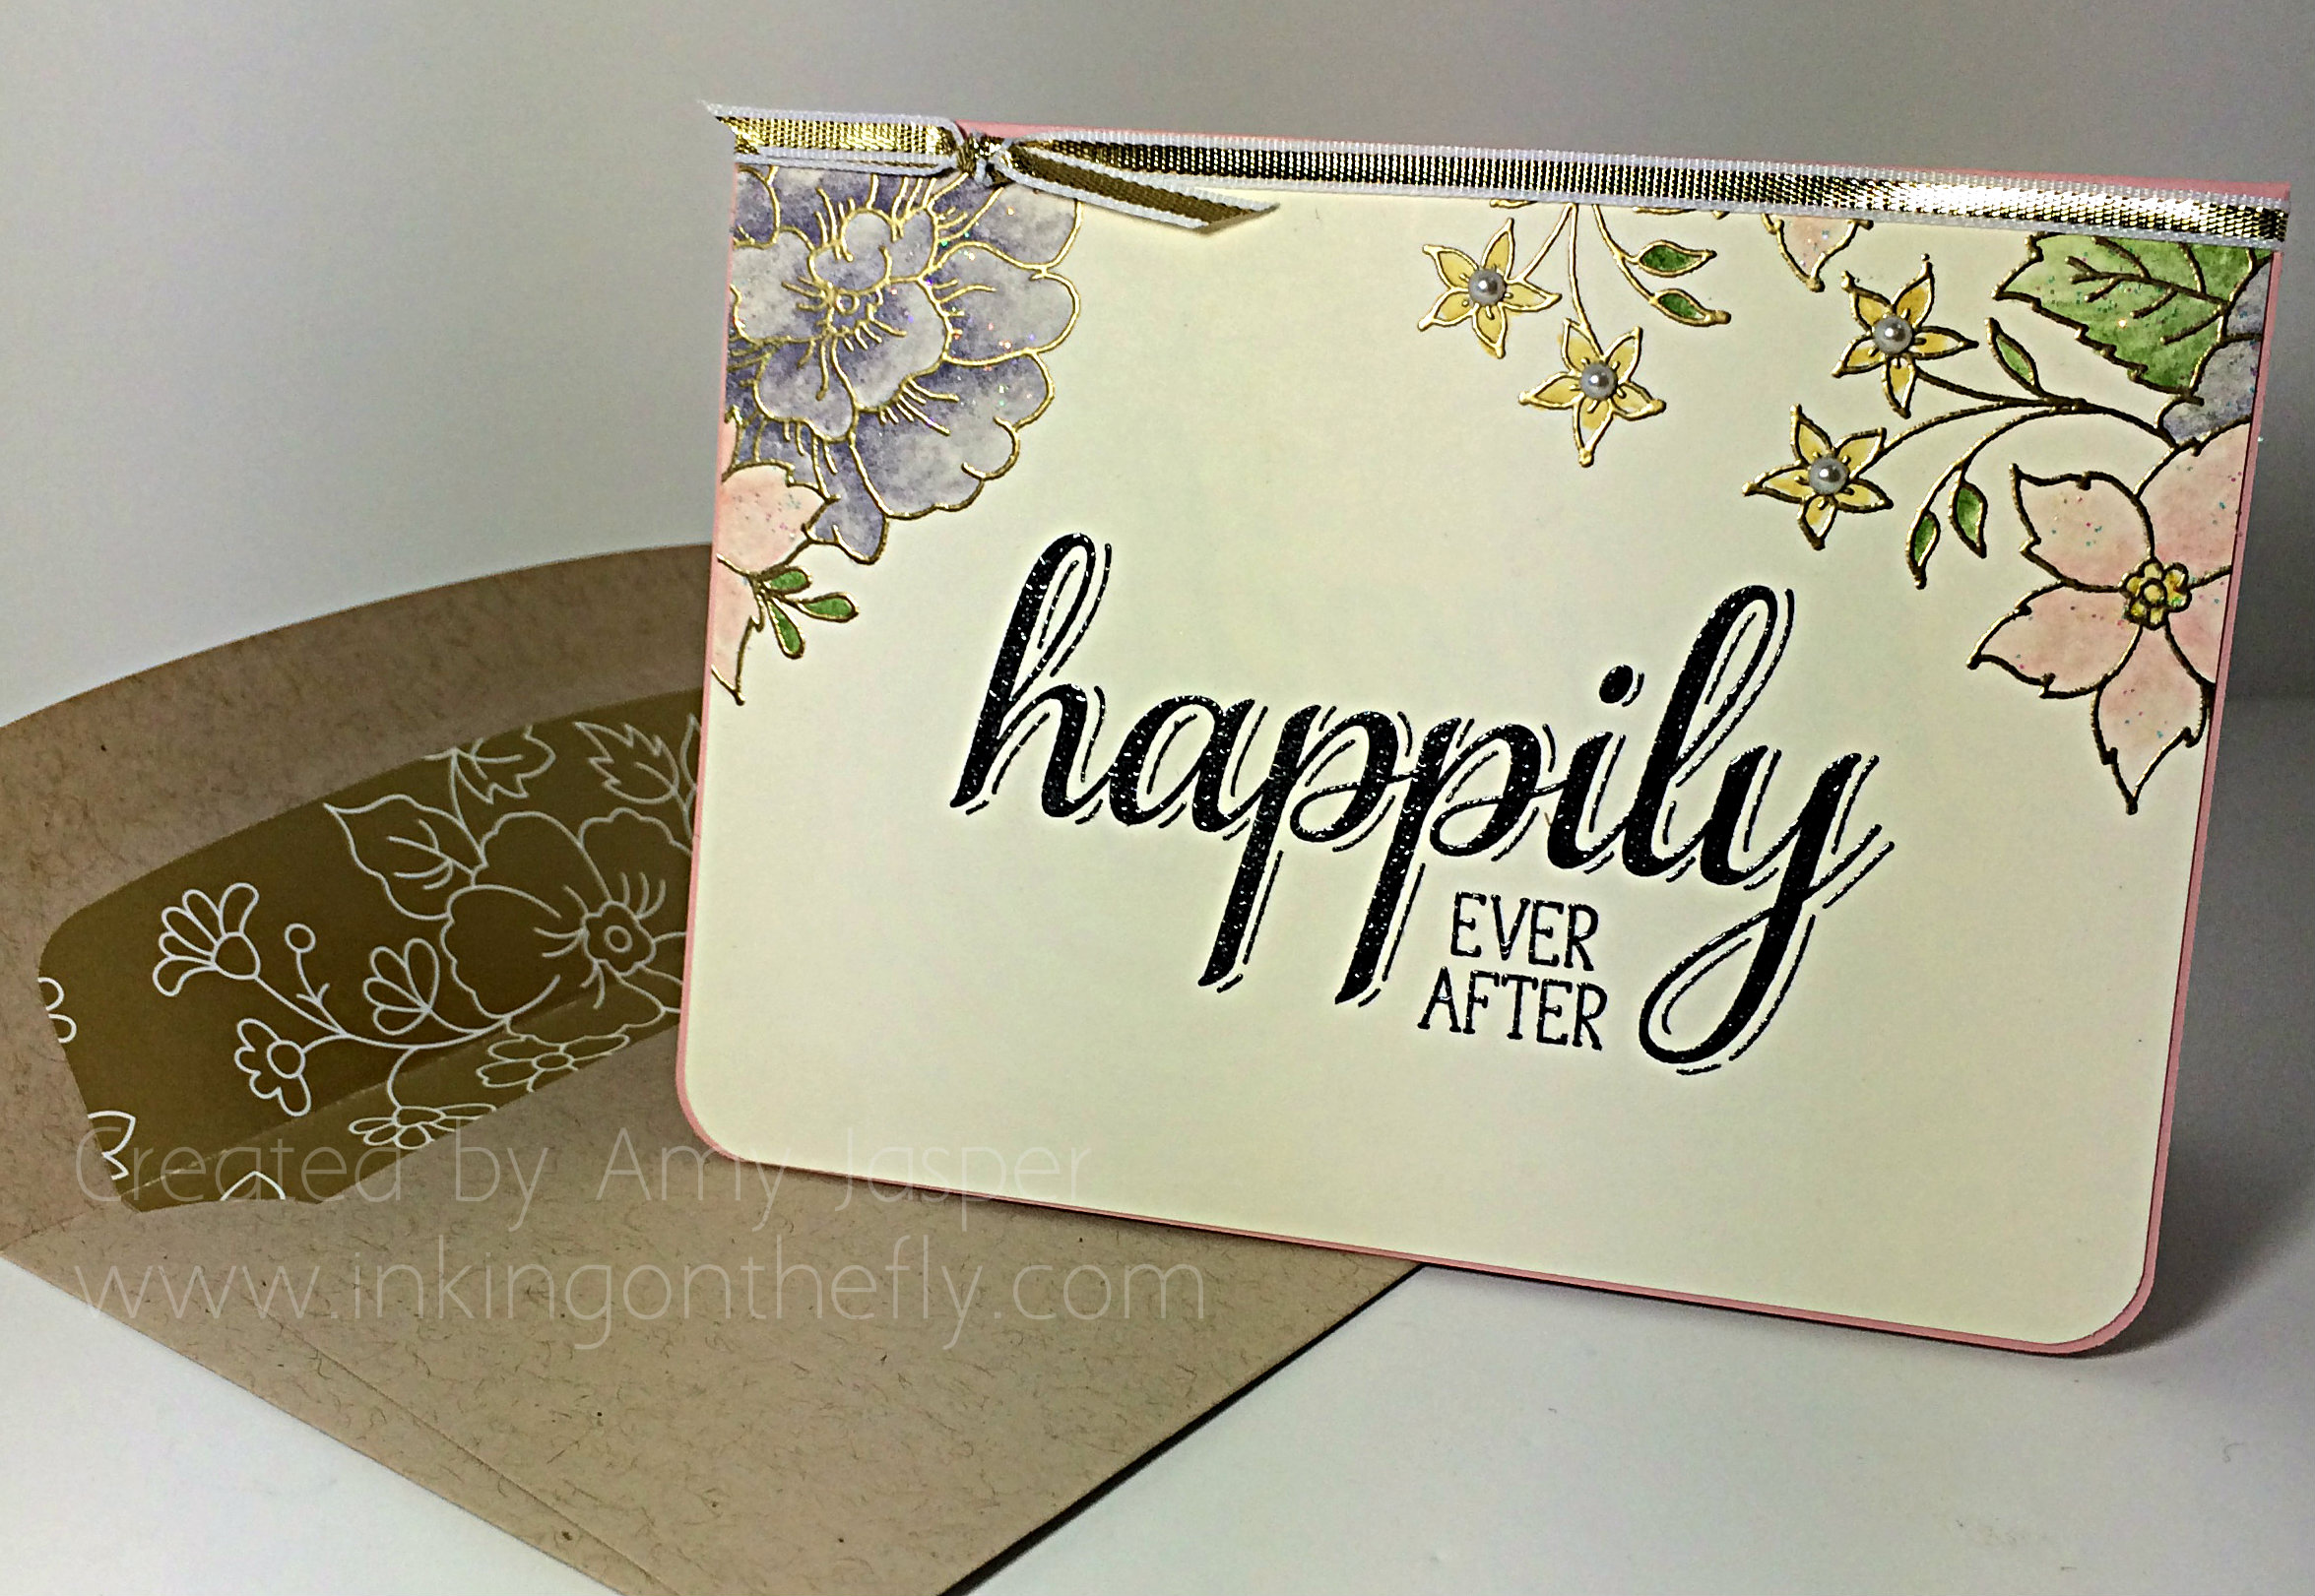
In the end, my card became a note card size (3.5″ x 4.75″), but only because I changed my mind a few times as to what I wanted it to look like and eventually it had to be cut down to the size you see here.

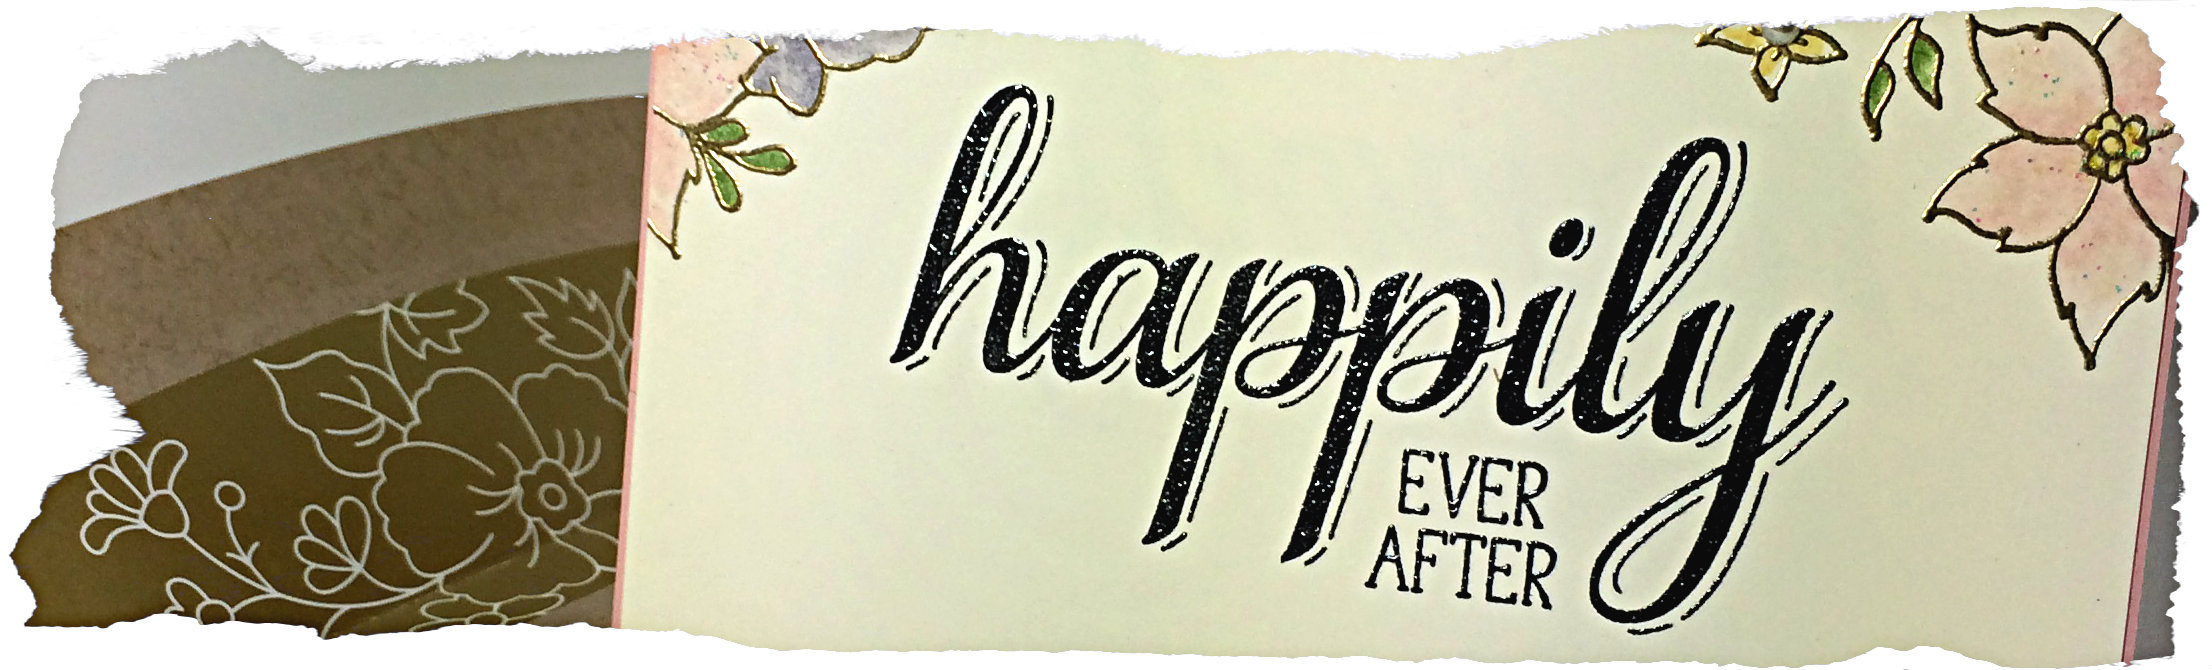
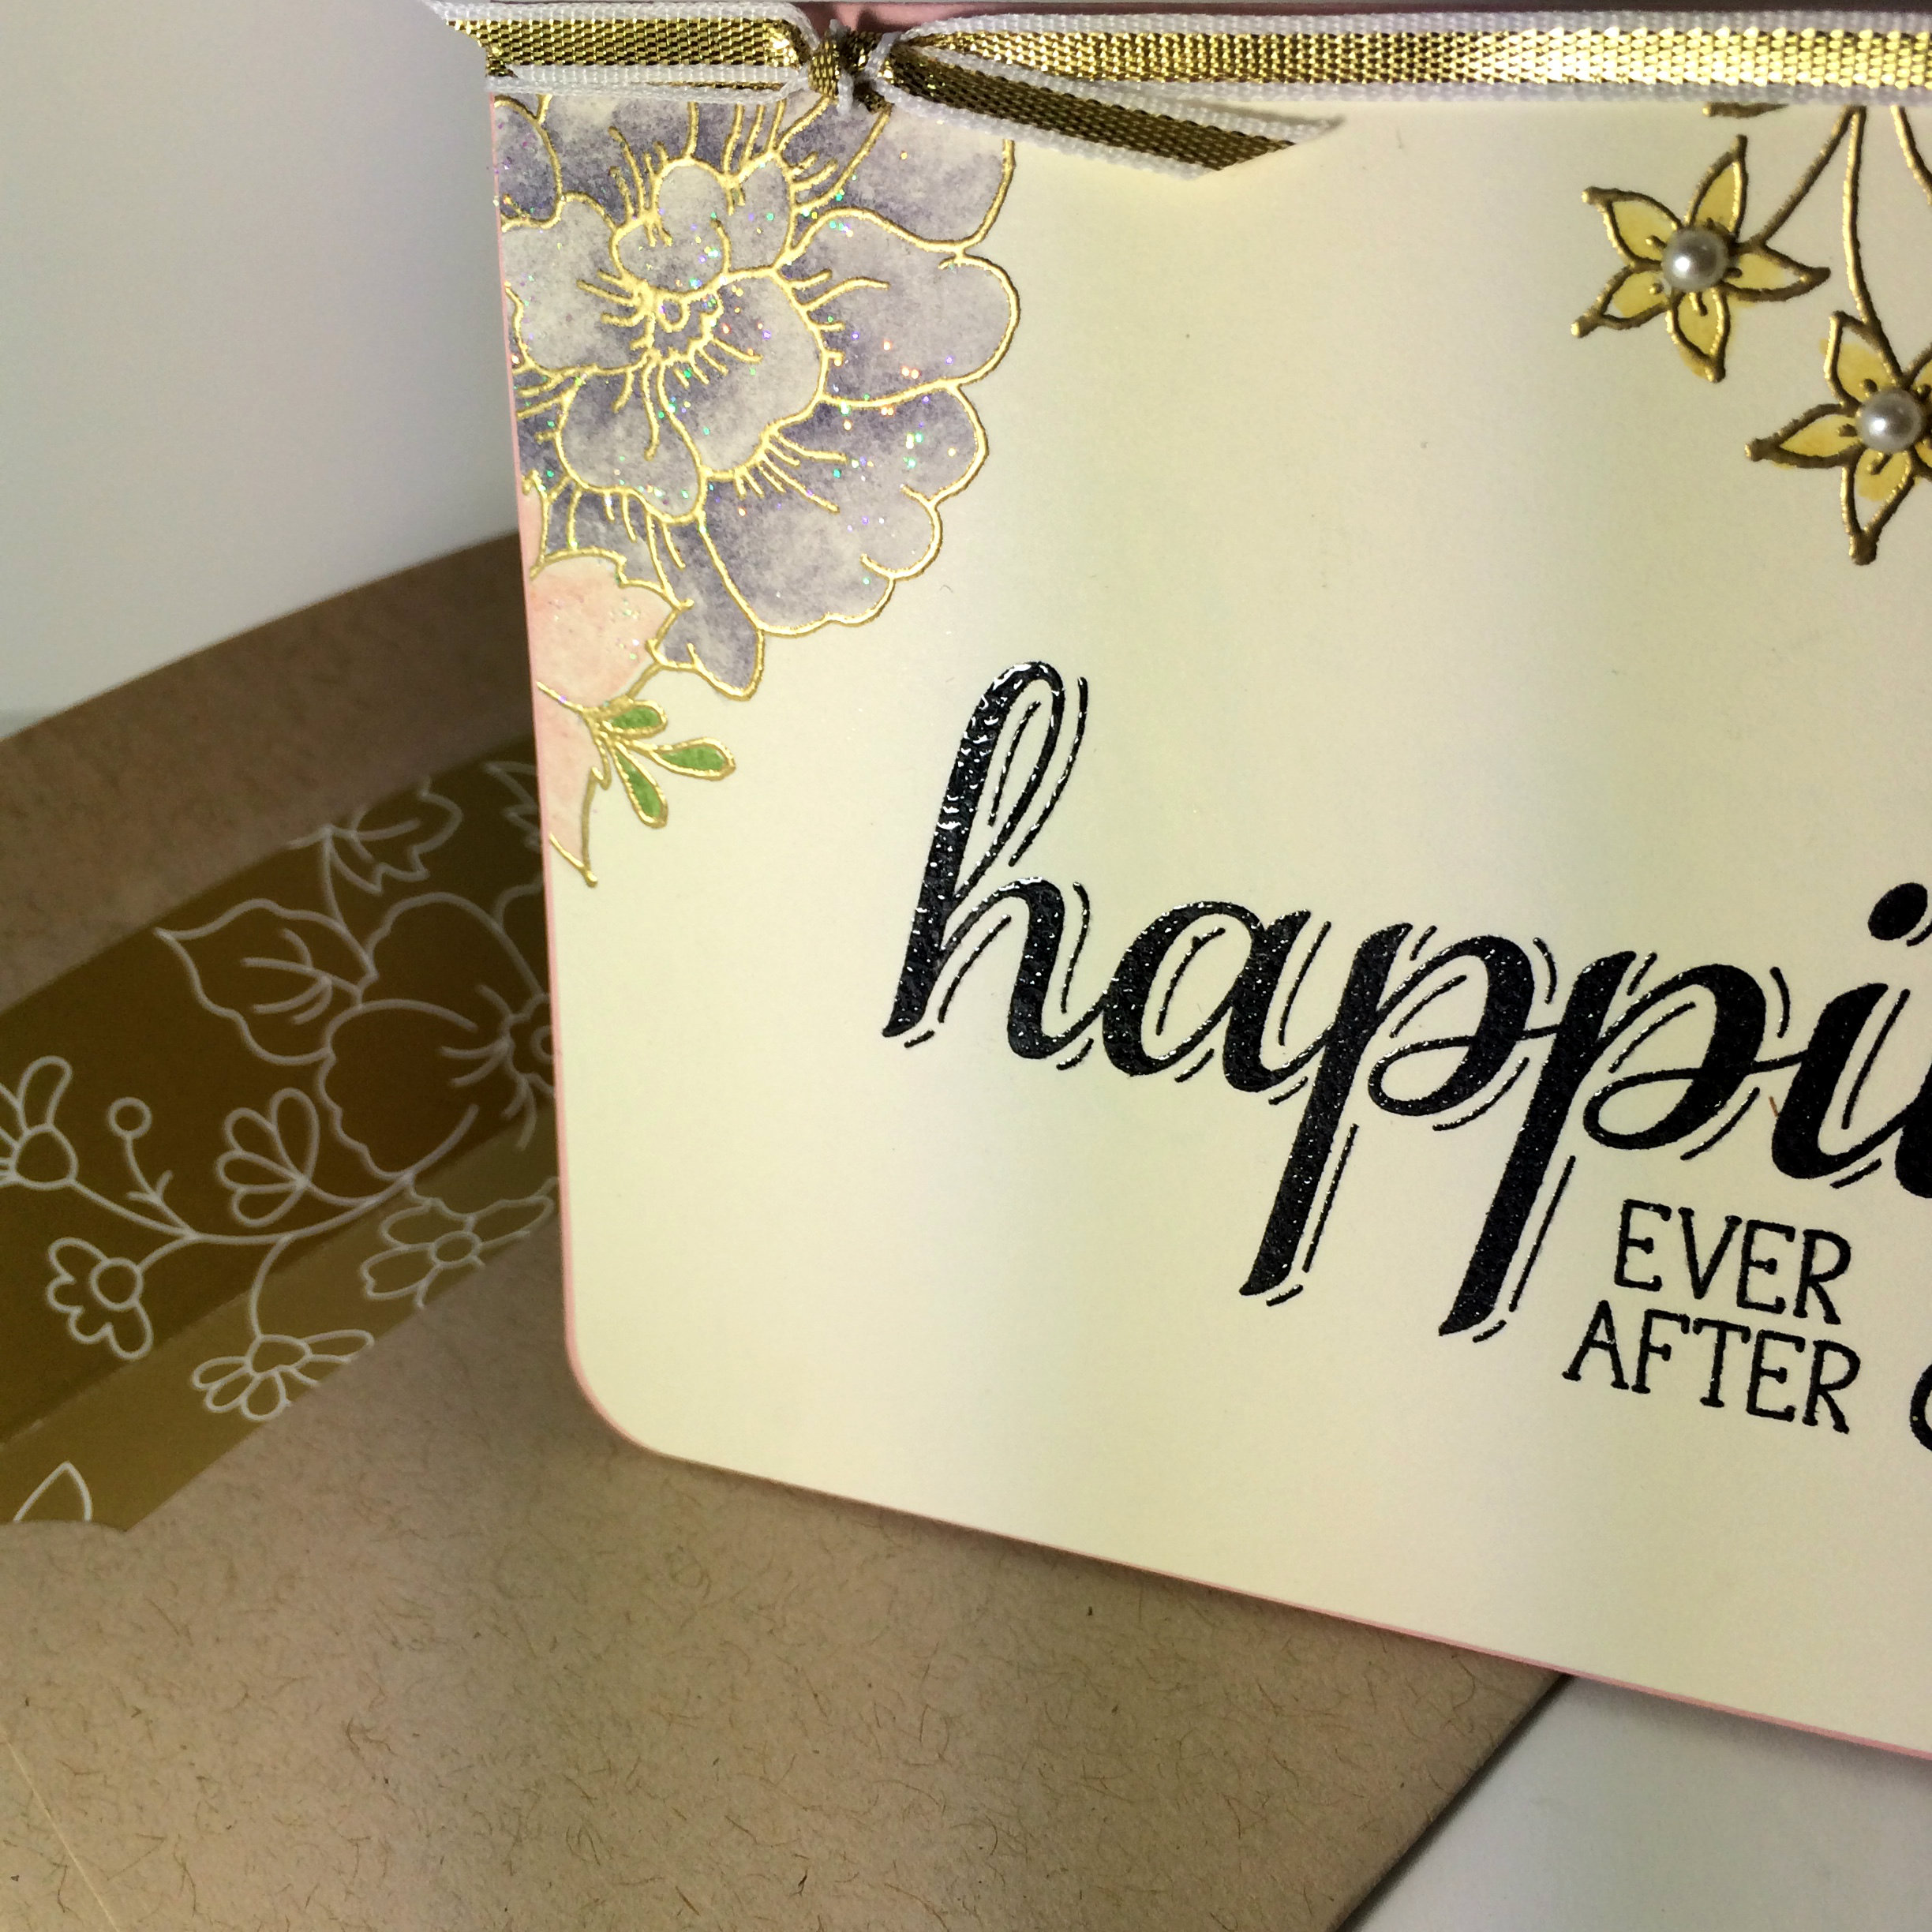
I used Very Vanilla cardstock and stamped the sentiment in Jet Black Stazon ink. It looked too flat, so I applied Clear Embossing powder over the ink and heat set it to give a glossy finish (did you know you could do that with Stazon?!). I then stamped the flowers from the I Like You hostess stamp set with Versamark ink and heat set the Gold Embossing powder over that. Next, the flowers were coloured with Classic ink using a Blender Pen (pulling those out again now that the Blendabilities are discontinued…sniff…) I used Blushing Bride, Wild Wasabi, Hello Honey, and Wisteria Wonder ink for the flowers, then finished them off with a few blobs of Dazzling Details glitter glue which I spread all over the flowers and leaves with the tip of my finger. The wee flowers were topped off with small Basic Pearls.

079sparkle

You can see the glitter from the Dazzling Details glue a bit better in the above photo. Did you notice the envelope liner in this photo? I used the Gold Soiree Specialty Designer Series paper and my Envelope Liner framelits to create the elegant look to this Crumb Cake Note Card Envelope. It’s very handy to have paper that coordinates with the I Like You stamp set!

I used Blushing Bride cardstock for the base with a very thin border around the Very Vanilla layer. The bottom corners were all rounded with my Project Life corner rounder punch. I topped the front of the card with a piece of Gold 1/8″ ribbon.

Simple.

Pretty.

079envelope

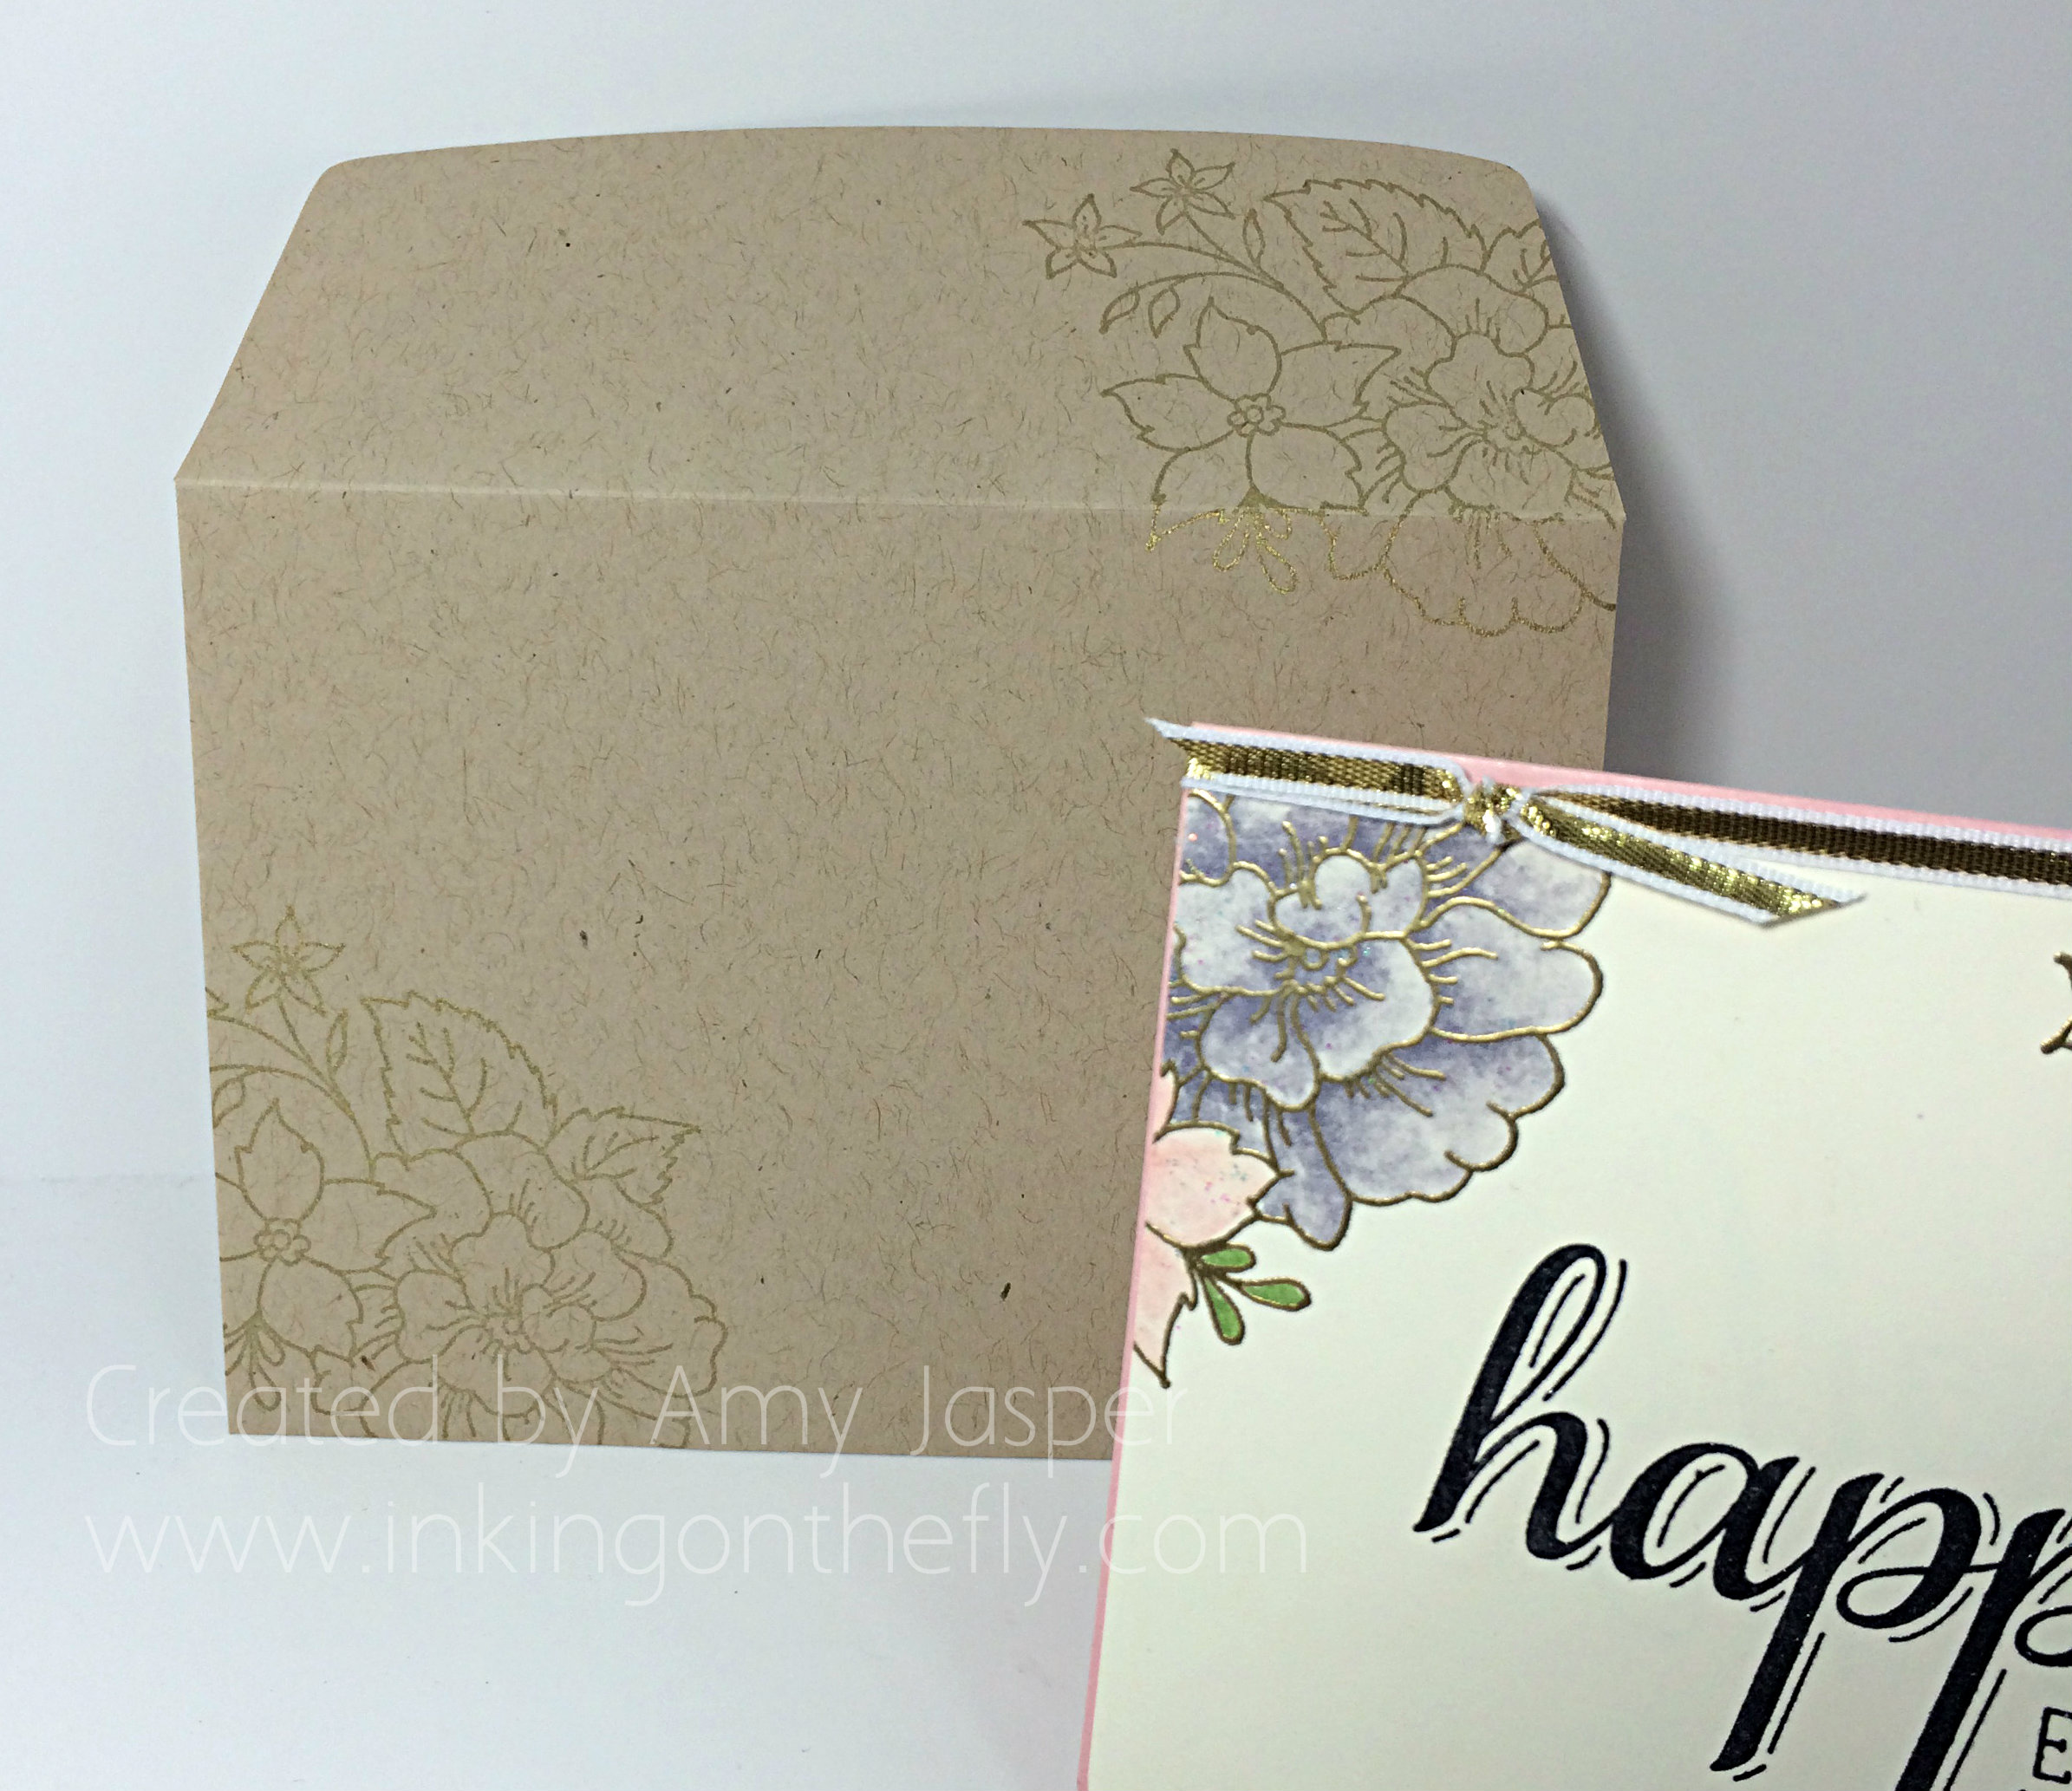
The outside of the envelope was stamped using the I Like You flower image as well, but with Gold ink.

And it all comes together! Whah whah!!

Now I’m ready for the next wedding (come on my single friends!! Bring it on!) when I will use this gift card to top off the amazingly expensive and perfect and fabulous wedding present that will go along with it.

Why don’t you give this sketch a go? Don’t forget to show it off at the As You See It Challenge blog. I know you will inspire me with whatever your take on the sketch may be. I can’t wait to see what you come up with!!

Amy

Designer-Badge


What Wood I Do?

078header

I just love the Adventure Bound paper stack. The photographic images mixed in with the simple patterns make it very versatile. Check out how I used it along with the Alphabet Rotary stamp to make a punny thank you card!

I started with this sketch from the As You See It Challenge this week:

AYSIChallenge078-1024x1024

I chose a masculine theme to create this card for the wonderful men in my life who I would be absolutely lost without – men in my family and my church who always amaze me with their willingness to help in whatever way that they can. They are moving furniture, digging holes, repairing computers, picking up groceries, putting up the trampoline, building basements, lending tools, or offering a word of encouragement.  I am frequently surprised by their willingness and even eagerness to do something out of the kindness of their heart. It overwhelms me with gratitude.

This card was created with some of these men in mind.

078Amy

I haven’t completed the inside, but it would likely carry on the pun by saying “I don’t know, but the odds are probably stacked against me!” (ok, its a groaner, but I feel very clever right now, lol!)

Whisper White cardstock was used to thinly matt the Adventure Bound Designer Series paper (wood pile image) and the Crumb Cake cardstock. The Alphabet Rotary Stamp was used to create the sentiment. I chose a piece of Kraft cardstock for the banner that I dry embossed with the Woodgrain Embossing folder and sponged lightly with Soft Suede ink to bring out the ‘grain’. I then hand cut some wood pieces out of another scrap of the wood pile paper from the Adventure Bound stack and added those along with the Linen Thread for embellishment. I wasn’t sure what to use to represent the 3 sequins in the sketch, but decided to simply add some splotches with the Gorgeous Grunge stamp set in Crumb Cake ink. I used Stampin’ Dimensionals under a couple of the wood cut out pieces as well as under the entire Whisper White cardstock layer to adhere it to the Basic Black card base.

078angle

I hope you’ll try this sketch from As You See It and share your project on the blog for us. We’d love to see what you come up with!

Amy

Designer-Badge

Just Mail it Already!!

073Amyheader

Oh, how I missed you last week. How’ve you been? I was away at the Leadership Conference for Stampin’ Up! down in Orlando, Florida. The time change was harder for me than ever! But I learned so much and have a lot to work on to improve my business and my home life!  I was especially touched and inspired by what our keynote speaker had to say about the power and significance of handwritten notes and letters in this world of emails, texts and Social Media updates. His words and the stories that he shared of people reading messages from loved ones who have passed on, sparked a flame in me to change my ways – just a little bit.

I love making cards. Really love it. And I love showing others how to make cards. But do you think I can get myself to send a card? To remember to send one before the birthday or event for which that card is intended? No. I am TERRIBLE at that! I have an ever-growing collection of hand-made cards that have been mailed to NO ONE!!

So, this week, I decided to share the inspiration with my Monthly Stampers group. I gave them each an envelope with a postage stamp and encouraged them to use one of the cards that we finished in our class that day to mail to a loved one. To write the address on the envelope right then and there. To write in the card, and mail it on their way home. I did this for them, yes, but I did this for me. My card will go to my Granny, whom I seldom see, and it seems as though she is a world away. I have written in my card. I have addressed the envelope. It has been mailed. My hope is that lives will be touched by our hand-written notes of love and gratitude. The notes and cards that share a bit of us. Our hand-writing is only ours. These notes are not about the words on the page so much as they are about the hand that wrote them. Hand-written notes have a personal touch, and therefore, a personal and relational connection, that typed messages will never carry.

Oh ya, and here’s the As You See It Challenge Sketch for my design this week:

#073And the card that I made:

073AmyThis card kinda makes me smile. I can’t say that it’s my favourite, but the colours are happy and fun. It’s playful.

I started with the Coastal Cabana card base and added the piece of Best Year Ever Designer Series Paper (only available for FREE through the Sale-a-bration promotion). I adhered that piece with Stampin’ Up Dimensionals simply because I have the added bulk of the Baker’s Twine around it, making it lumpy if I were to adhere it flat to the card base. I have a White Paper Doily behind the Basic Black piece of cardstock. That piece is where the real fun began!!

I used one of my free stamps from Leadership, out of the Balloon Bash stamp set, and inked it up with the clear Versamark ink, stamping it on the Basic Black cardstock and heat setting some White embossing powder on it. I stamped it multiple times over the cardstock, being careful to mask off the words under the candles on this particular image. Then I used my Blendability markers (I received 4 new colours from Prize Patrol at Leadership!) over the embossed candles. It makes them so fun and colourful! I love this technique!!

The Basic Black embossed piece was attached to the card with Stampin’ Up Dimensionals. That same stamp, from which I masked off the words, I now masked off the image and used the words with Tuxedo Black Momento ink on the Pink Pirouette banner. The HB image was inked with Melon Mambo ink, stamped on Whisper White cardstock, and hand-cut to apply (yes, with Dimensionals again!) to the 1-3/4″ circle punch of Basic Black cardstock.

The hashtag sentiment was stamped with Tuxedo Black Momento ink by masking off the HB part of that particular image, so I could just capture the word on that piece of the card. This resulted in a Melon Mambo smudge of ink just under the hashtag symbol, but, guess what, you can barely see it!! Why can’t you see it, you ask? I used my White Gel pen to colour over the pink smudge! Phew! Saved!

073pinkblurI hope you’ll try this technique with your Blendability markers. It only works with the alcohol markers as the water-based markers will wipe right off of the glossy finish. Keep in mind that if you spend too long colouring over the heat embossed areas, the alcohol in the markers will start to break down the embossed material, so keep your colouring brief!

Now, go, make a card for this sketch challenge, load it up to the As You See It Challenge blog so we can all ooh and ahh. Then … just mail it already!!! Bless someone with a hand-made, hand-written, personally to them, card. You’ll make their day better 🙂

Amy

Designer-Badge