paper pumpkin

So Cool Paper Pumpkin Unboxing

Hey. Hey.

In case you missed it on my Monday Facebook Live, you can watch the replay of my unboxing video of the fun and cheerful April Paper Pumpkin kit from Stampin’ Up!. This kit coordinates with the Ice Cream Corner Suite from Stampin’ Up! and is embarrassingly easy to stamp and assemble!

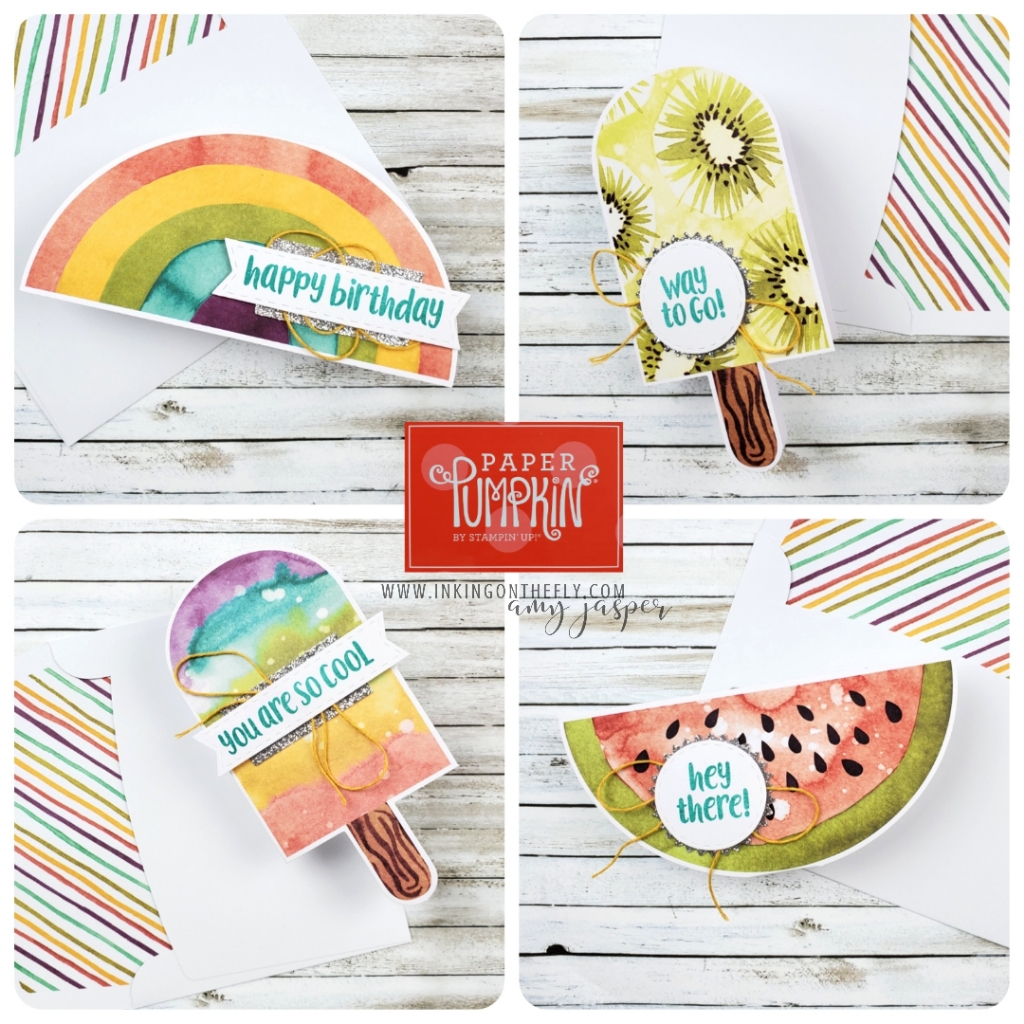
I can’t wait to share some alternatives for this one next week! You can join me live at 10:30 (ish) every Monday on Facebook where I share stamping projects and Paper Pumpkin each week. If you’re not on Facebook, you can watch the replay here every Tuesday.

Click here to get your monthly Paper Pumpkin box with me here in Canada.


Here’s to You Alternative

I loved the theme of the March Paper Pumpkin kit. Mountains and trees are some of my favourite things! The kit also had a little gift inside that wasn’t used in the making of the basic card designs: a set of 4 mini masks and a full sponge “round”.

When you get an awesome bonus like that, you just HAVE to play with it! My alternative project for the kit only uses one of the masks, but I’ll definitely be playing with them some more!

I used the mask that has the mountains on it. I sponged with Calypso Coral, Seaside Spray, and Mossy Meadow ink on Basic White cardstock.

I used Old Olive cardstock as behind my sponged Basic White, wrapped and tied my Linen Thread around them and used Stampin’ Dimensionals to adhere them to the Pretty Peacock card base that was provided in the Paper Pumpkin Kit. The die-cut trees and the narrow strip of Old Olive coloured paper are also from the supplies in the kit.

I shared this card during a Facebook Live video yesterday. If you’re on Facebook, you definitely should like and follow my Facebook Page so you don’t miss out on my posts, promotions, classes and events.

Watch the video below to see how I used the mask and sponges to create this card.

Side Step Bouquet

I had some fun with the February 2021 Paper Pumpkin kit: Bouquet of Hope and created a side-step card design with some of the supplies and the stamp set in the kit. You can watch the video of my awkward process making this card by going to my videos on my Facebook Page. I didn’t have much of a plan when I started this card, other than knowing it would be a step card fun fold – thus, the awkwardness!

The video shares my process and provides the initial measurements to create the base of the side-step design. I still want to try to work with the other card bases in the kit to make some more of these fun folds with the other two colours in the kit.

I stamped the sentiment and the bouquet image with Tuxedo Black Momento ink. The image was coloured with Stampin’ Blends Markers.

While making this card, I couldn’t decide what I wanted to do on the front step on the right side. I tried ribbon and various strips of paper, but everything I tried was too bold or seemed to change the overall feel of the design. In the end, I stamped the bouquet a second time on a scrap piece of Basic White cardstock, coloured the three roses with my Blends Markers (Calypso Coral with a touch of Light Cherry Cobbler). I fussy cut the roses and added them to that front step. It felt like just the right thing to finish this design!

Check out my Facebook Live Video for the measurements and give this design a try.

Today is the last day to subscribe in time to get the March Paper Pumpkin kit delivered to you. Start your subscription by clicking HERE!