watercolour

April Showers

What do you get when you combine the Woodland Embossing folder, Watercolor Paper and the Watercolor Pencils from Stampin’ Up? Well, scroll on, crafty friends, and find out!!

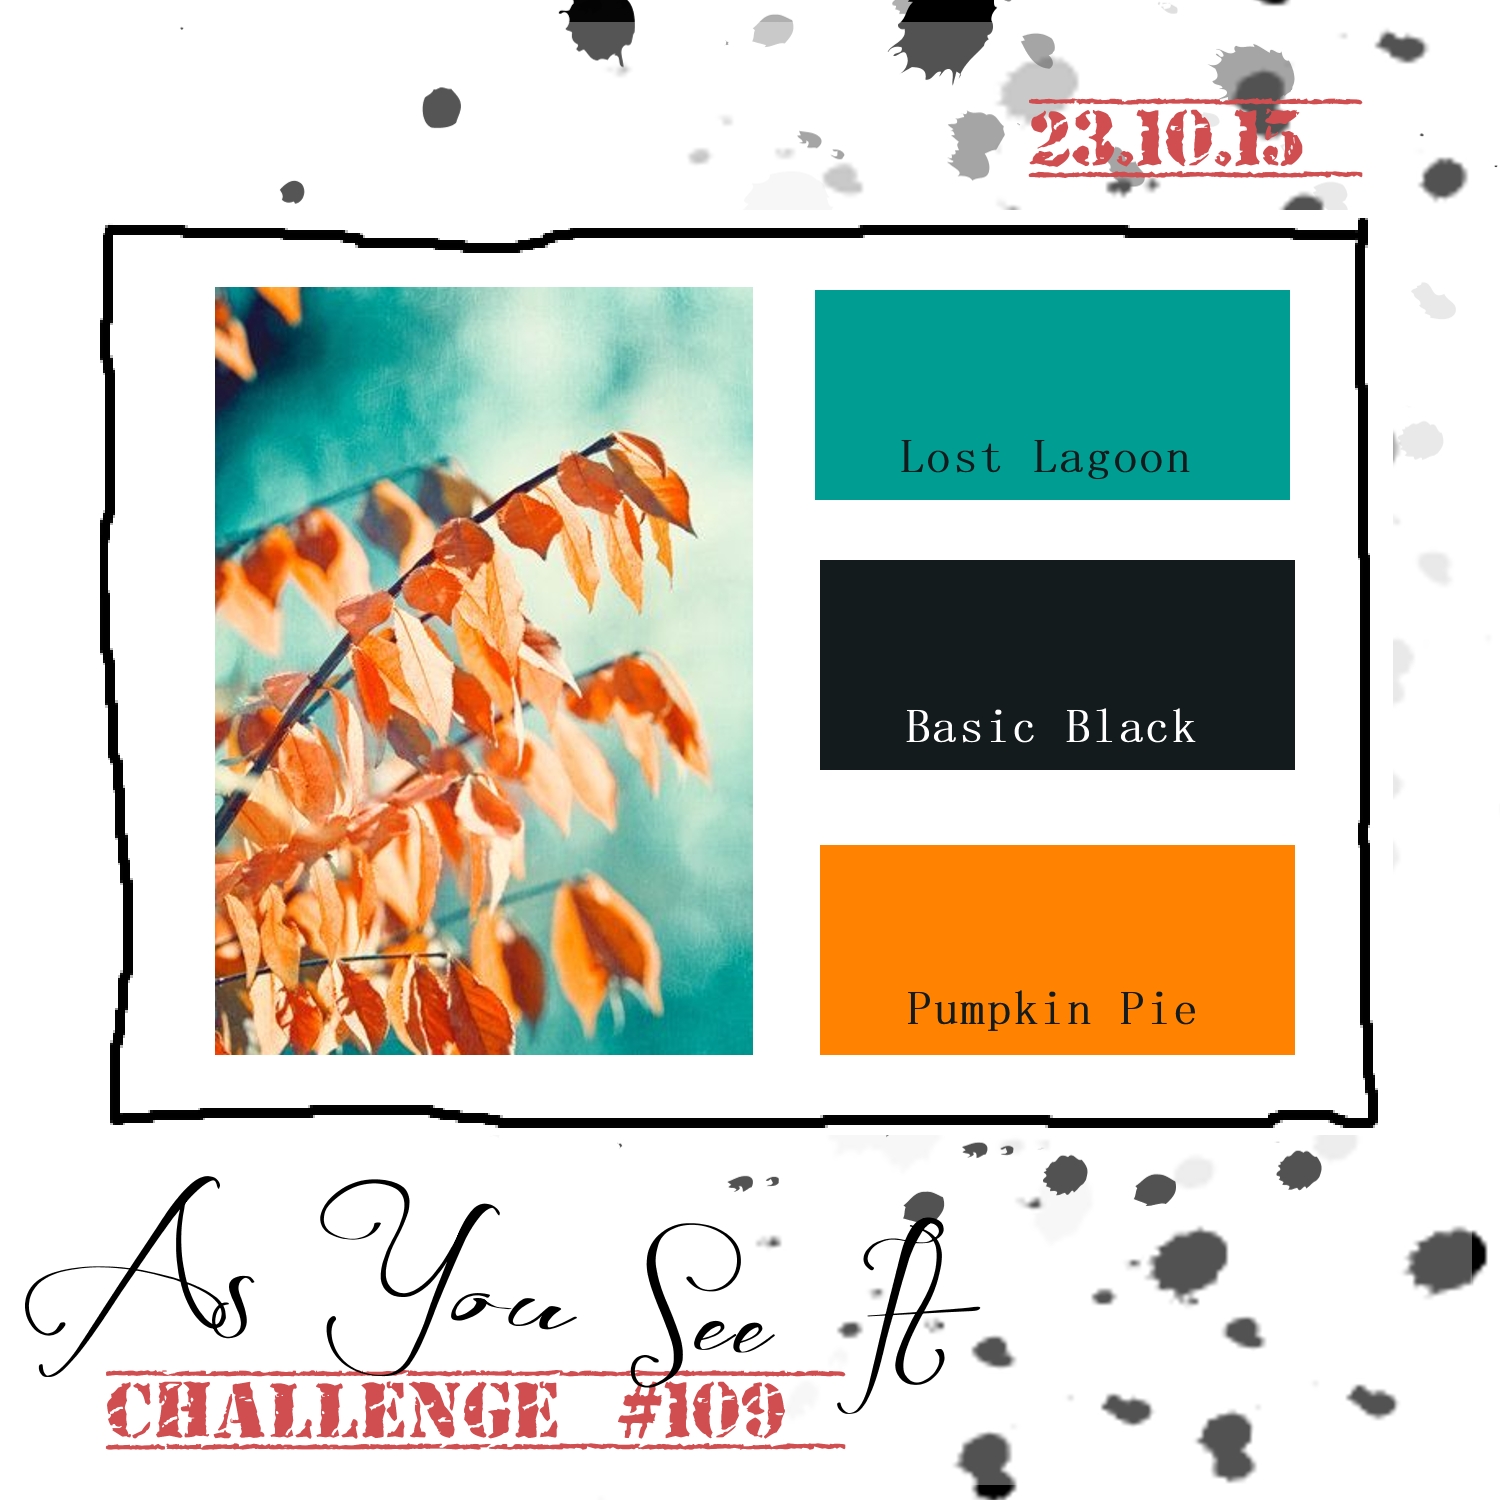
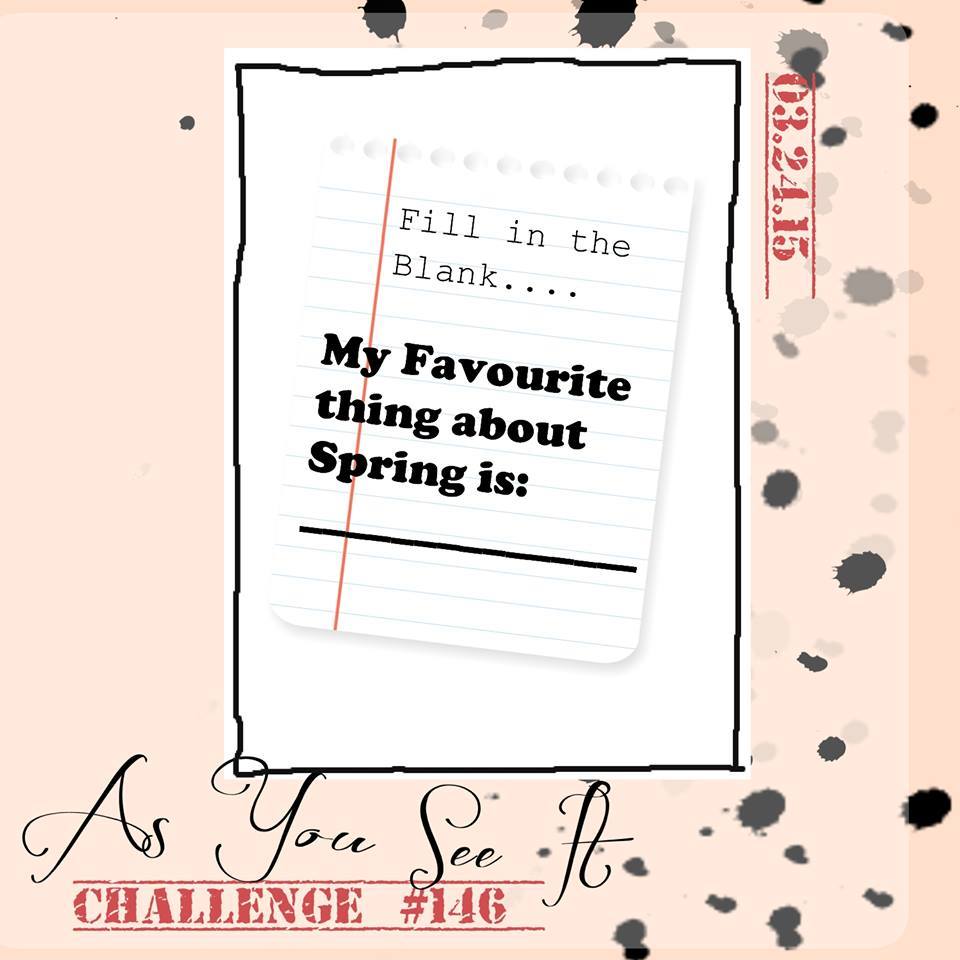
The As You See It Challenge Blog has a new challenge every two weeks. Sometimes it’s a sketch or a colour combination. Sometimes it’s an assortment challenge or a theme challenge. This one is a fill in the blank challenge! Whoohoo!!

#146Though autumn is my favourite  season, there is something about every season that I love and there is no season that I dislike. Although, of all the months of the year, I dislike February the most. By the time February comes around, I’m very “done” with winter. February is so dreary and dirty as the snow starts to disappear and the dirt and brown grass becomes exposed. Yuck!

But usually, part way through March and moving into April, we start to see more sunshine and the green leaves of spring bulbs show signs of life and renewal. Soon the colours of spring begin to appear. But it’s the spring rain, that I love the most. It’s the rain that helps wash the old winter dirt away and makes the plants grow and become green again. It’s the rain that makes the earth smell so vibrant, so fresh!

So, for this challenge, I focused on the rain and the colours of spring.

April Showers card with Stampin' Up Woodland Embossing folder and Watercolor Pencils by Amy Jasper www.inkingonthefly.comThe beautiful background with the Woodland Embossing folder was inspired by my lovely friend and adopted team leader. She showed me how she used the de-bossed side of the paper (where the trees were indented rather than raised) and coloured the indented tree images with her Watercolor Pencils from Stampin’ Up. Once coloured, she used a Stampin’ Up Aqua Painter to blend the colour with water. It was so pretty, I had to try it! I love the look, don’t you!!?

I added a touch of the Clear Wink of Stella on the right side of each tree trunk to indicate the glimmer of rain in the spring sunshine.  The Clear Wink of Stella spatter over the Watercolor Paper also makes me think of raindrops sparkling in the sun.

The rest of the card is all about layers and paper cutting, really.

April Showers ladybugsThe ladybug duo is from the Lots of Love Hostess set. I stamped them on Watermelon Wonder cardstock with Jet Black Stazon ink and used the Real Red Watercolor Pencil and a Blender Pen to the outer edges of each ladybug. Then I fussy-cut around their bodies (cutting off their arms, legs, and antlers … I mean antennae). I drew in their arms and legs with my Project Life Pen afterward.

The umbrella canopy image was stamped with Momento Tuxedo Black ink on Daffodil Delight cardstock and the handle image on Smoky Slate cardstock. Both were die cut with the coordinating Umbrella Weather Framelits.

The sentiment is from the Love You Lots Hostess stamp set and is stamped with Momento Tuxedo Black ink on the Bermuda Bay cardstock.

As for the rest: Basic Black cardstock for the card base. A layer of Basic Gray cardstock. A few Basic Rhinestones. And a flourish of looped Silver Metallic Thread.

Be sure to try the Watercolor Pencils with this Woodland Embossing folder. So pretty!!

April Showers card with Stampin' Up Woodland Embossing Folder and Watercolor Pencils by Amy Jasper www.inkingonthefly.comHappy Spring!!

Save

Save

Watercolour Carousel

Watercolouring is such a beautiful look and can seem like a difficult venture. But it doesn’t have to be a challenge. This card is created using a simple watercolour technique combined with the emboss resist. Easy peasy!Watercolour Carousel card by Amy Jasper www.inkingonthefly.com

I started by stamping the carousel image from the Carousel Birthday stamp set with Versamark ink on Stampin Up’s Watercolor Cardstock. Then I added some clear embossing powder to the image, tapped off the excess and heat set it with my Heat Tool until the image was clear and shiny.

Next, I applied water over the image. Just clear water using my Aqua Painter for a mess-free experience. I put the water only where I wanted my colour and applied it quite liberally to get the watercolour cardstock good and wet!

The inks came next: First I picked up some Bermuda Bay with my Aqua Painter and applied it to the top most section of my wet cardstock. I didn’t have to move the ink around very much as the water I had applied first did most of the work for me. I cleaned off my brush and picked up some Calypso Coral ink and applied it to the middle section of the area being careful to avoid having it touch the Bermuda Bay too much (that would just get muddy looking and nobody likes a muddy fairground!). Lastly, I cleaned off my brush again and used it to apply some Peek-a-boo Peach ink to the lower portion of my watered cardstock. To get the best colour saturation, I made sure that I used a drop of Ink Refill in the lid of each of these colours. This allowed me to pick up a nicely concentrated amount of ink on my Aqua Painter brush.

watercolour carousel card by Amy Jasper www.inkingonthefly.comWhen I was happy with my colours, I set that aside to dry and continued with the rest of the card. The image doesn’t end up coloured with the rest of the paper because the embossing repells the ink, not allowing it to saturate those areas of the watercolour cardstock.

Sahara Sand cardstock was used for the card base, then a layer of Tip Top Taupe. The patterned paper used is from the Cupcakes and Carousels Designer Series Paper Stack from Stampin’ Up. I used one larger strip across the front of the card and another smaller strip as an accent behind the Very Vanilla banner. The sentiment, also from the Carousel Birthday stamp set, was inked using my Stampin’ Up Markers (Bermuda Bay, Early Espresso, and Calypso Coral), on which I “huffed” with my breath to re-moisten the ink before stamping it on the Very Vanilla cardstock.

When my watercoloured image was dry, I could add it as my next layer using Stampin’ Up Dimensionals. The banner ends were hand cut with my Paper Snips; the patterned paper banner adhered directly, while the Very Vanilla banner with the sentiment was adhered using Stampin’ Up Dimensionals.

Almost done! It just needed some bling, so I added a strip of three Basic Rhinestones just below the right side of the banner and one single larger Basic Rhinestone to the center of the carousel image.

watercolour carousel card by Amy Jasper www.inkingonthefly.comI hope you like it. I sure do! It’s sooo pretty!

Be sure to leave me a hello and let me know if you’ve tried this watercolouring technique before and how it worked out for you.

Save

Save

Save

Orange Watercolour Wash

Last week, the As You See It Design team honoured Lola, a little girl in the midst of her 5 year battle with Leukemia. We asked that you would create cards with fairies, unicorns, pink, gold, or glitter so that she could view them digitally and enjoy the love and best wishes that they represent. The challenge itself is complete, but the link to load your cards is still active on the website until November 16th. If you haven’t posted a card yet, there’s more time available to shower Lola with kindness. I hope you will take the time to make a card for her and upload it to the As You See It page HERE. She will get to view all of the cards. I know it will put a big smile on her face to see how many people are cheering her on!

For today’s challenge, we have a colour combination.

AYSIChallenge109

I chose to use these colours to make a birthday card. One might call it a masculine birthday card, but I don’t like to generalize. This card could be used for anyone who appreciates these colours or this style of card.

Orange Watercolour Wash birthday cardEver since I discovered, while doing the card for a previous post, how much I like this Watercolour Wash background stamp on an angle, I keep wanting to use it! This time I inked it up with my Pumpkin Pie, Lost Lagoon, and Tuxedo Black Momento ink pads. I sponged on the stamp to soften the edges between colours, then stamped it on two layers of Whisper White cardstock at the same time. This allowed me to use the smaller piece for the 2 U sentiment as a layer while still maintaining the continuity of the colour wash over the entire card front.

Orange Watercolour Wash Birthday Card up closeThe letter ‘U’ is from the Larger than Life photopolymer stamp set, which was stamped with Versamark ink and heat embossed with Basic Black embossing powder. I die cut the ‘2’ with my Big Shot and Little Numbers Thinlits and adhered it with my Fine-Tip Glue Pen. The Happy Birthday sentiment is from the Tin of Cards stamp set.

The splatter image from the Gorgeous Grunge stamp set was added in Tuxedo Black Momento ink to the background before adding my layers.

I’m in love with the simple looping of thread and twine on my cards, so I took the black thread out of my Basic Black Baker’s Twine and looped it to add some needed texture to this one.

This card will be added to my Tin of Cards tin as one to save for my family. My nephew and my brother both have birthdays coming up in December. One down, one to go!

Be sure to upload your take on this colour challenge to the As You See It Challenge page. It doesn’t have to be a card, either!!