quick and cute

Watercolour Carousel

Watercolouring is such a beautiful look and can seem like a difficult venture. But it doesn’t have to be a challenge. This card is created using a simple watercolour technique combined with the emboss resist. Easy peasy!Watercolour Carousel card by Amy Jasper www.inkingonthefly.com

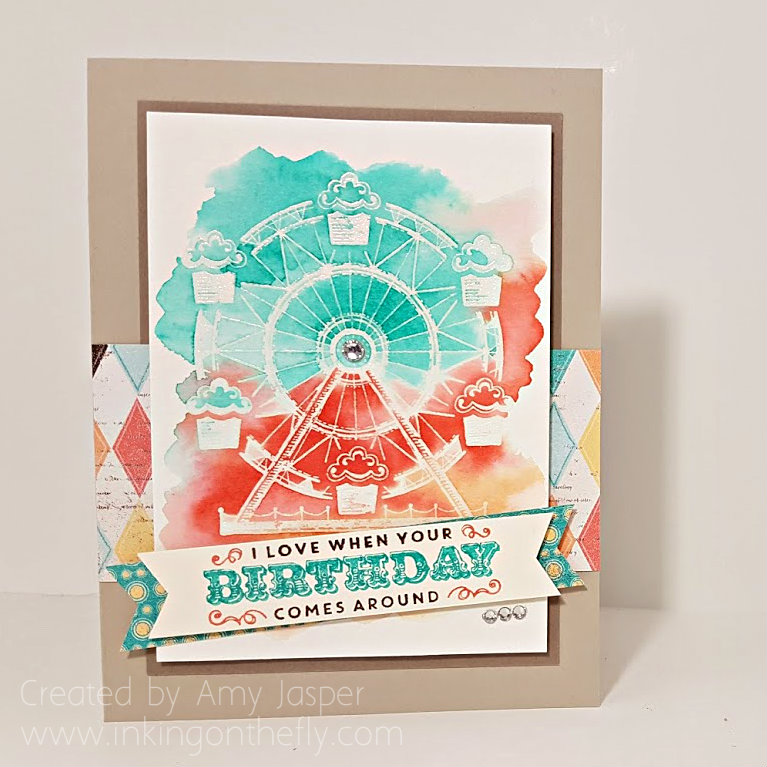
I started by stamping the carousel image from the Carousel Birthday stamp set with Versamark ink on Stampin Up’s Watercolor Cardstock. Then I added some clear embossing powder to the image, tapped off the excess and heat set it with my Heat Tool until the image was clear and shiny.

Next, I applied water over the image. Just clear water using my Aqua Painter for a mess-free experience. I put the water only where I wanted my colour and applied it quite liberally to get the watercolour cardstock good and wet!

The inks came next: First I picked up some Bermuda Bay with my Aqua Painter and applied it to the top most section of my wet cardstock. I didn’t have to move the ink around very much as the water I had applied first did most of the work for me. I cleaned off my brush and picked up some Calypso Coral ink and applied it to the middle section of the area being careful to avoid having it touch the Bermuda Bay too much (that would just get muddy looking and nobody likes a muddy fairground!). Lastly, I cleaned off my brush again and used it to apply some Peek-a-boo Peach ink to the lower portion of my watered cardstock. To get the best colour saturation, I made sure that I used a drop of Ink Refill in the lid of each of these colours. This allowed me to pick up a nicely concentrated amount of ink on my Aqua Painter brush.

watercolour carousel card by Amy Jasper www.inkingonthefly.com
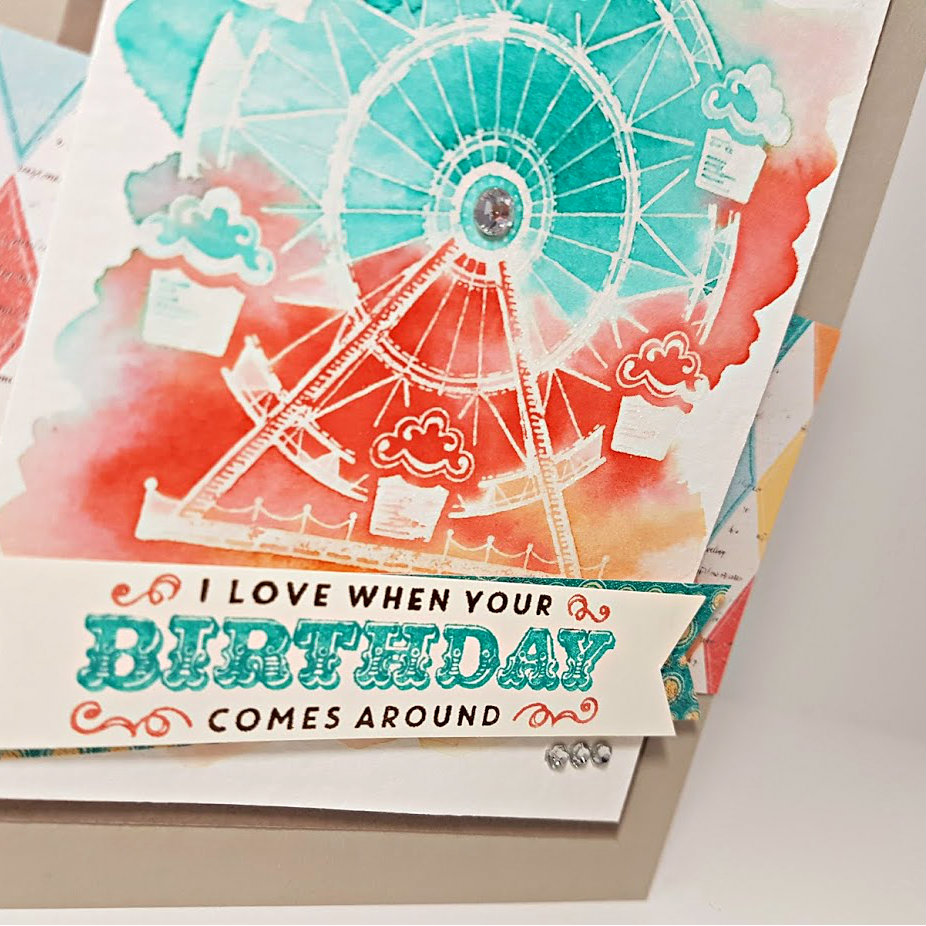
When I was happy with my colours, I set that aside to dry and continued with the rest of the card. The image doesn’t end up coloured with the rest of the paper because the embossing repells the ink, not allowing it to saturate those areas of the watercolour cardstock.

Sahara Sand cardstock was used for the card base, then a layer of Tip Top Taupe. The patterned paper used is from the Cupcakes and Carousels Designer Series Paper Stack from Stampin’ Up. I used one larger strip across the front of the card and another smaller strip as an accent behind the Very Vanilla banner. The sentiment, also from the Carousel Birthday stamp set, was inked using my Stampin’ Up Markers (Bermuda Bay, Early Espresso, and Calypso Coral), on which I “huffed” with my breath to re-moisten the ink before stamping it on the Very Vanilla cardstock.

When my watercoloured image was dry, I could add it as my next layer using Stampin’ Up Dimensionals. The banner ends were hand cut with my Paper Snips; the patterned paper banner adhered directly, while the Very Vanilla banner with the sentiment was adhered using Stampin’ Up Dimensionals.

Almost done! It just needed some bling, so I added a strip of three Basic Rhinestones just below the right side of the banner and one single larger Basic Rhinestone to the center of the carousel image.

watercolour carousel card by Amy Jasper www.inkingonthefly.comI hope you like it. I sure do! It’s sooo pretty!

Be sure to leave me a hello and let me know if you’ve tried this watercolouring technique before and how it worked out for you.

Save

Save

Save

Thanks a Melon!

091headerA summer-themed watermelon card using the Alphabet Rotary stamp to create a play on words. How convenient that Stampin’ Up has the perfect colour, Watermelon Wonder, to make this cute design!

Here’s the sketch for this week’s As You See It Challenge #91:

AYSIChallenge091I was short on time this week, but my design came together super fast! (this is a very rare occurrence, believe me!!). The most time-consuming part was to try to think of a cute saying that worked in watermelons or seeds, or even spitting! You never know what you might find on the internet!

091Amy Basic Black was used for the card base over which is a layer of Watermelon Wonder cardstock and Cucumber Crush cardstock using Stampin’ Up Dimensionals. A piece of Whisper White Organza ribbon covers the seam where the two colours meet and is simply wrapped around the back and secured with Tear Tape (a new product from Stampin’ Up!). A second piece of the Organza ribbon is tied in a single knot around the first piece of ribbon to create a faux bow.

Originally, I was going to use my Tree Builder Punch to create the watermelon seeds. However, I completely forgot that I loaned it out, so I used a black permanent marker on some Basic Pearls and placed them with “careful randomness” (pretty sure that’s an oxymoron, lol!). I think the pearls are actually the better choice as they add some texture and dimension to the card, while the water drop part of the Tree Builder Punch would have only created flat black seeds – much less interesting. A win for me!

091pearlsBefore putting it all together, the 1 3/4 inch Scallop Circle punch was used to create the bite out of the top of my card. Then, very carefully, the sentiment was added using the Alphabet Rotary Stamp with Jet Black Stazon Ink. There is coordinating ink sponged around the edges of the two pieces of coloured cardstock to bring some extra richness – kind of like creating a vignette border around the card. This can help pull the eye into the center of your artwork.

You can see other designs that use this sketch by going to the As You See It Challenge blog where you can also link the project that you make with this sketch! I hope you do! It’s amazing to me how much variety can develop from the same starting point.

Glad you stopped by!

Amy

Colourful Well Wishes

090headerWelcome to my blog where I share my love of designing with my Stampin’ Up paper, inks and stamps! Check out how I used the hearts mask from the Hearts and Stars Masks set for today’s card.

Here’s the challenge that I started with from the As You See It Challenge Blog.

#90One layer cards are a very scary thing for me. I’m sure I’ll have nightmares tonight!

Ok, they aren’t that bad (but, seriously, way more challenging than you might think!).

That’s the challenge today; a one layer card. As a lover of Stampin’ Up Dimensionals, this was so so hard. But, it’s all about being challenged so you can develop your skills and stretch your creative muscles!! So, don’t shy away from this one.

I decided to stick with a basic Whisper White card base after a few attempts with other colours and ideas (and a few smudges and crooked stamping).

090AmyI used the hearts from the Hearts and Stars Masks and, with Sponge Daubers, applied the following inks: Daffodil Delight, Melon Mambo, Bermuda Bay, and Crushed Cucumber. Then I shifted the mask to allow me to strategically place overlapping hearts in random places to get this kind of colourful bokeh look.

I was careful to leave a vacant area in the center of the card while doing the hearts so I could have a spot for my sentiment (from the Teeny Tiny Wishes stamp set). The “get well wishes” sentiment was stamped with Jet Black Stazon ink. I wanted to try to create a focal point for the words, so I placed a 1-3/4″ punched out circle of paper over the area and lightly sponged with Soft Sky ink around it before removing it again (TIP: you can put a tiny bit of SNAIL under the mask to help it stay in place, but even then, I still hold it very firmly while I sponge around it).

090closeThe cute little black heart is from using the Bordering Hearts punch and was attached with my beloved Multipurpose Liquid Glue (just the tiniest amount, though, so it won’t squish out around the heart and stay sticky forever and ever and ever). Over that, a single sweet little Basic Rhinestone.

The scary thing about one layer cards, is that if you make a mistake, that’s it! The gig is up! Start over! I started over with my gig, um, I think 4 times, (6, if you count my first attempts with watercolour paper). Yeesh!

You know what though. I think this would be a great card to make multiples of and have on hand. It’s sweet and simple and extremely cost effective! So, give a one layer card a try and let me know how it goes.

Don’t forget to upload your picture to a public site like Pinterest, then link it to the As You See It Challenge #90 and show off your hard work!!

Amy.