Video

Desktop Adhesive Caddy

At the end of each year, I try to offer a special project for my customers.

Usually, I have a Christmas party in my home with goodies, prizes, and cheerful holiday music, while we craft together in our festive attire. It’s a wonderful time! The evening always ends with warmed hearts and a final Merry Christmas greeting to all, as each person bundles up against the snow and cold to make their way home again.

This year was a little bit different as we weren’t able to get together in person. Instead, we were able to meet together virtually on Zoom and enjoy each other’s company while we created the project that I prepared for everyone. The thing about virtual classes is that customers from out of town, who normally couldn’t attend my classes in person, were able to join in on the event. What a gift! We still had prizes and cheerful holiday music and we still ended with warmed hearts and a final Merry Christmas as we signed off and settled into our own space in our own homes. It was delightful! I feel incredibly blessed with the friends I’ve made because of my Stampin’ Up! business.

That said, I thought I would share the project with you as well, dear reader. We made a desktop adhesive  caddy that was inspired by the project shared on sallystampers.com. I made some changes to the individual boxes and added a couple more sections for the Stampin’ Seal and Stampin’ Seal Plus. The only adhesive that doesn’t fit in my caddy is the Fine-Tip Glue Pen (I might have to create an additional section and share that with you another day).

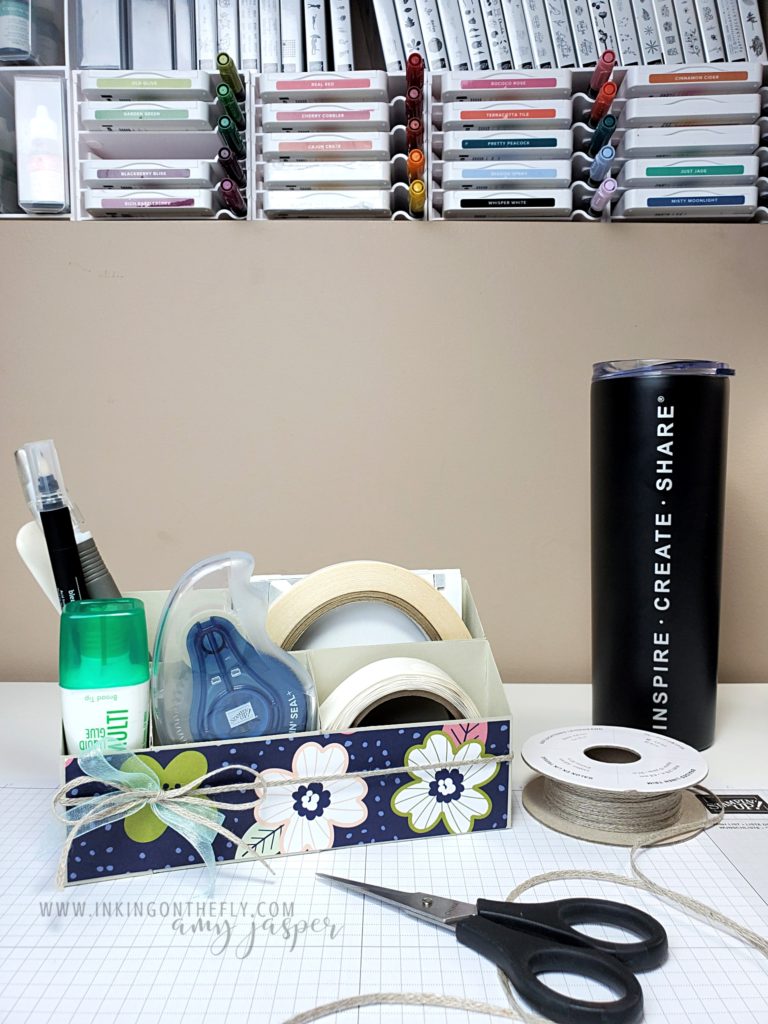
The designer series paper I used for this project will be available in January along with many more beautiful stamps, paper, and embellishments launch of the Sale-a-bration brochure and the January – June 2021 Mini Catalogue.

Follow along with my video tutorial to make this beautiful and functional desktop adhesive caddy.

I wish you a very warm heart and a safe and happy holiday! Merry Christmas!

The Beauty of Friendship

I love speed challenges! They get my creative mojo flowing AND I get a card completed lickety-split!

This card came together in my mind really easily. Let me tell you, these used to be REALLY hard for me! The more I do them, the easier they seem to be. It’s such a great creative exercise. I highly recommend you give a speed challenge a try. If you don’t know how it works, you basically think about the card you want to make. Once you have a plan, you can gather your supplies together, but you CANNOT pre-cut any of your paper or ribbon before you start the clock. When you DO start the clock, you move with confidence until your card is complete. Stop the clock and record your time!

Sometimes, the finished product is a little bit lacking, but you will ALWAYS find that your creative brain has jumped into high gear and something about the card you made has inspired you to try it another way. I love how a speed challenge gets my creative mojo flowing freely!

The As You See It Challenge this time, is a Speed Stamping Challenge with a butterfly theme! You can check out what other people created for this challenge and also share your own design with us over at the As You See It Challenge blog.

I borrowed the Beauty Abounds stamp set from a friend for this challenge because I don’t have ANY butterfly stamps! Can you believe it!!?

I stamped the sentiment on the Whisper White cardstock with Tuxedo Black Momento ink, then stamped the bokeh circles with Balmy Blue ink and Granny Apple Green ink. The butterfly images were stamped with Versamark Ink, Gold Embossing Powder was applied and heat set with my Heat Tool.

I added a second layer of Whisper White behind this piece, partly to create a stiffer layer, but also to give a subtle layered look with the white on white edges.

Linen Thread was wrapped around the white layers and tied in a bow before attaching it to the Artistry Blooms Designer Series Paper and Crumb Cake cardstock card base with Stampin’ Dimensionals.

You can check out the video of this card that only took 9 minutes and 3 seconds to make. In our busy world, even 9 minutes can feel like a long time, so I sped the video up for you! LOL! You’re welcome!

Take Your Cards to the Next Level with Embossing Paste

I had some fun playing with Stampin’ Up! Embossing Paste last week. Through playing, I accidentally created a new technique!

The card I shared last week showed off the results of that first accident, while today’s card shows another background made with the same technique using just Coastal Cabana ink.

The Friends & Family Stamp Set from Stampin’ Up! is so cute and allows the ability to customize people for your paper crafts! You can use it to make an entire customized family! This set is retiring at the end of May, so order it before it’s gone!

I coloured my cute boy with Stampin’ Up! Blends Markers. To create the shadow at his feet, you can use the Light Smokey Slate Blends Marker, then use the Color Lifter over the bottom of the shadow and it will fade it out a bit, softening the edge.

I used Coastal Cabana ink to colour the Embossing Paste, by first applying a small amount of ink directly to the brick patterned mask, then applied the paste over the color, which allows the paste to become coloured and provides a nice variation to the final brick look. I love how easy it is and how cool it looks!

You can check out my Facebook Live video of this embossing paste technique by clicking HERE.