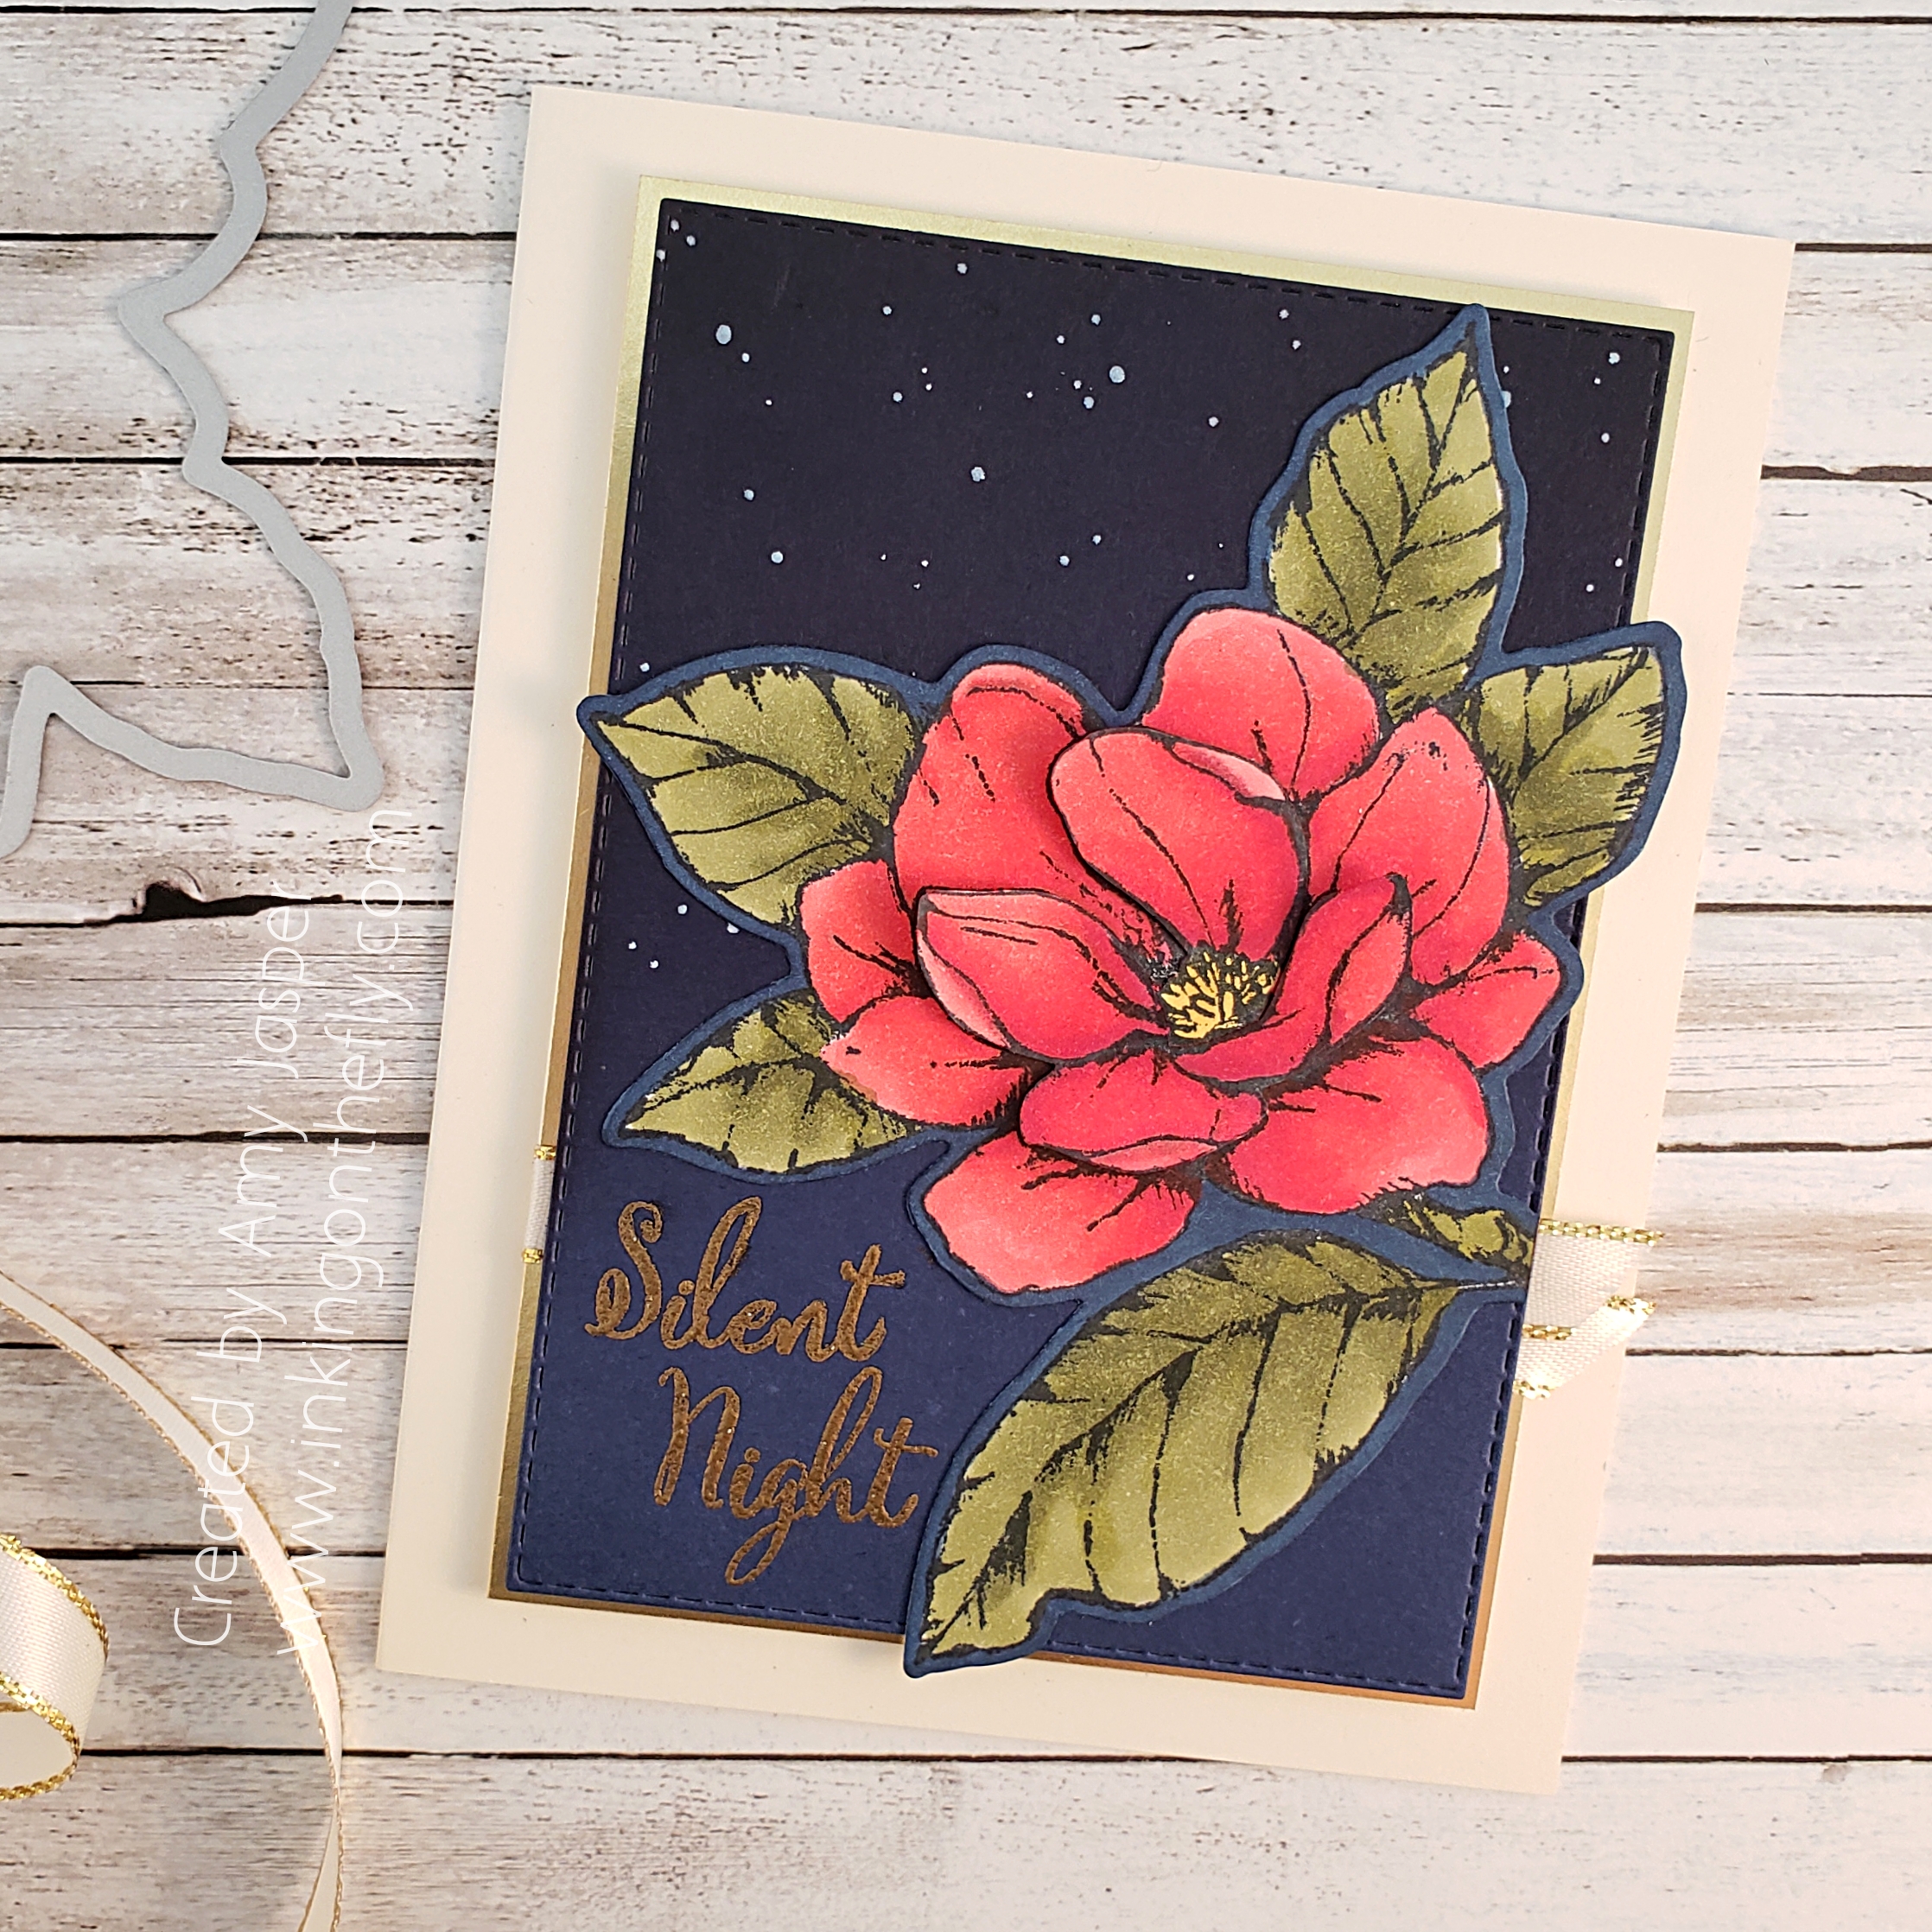
technique

Rooted Heirloom

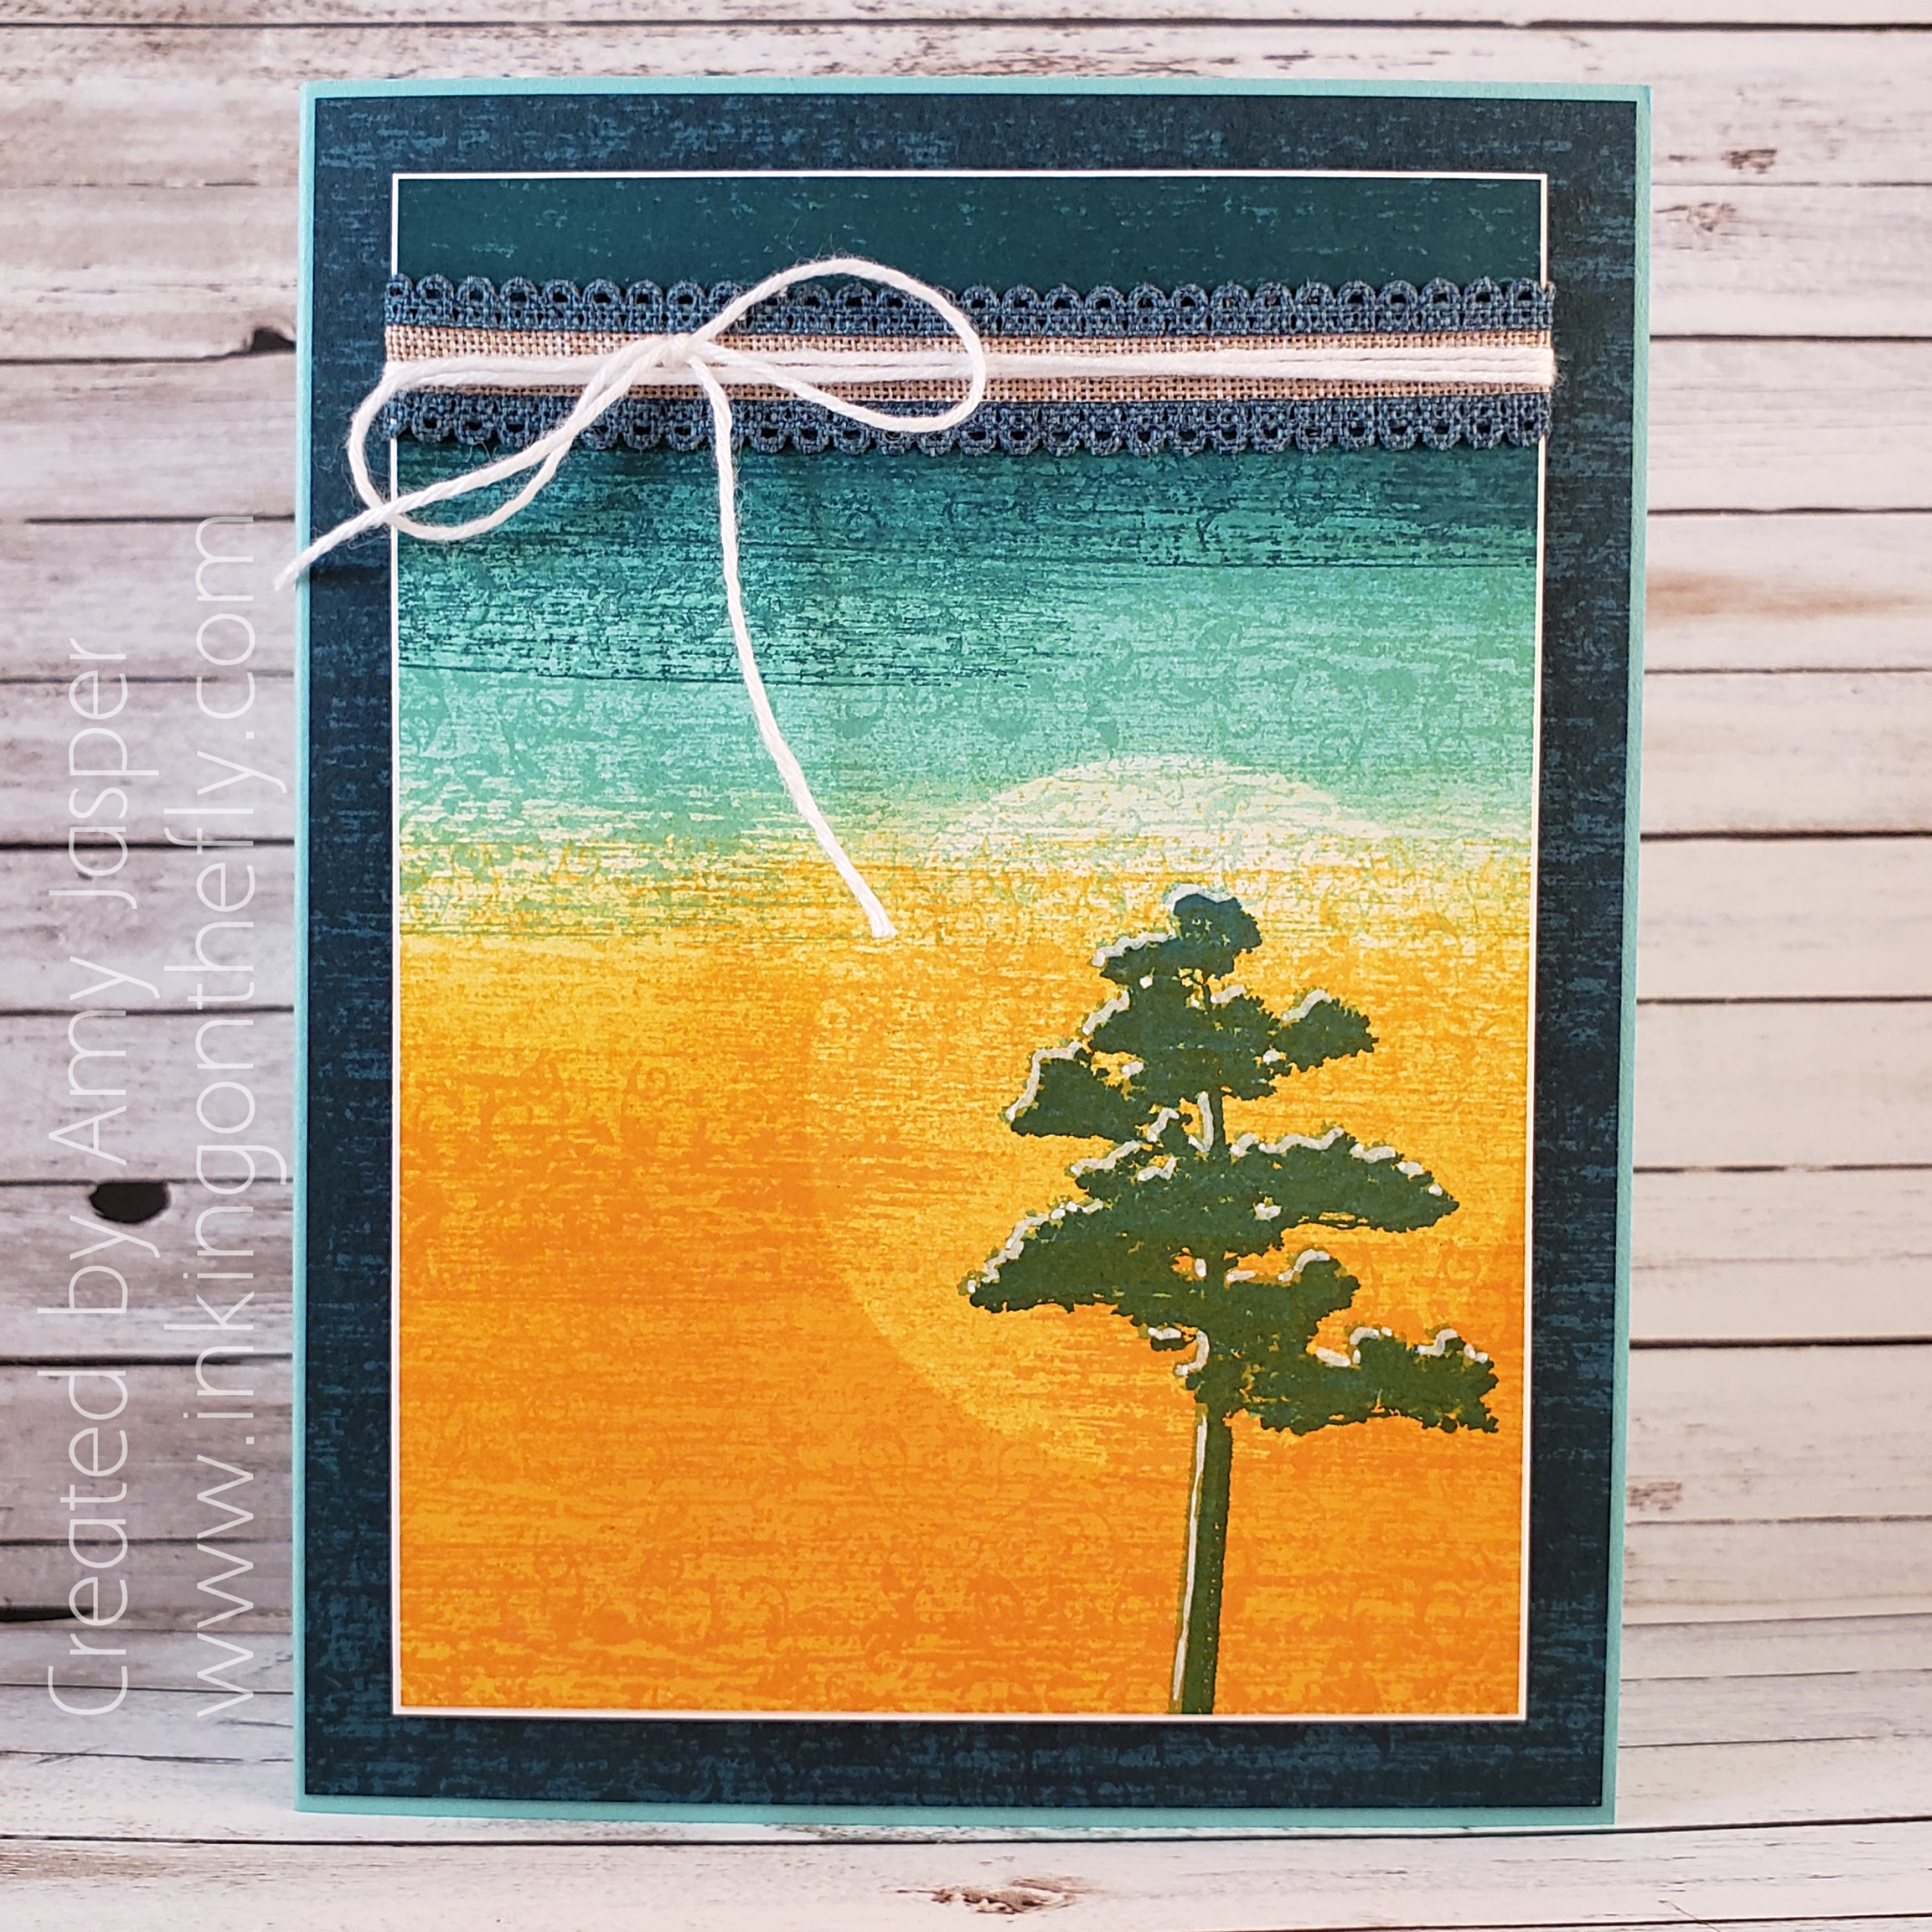
My card today features the Rooted in Nature stamp set and the Woven Heirlooms stamp set by Stampin’ Up! Check out the gorgeous texture created by sponging and stamping!

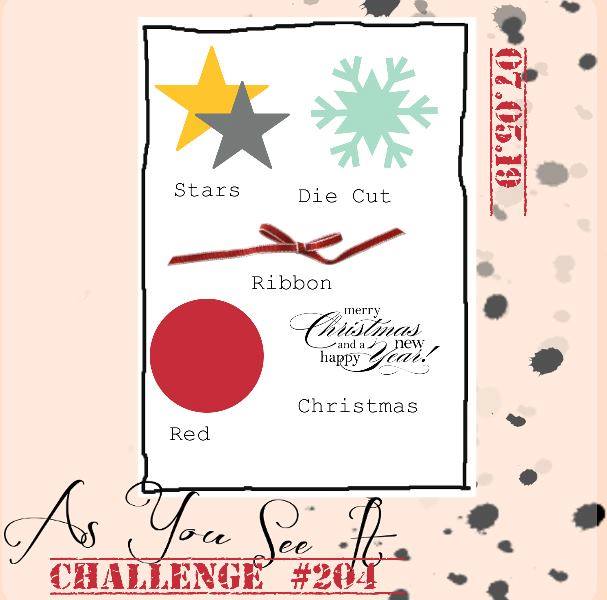
Here’s the inspirational colour challenge from the As You See It Challenge Blog.

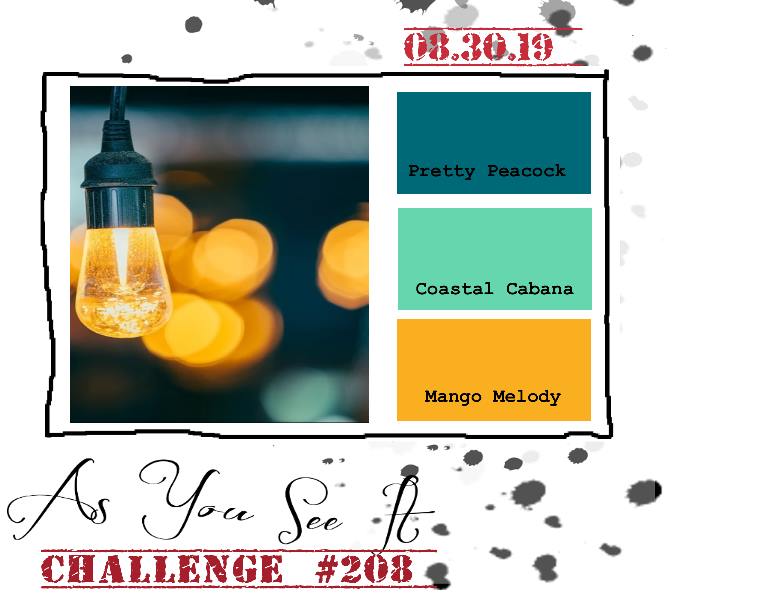
I love this image of warm light and the out of focus background of contrasting colour that creates a bokeh effect. It makes me want to know what else is in the room and who is enjoying that atmosphere. Is it an outdoor wedding? or is it on the front porch of a rustic cabin that overlooks the lake? or maybe it’s in a Greek taverna, and we are looking out at the lamp-lit, stone-paved streets through the large open doorways. I can hear the bouzouki music, the subtle clinking of dishes, and the murmur of intimate table conversations. Wherever it is. I think I’d like to be there. How about you?

My first instinct with this colour scheme was to play with sponging and blending. This had me pulling out my Sponge Brayers from Stampin’ Up!. Here’s my take on this colour challenge.

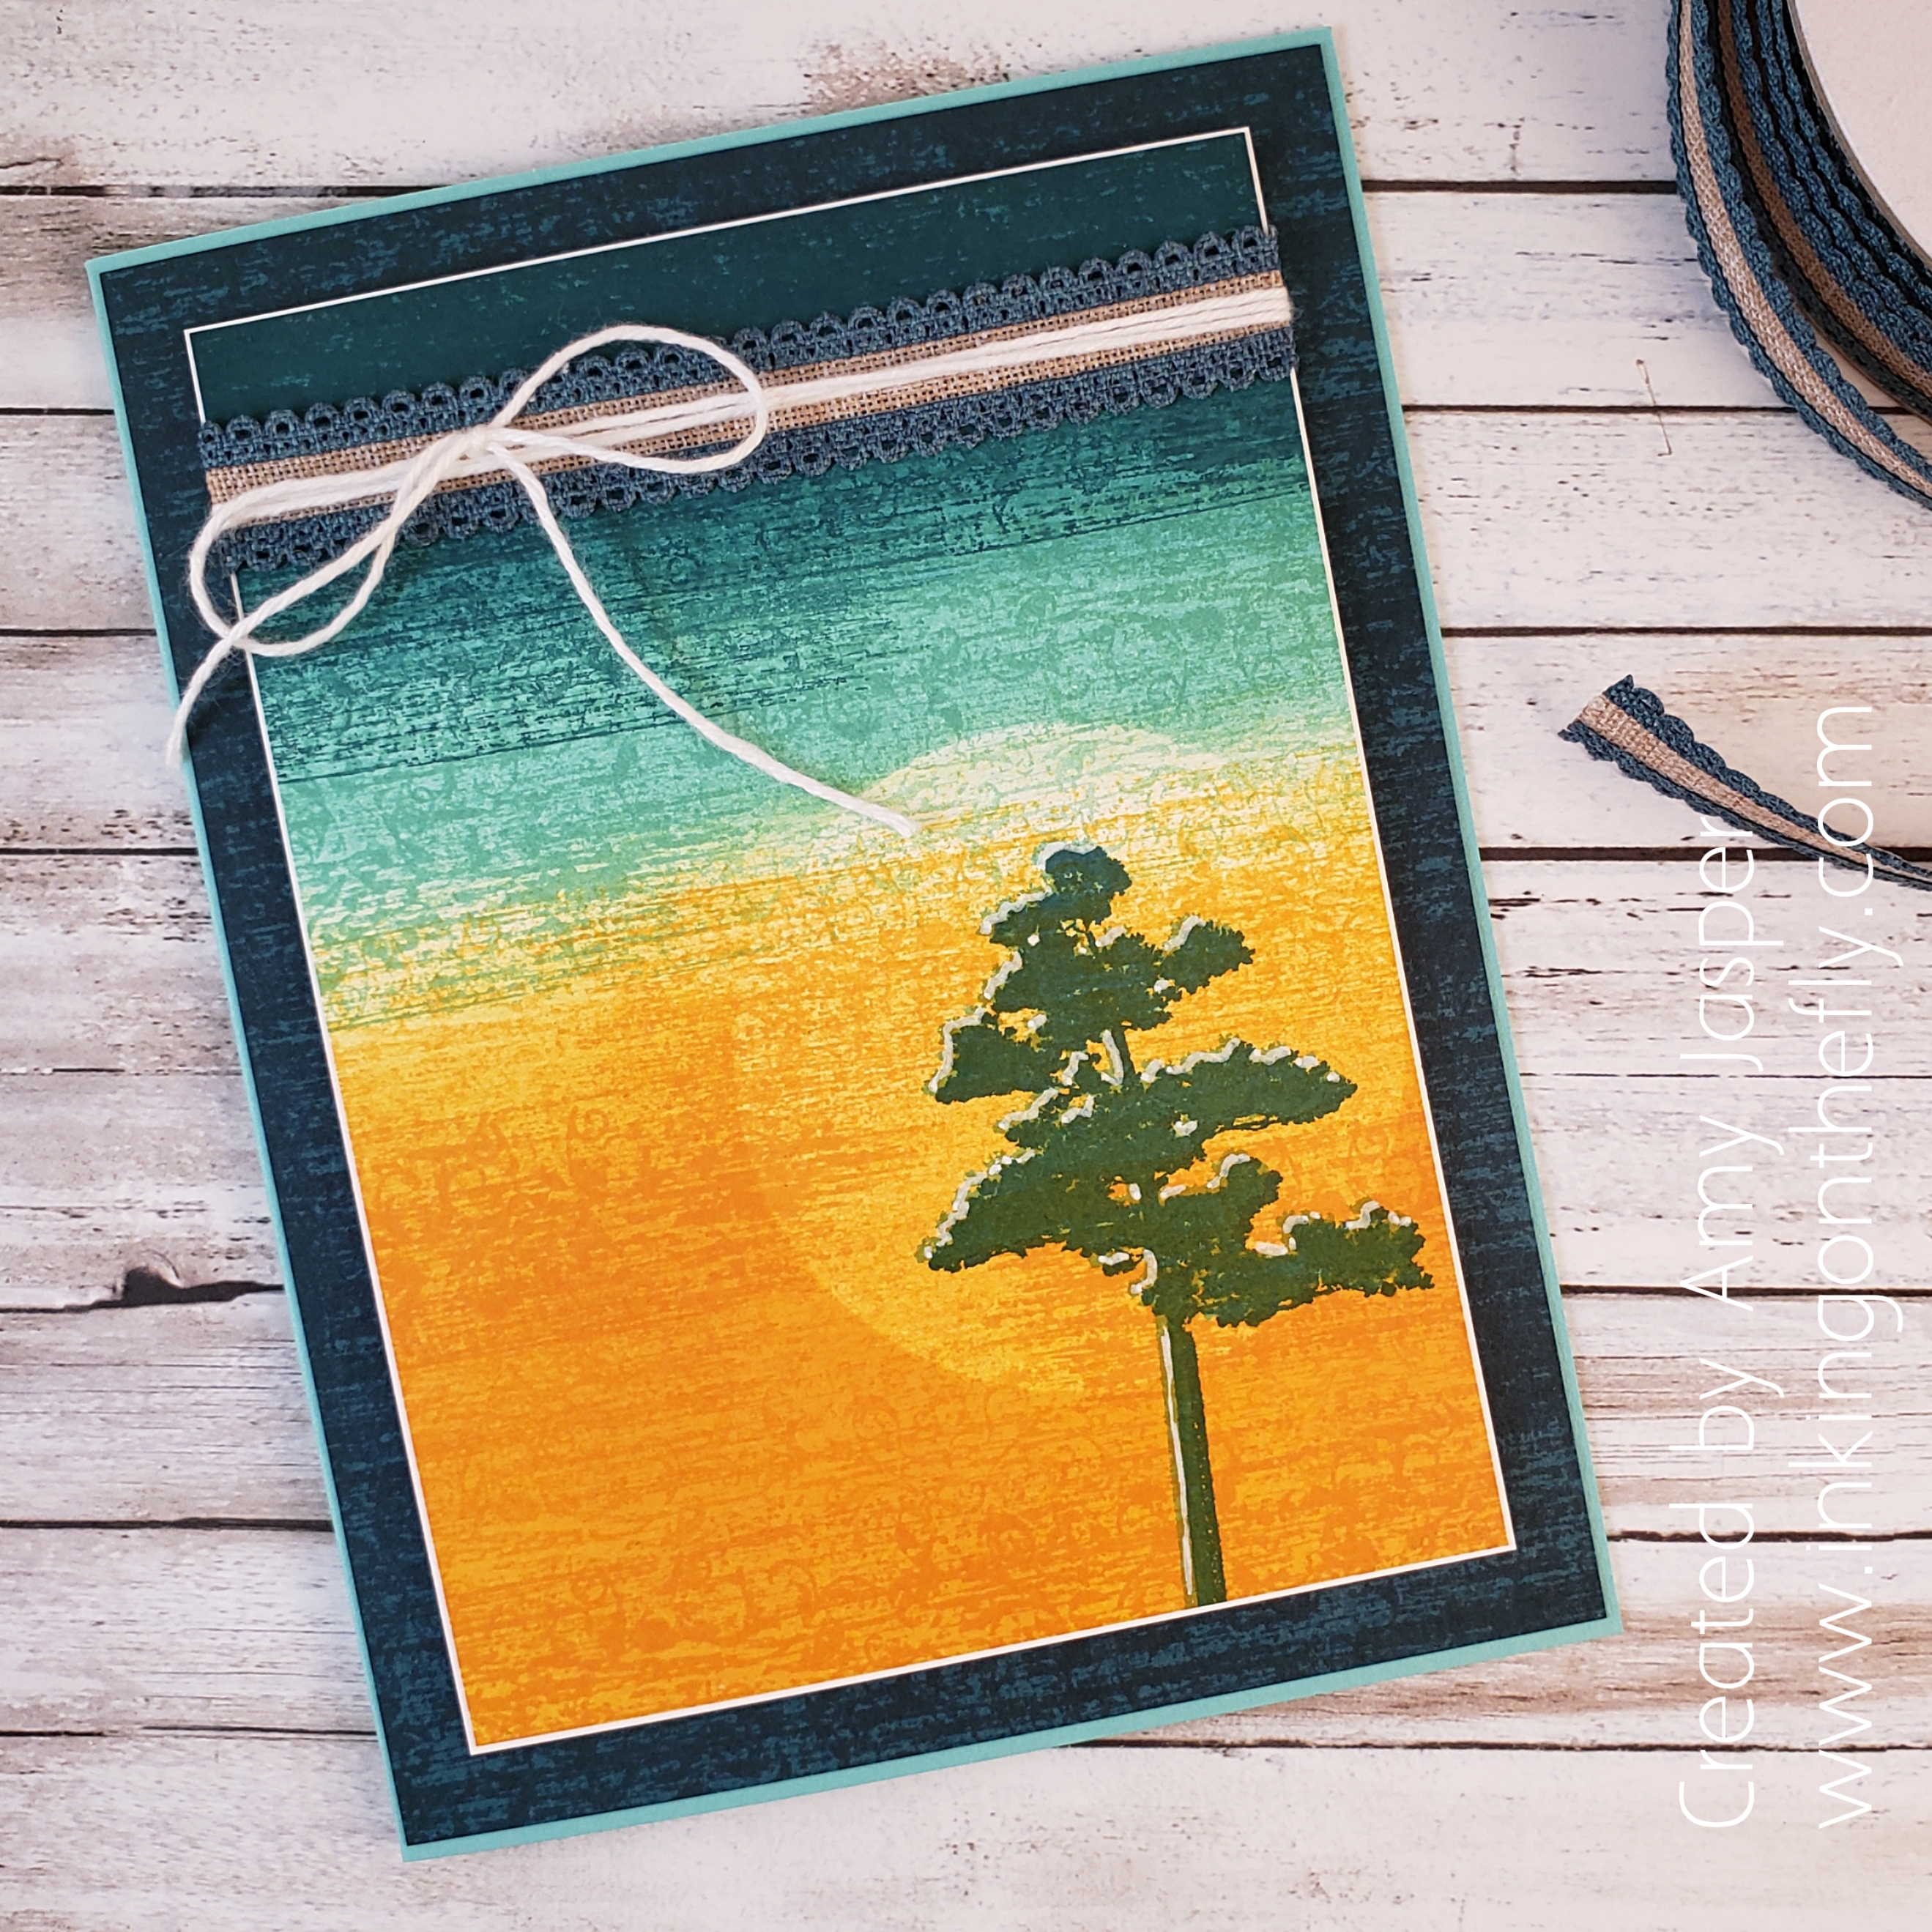
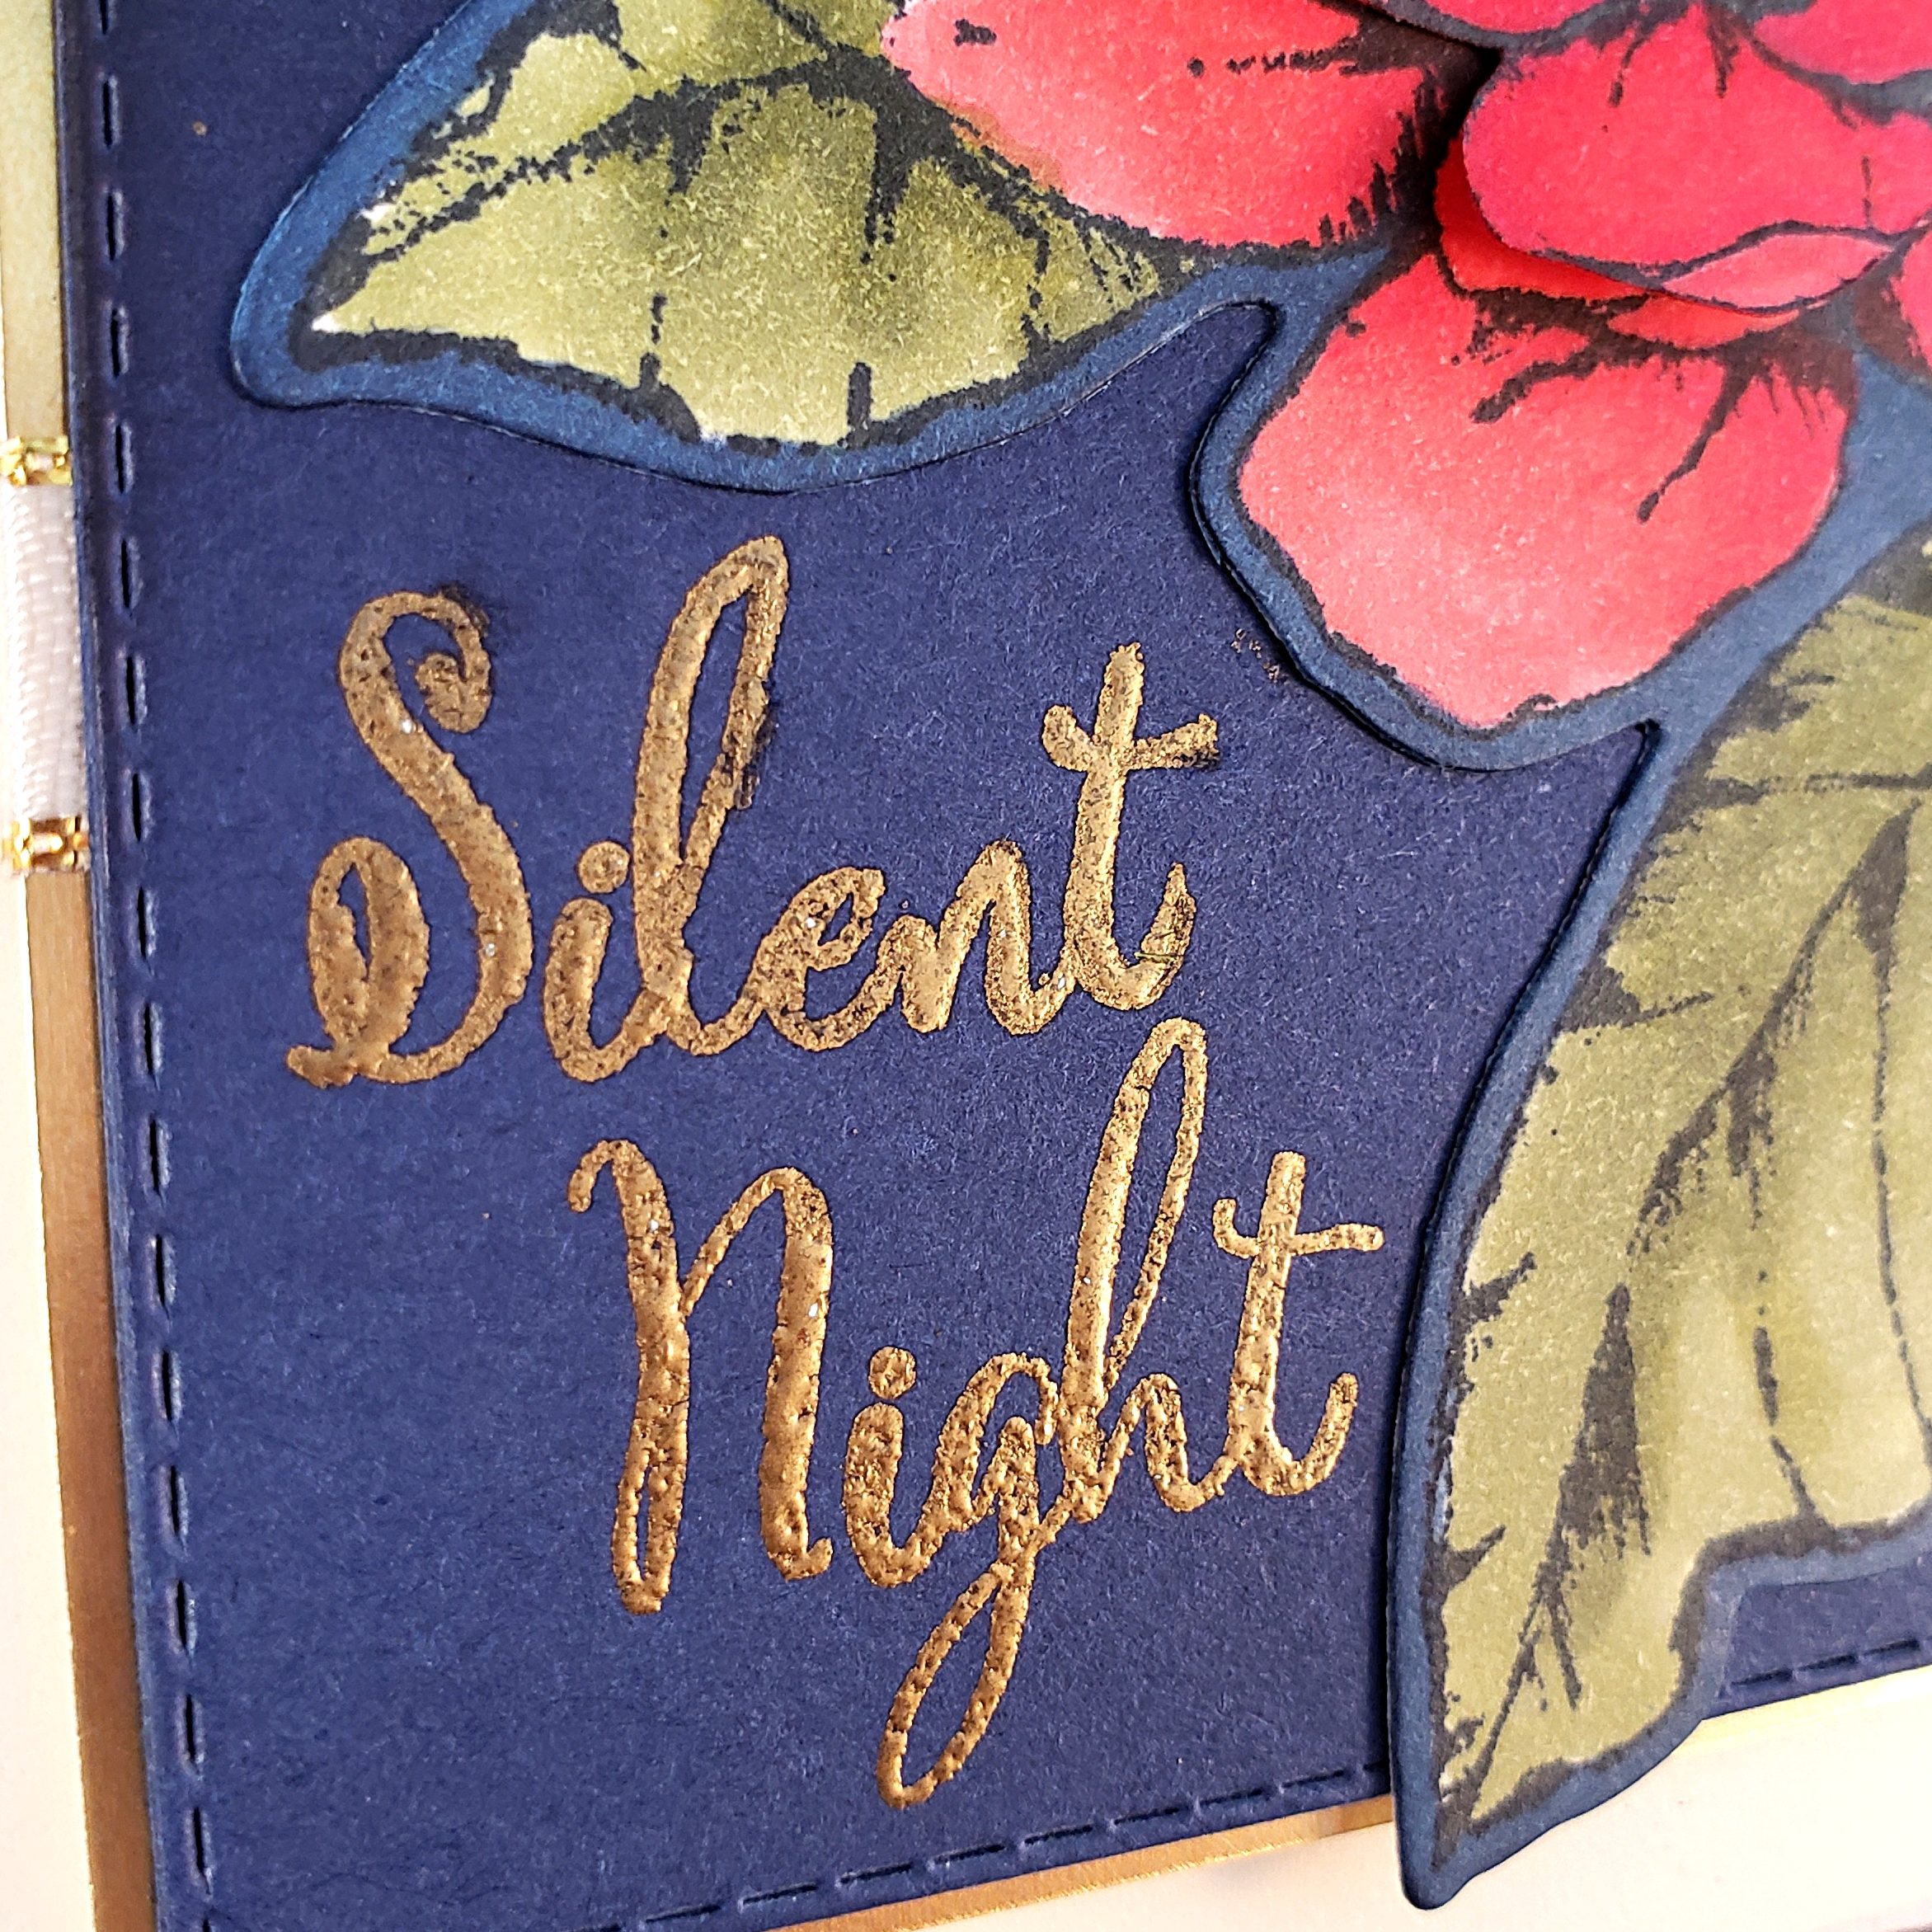
I tried to find a sentiment to add once all of my sponging and rolling and stamping was done, but nothing seemed to fit without taking away the balance of the overall card design. This one will have to say it all on the inside with my personal note instead.

My first step was to take a piece of Whisper White cardstock and roll Mango Melody ink across the bottom half with my Sponge Brayer. Then I placed a circle piece of Post-It Note that I had punched out using the 2-1/4″ Circle Punch from Stampin’ Up! where I wanted the sun to be. Then more rolling. I added more Mango Melody, then switched to a clean brayer sponge and rolled on some Coastal Cabana, then some Pretty Peacock ink. I removed the Post-It Note and added a bit more Coastal Cabana and Mango Melody until my sun didn’t feel so harsh.

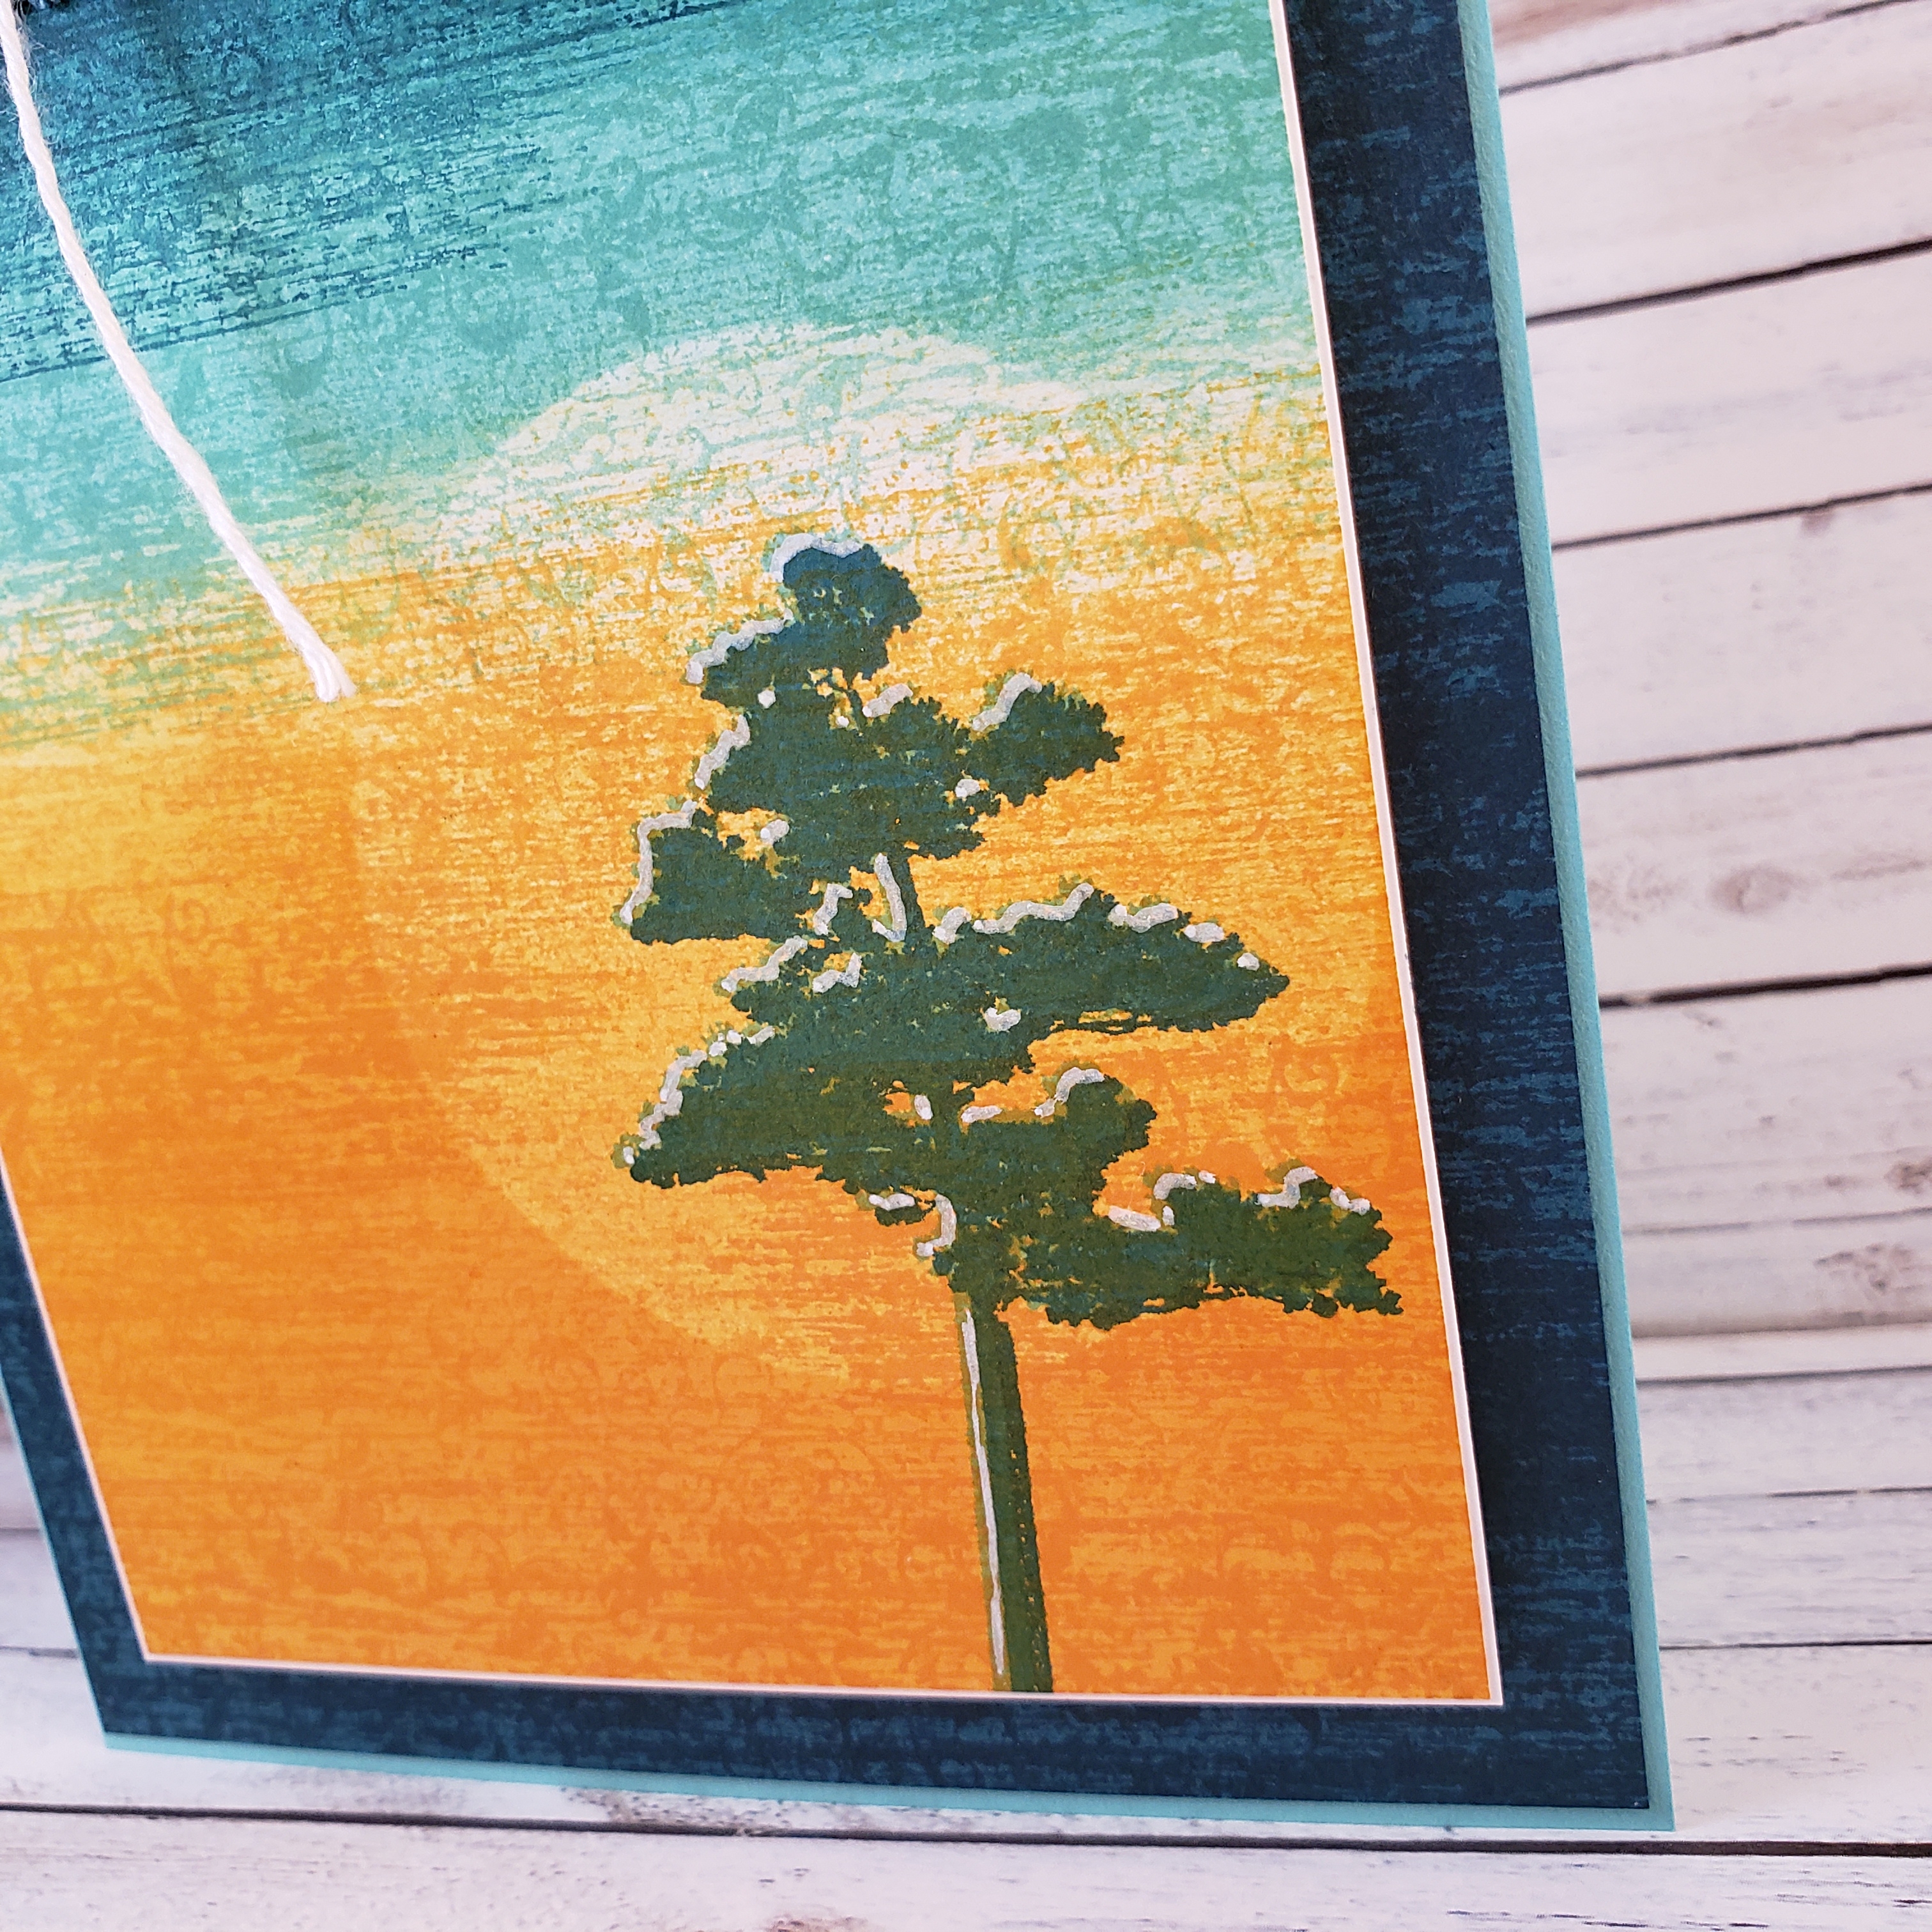
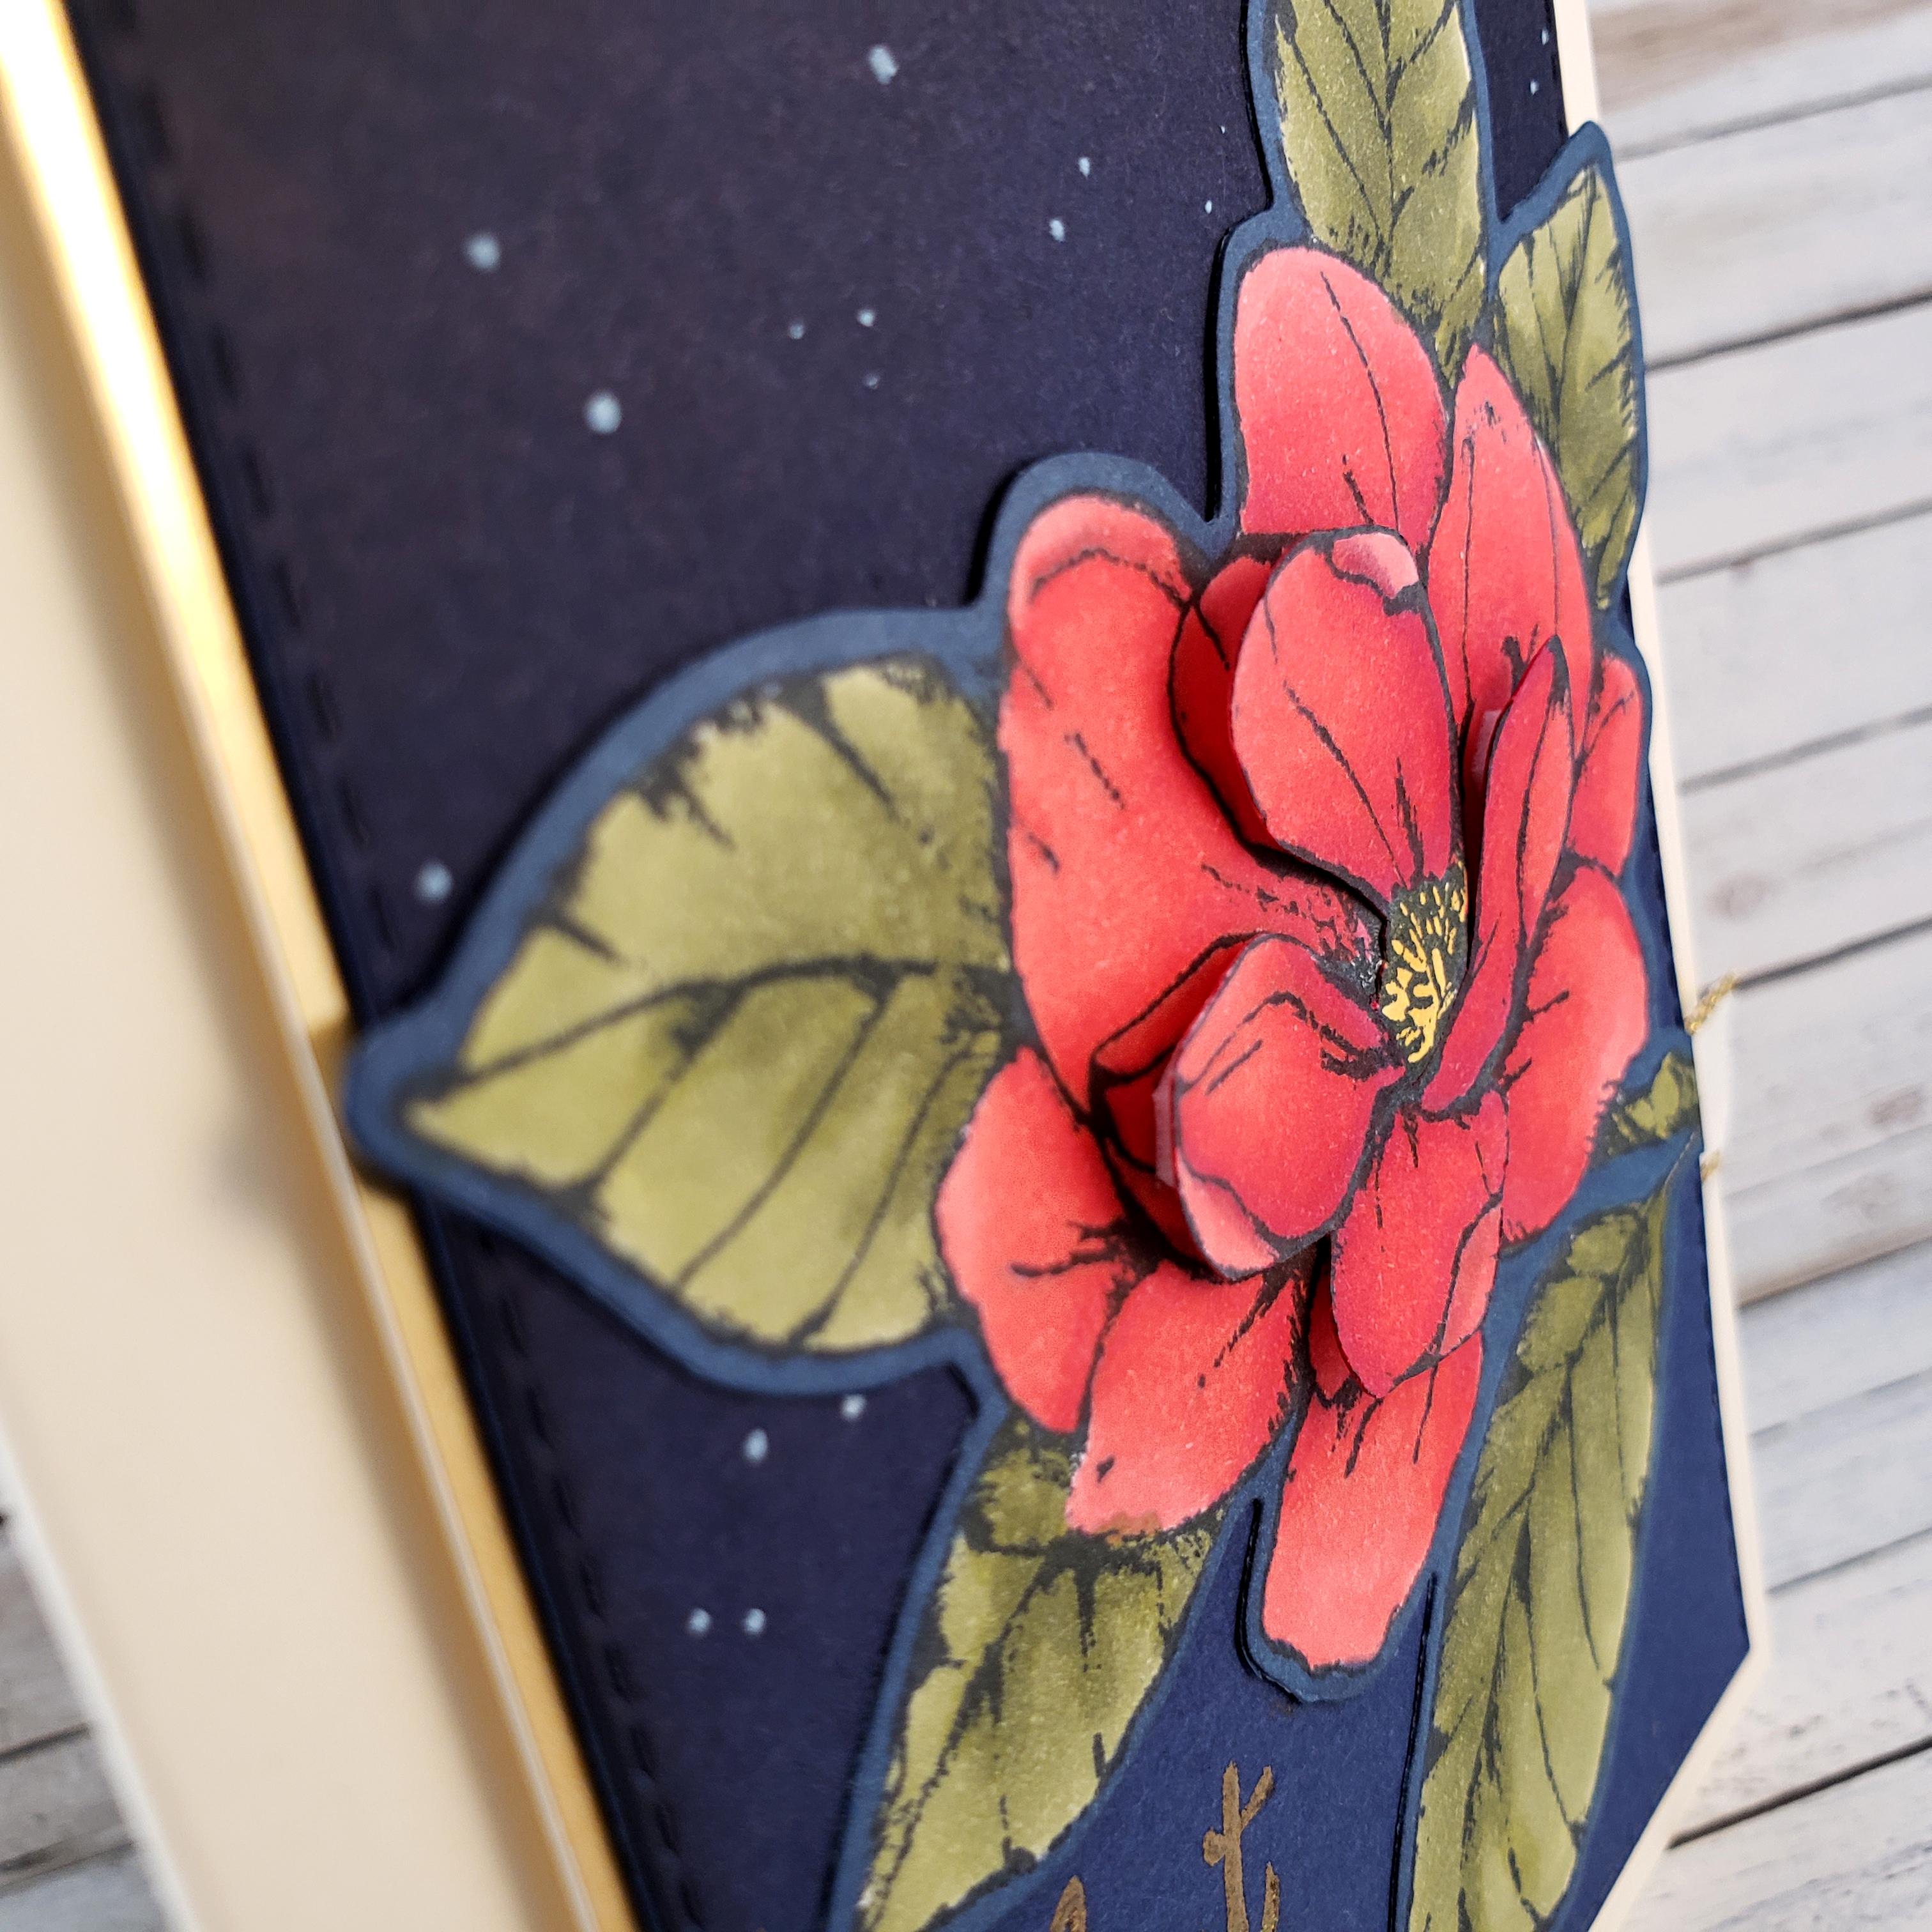
Next, I stamped the tree image from the Rooted in Nature stamp set from Stampin’ Up! using Coastal Cabana ink (it’s in there, I promise). To stamp the image, I used my Stamparatus because I wanted to reposition the paper after stamping and stamp it again with Pretty Peacock ink so that the top of the tree would have a sort of highlight as though the sun was brightening the other side of the tree. It worked, but I added something else at the end. Keep reading!

Once my tree image was in place, I was mostly happy with my artwork, but it was missing something. It was so smooth and … a bit too perfect. I decided to add some texture using the largest stamp image in the Woven Heirlooms stamp set. This I added over the entire paper, being sure to use Mango Melody over the Mango Melody, Coastal Cabana over the Coastal Cabana, and the … well, you get the idea. I stamped like this multiple times until the texture you see came to existence. You can see that I also used this technique on the Pretty Peacock layer of cardstock in the bactkground. Such great texture and suddenly the image was interesting and alive. It makes me think there’s quiet air movement and a lot of heat where that tree lives!

The tree begged for more light, so I used my White Stampin’ Chalk Marker to add highlights between the Coastal Cabana tree and the Pretty Peacock tree images.

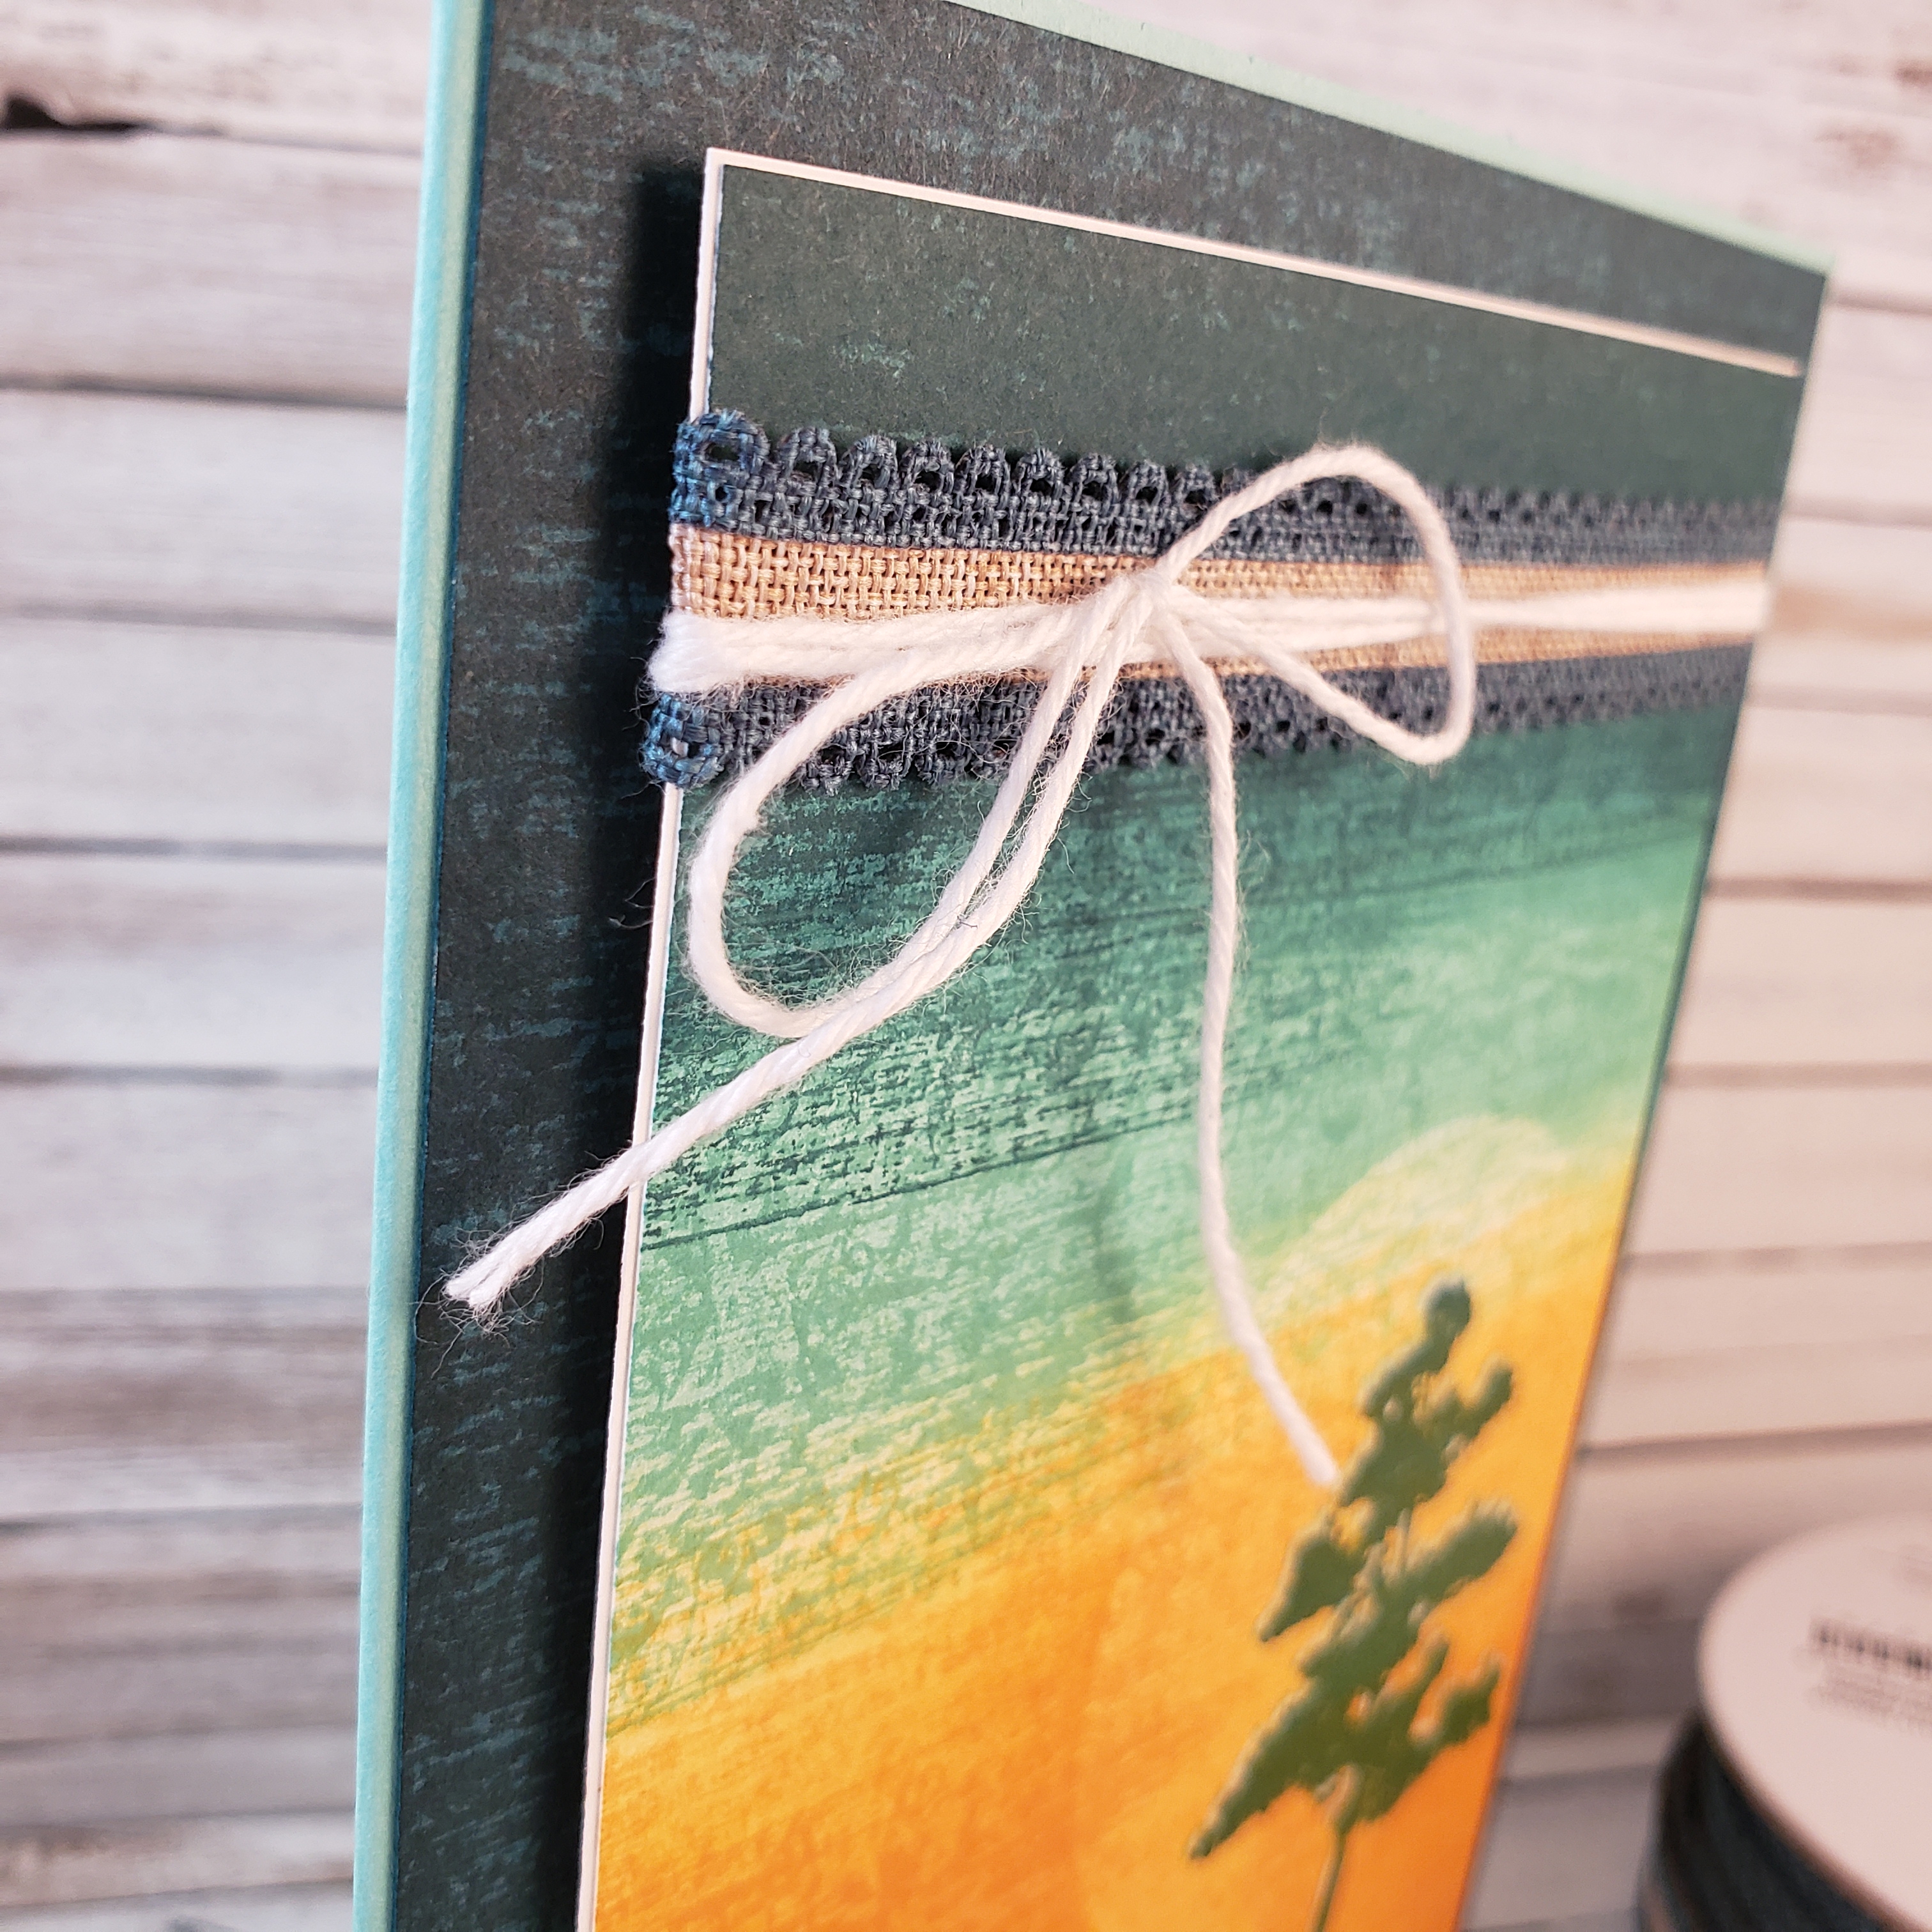
Once my art piece was complete, I knew that I wanted to add some embellishments. That’s where the Pretty Peacock Scalloped Linen Ribbon and the Whisper White Solid Baker’s Twine come in. First, I added a very narrow Whisper White matte layer to delicately frame my art, then I wrapped the linen ribbon around the card front, securing it on the back with Mini Glue Dots. The baker’s twine was wrapped around three times before finishing it with a bow.

Stampin’ Dimensionals hold those layers in place on the stamped Pretty Peacock layer. The card base is Coastal Cabana cardstock.

What would you do with these colours? What does the image inspire in your creative mind? Why not create something and share it with us at the As You See It Challenge Blog.

As always, if you are in Canada, you can order any of these products from me at my online store by clicking on the shop button on this page or the menu at the top of the page.


Christmas in July

I just can’t get enough of the Good Morning Magnolia stamp set!

The As You See it Challenge this week is what we call an assortment challenge. You have to include all of the listed elements on your card design.

I wasn’t sure how to pull this one off as I like to use current Stampin’ Up! product for the cards I post on my blog and I didn’t have ANY stars!! Not a single current stamp set or die cut with a star. I’m a little bit shocked at this finding. It appears that I need to make a purchase, lol!

Since I didn’t have stars, I remembered a technique using the Chalk Marker to dot the background to look like stars in the night sky. That was the beginning of this card.

I sponged some Night of Navy ink on to Night of Navy cardstock fading it lighter as I moved down the paper. The Chalk Marker dots were then added to make the starry night sky. The sentiment is another problem that I came across as I couldn’t find any Christmas sayings that were the right size for that small space. So I created my own using the Make a Difference Photopolymer Stamp Set. It’s a bit more effort, but it allows you to write whatever you might choose. I stamped each letter with Versamark ink, then heat embossed with Gold Embossing Powder.

I used the Rectangle Stitched Dies to cut the Night of Navy piece to the size I wanted. That was attached to a piece of Gold Foil Paper on which I added a little peek-a-boo amount of the Gold Metallic Edged Ribbon. Both of those layers were added to the Thick Very Vanilla cardstock card base.

The magnolia image is the main attraction on this elegant Christmas card. I stamped the image on Whisper White cardstock with Tuxedo Black Momento ink, then coloured it using my Stampin’ Blends Markers: Poppy Parade (light and dark), a tiny touch of the Cherry Cobbler (I think it was the light one, but I can’t remember now, sorry), Mango Melody (dark) for the centre, Mossy Meadow (light and dark), and the Color Lifter Blends Marker to intensify some highlights on the petals. I then coloured around the outside of the flower with the Sark Night of Navy Blends Marker so that when I die cut the image, it would blend more with my background colour. I attached the die cut magnolia with Multipurpose Liquid Glue.

But that’s not all!

I stamped the magnolia a second time on Whisper White cardstock, colouring just the flower centre and four centre-most petals. I then fussy cut around those four petals. I attached them with Multipurpose Tombo Liquid Glue under the centre of the group of petals, and with Mini Stampin’ Dimensionals under the outer-most area of the petals, giving the flower more of a 3D look.

I love how it turned out!! I am definitely going to share this 3D look with my technique class in the future. I think they’ll really like it!

Now it’s your turn to give this assortment challenge a try and share it with us on the As You See It Challenge Blog! We would love to see how you pulled all of those elements together.

And if you like this Good Morning Magnolia stamp set as much as I do and you are in Canada, why not go over to my ONLINE STORE and add it to an order. You’ll probably love the whole Magnolia Lane Suite! It’s all just gorgeous!

Watercolour Tissue Paper Technique

Have you ever used tissue paper on your hand made cards? There are a few fun and creative ways to work with tissue paper, some of which you may remember from elementary school crafts! I wanted to share a technique that I recently found online. It’s a bit messy, but definitely worth the trouble. My method primarily follows the instruction from a crafter named Loll Thompson, though I do a couple things differently.

Here’s one of the cards I made using this technique.

I used Pineapple Punch, Calypso Coral, and Mango Melody with the tissue paper technique. After crumpling and pressing the dry tissue paper onto a piece of Whisper White cardstock, I used my embossing buddy over the surface, then gently tapped the Versamark ink on the wrinkled tissue paper so that it would only touch the tops of the wrinkled bits. Then I used Silver Embossing Powder with my Heat Tool to create this awesome and unique background.

The Stitched Rectangle Framelits Dies were used to create the Whisper White frame. I die cut the hot air balloon from a piece of the Black Foil Sheets from Stampin’ Up! and carefully adhered it to the frame and the banner, which are both attached to the card with Stampin’ Dimensionals.

The sentiment from the Lift Me Up stamp set from Stampin’ Up! is stamped on Whisper White cardstock with Flirty Flamingo ink to coordinate with the results of the watercolour effect.

The card with the cupcake from the Hello Cupcake stamp set (no longer available for purchase), shows off the colour combination of Blueberry Bushel, Call Me Clover, and Pineaple Punch ink with Copper Embossing Powder. You will find that this technique gives you different results every time!

Check out the video and find out more about how to do this watercolour tissue paper technique.